Inhaltsverzeichnis
create new, edit, delete
This function is used with the merchandise management module.
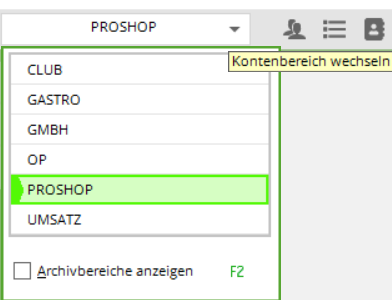
To work in the cash register, first select the corresponding account area, e.g. PROSHOP or SALES.
Click on the arrow on the top left-hand side:
or select in the menu Select sales/account area menu, select the appropriate area.
Entering suppliers
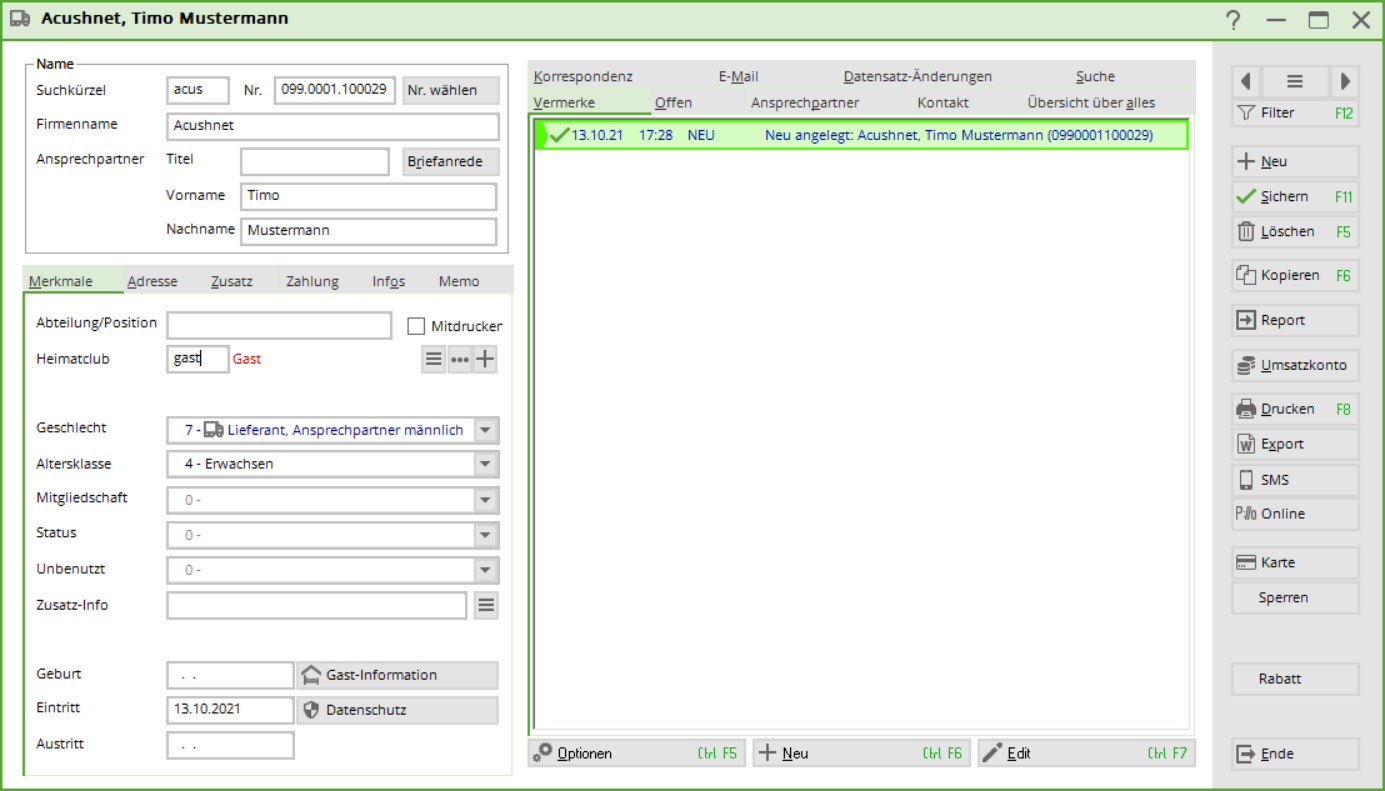
It is best to start by entering the suppliers - this is done in exactly the same way as for persons and companies via Contacts/…enter new, delete change. For suppliers, first enter the gender „7 - Supplier, contact person male“ or „8 - Supplier, contact person female“. Otherwise, creating a supplier is similar to creating a company member.
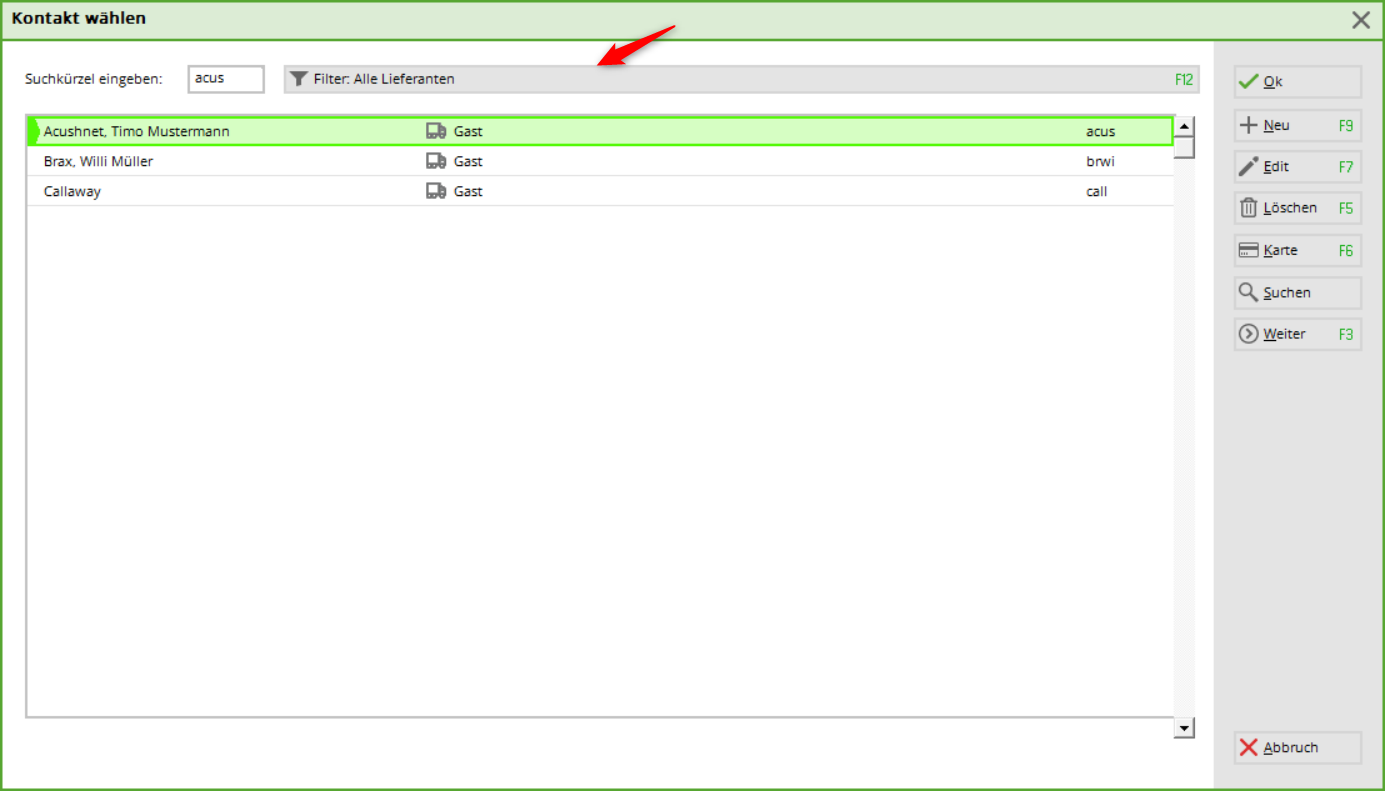
However, it is important that you set the „All suppliers“ filter in the „Members and guests“ selection list so that the suppliers are displayed.
Enter the article
Default settings
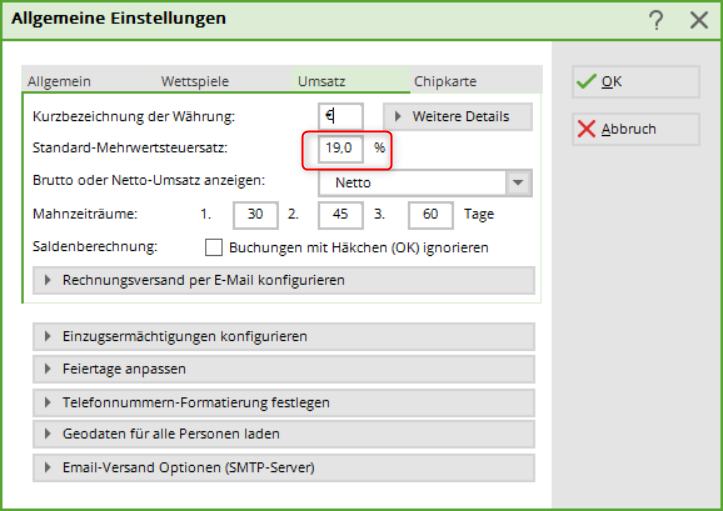
Before you enter the articles, please check under the menu item Settings/Programme settings/General settings, in the „Turnover“ tab and whether the correct percentage rate has been entered in the „Standard VAT rate“ input field:
If this is the case, confirm with OK. Otherwise, change the entry and also confirm with OK. If you have items with, for example, 7% VAT, you can change this individually in the item definition. PC CADDIE remembers this percentage rate for all subsequent items and only changes it back to e.g. 19% as soon as you set this VAT rate again for another item.
Enter article
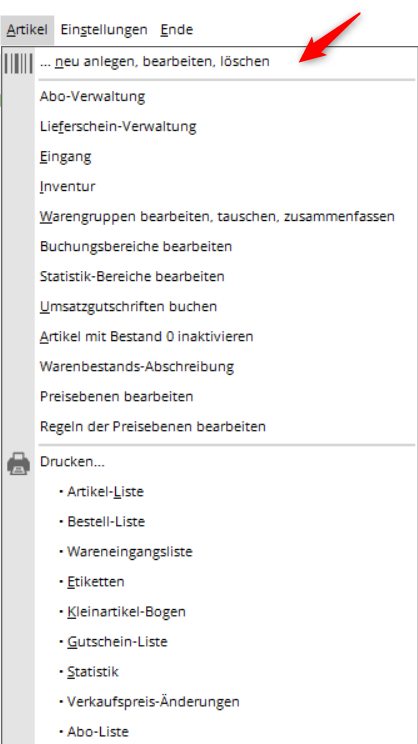
To enter the articles, use the menu item Items/…create new, edit, delete. Or select the icon from the icon bar. You can enter your Proshop items here. To enter a new item, click on New, to change an existing item, click on Ändern:
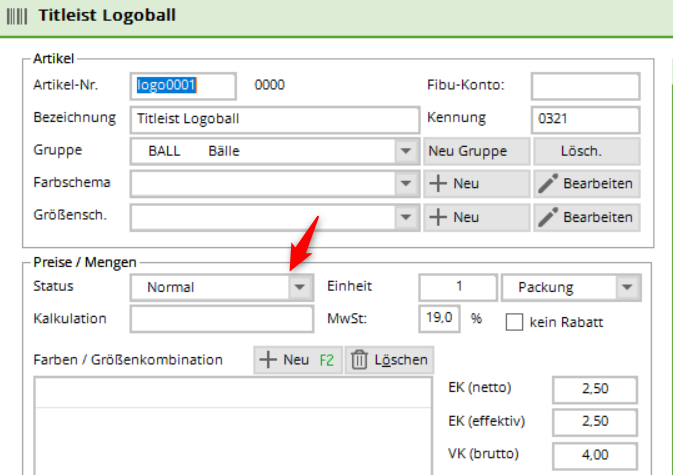
Here is an example of an article balls:
Article
Item no.
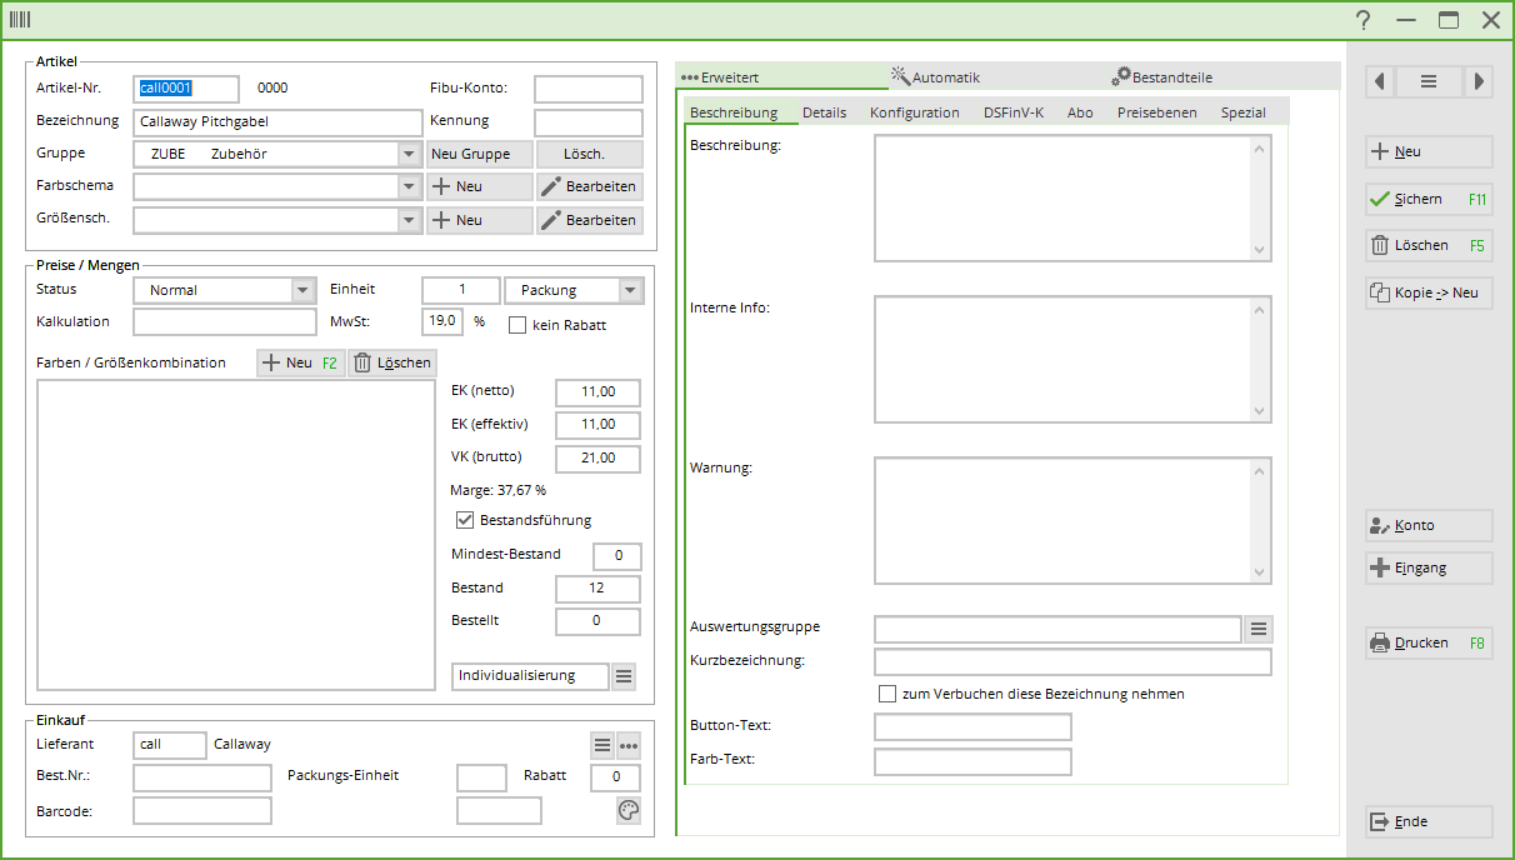
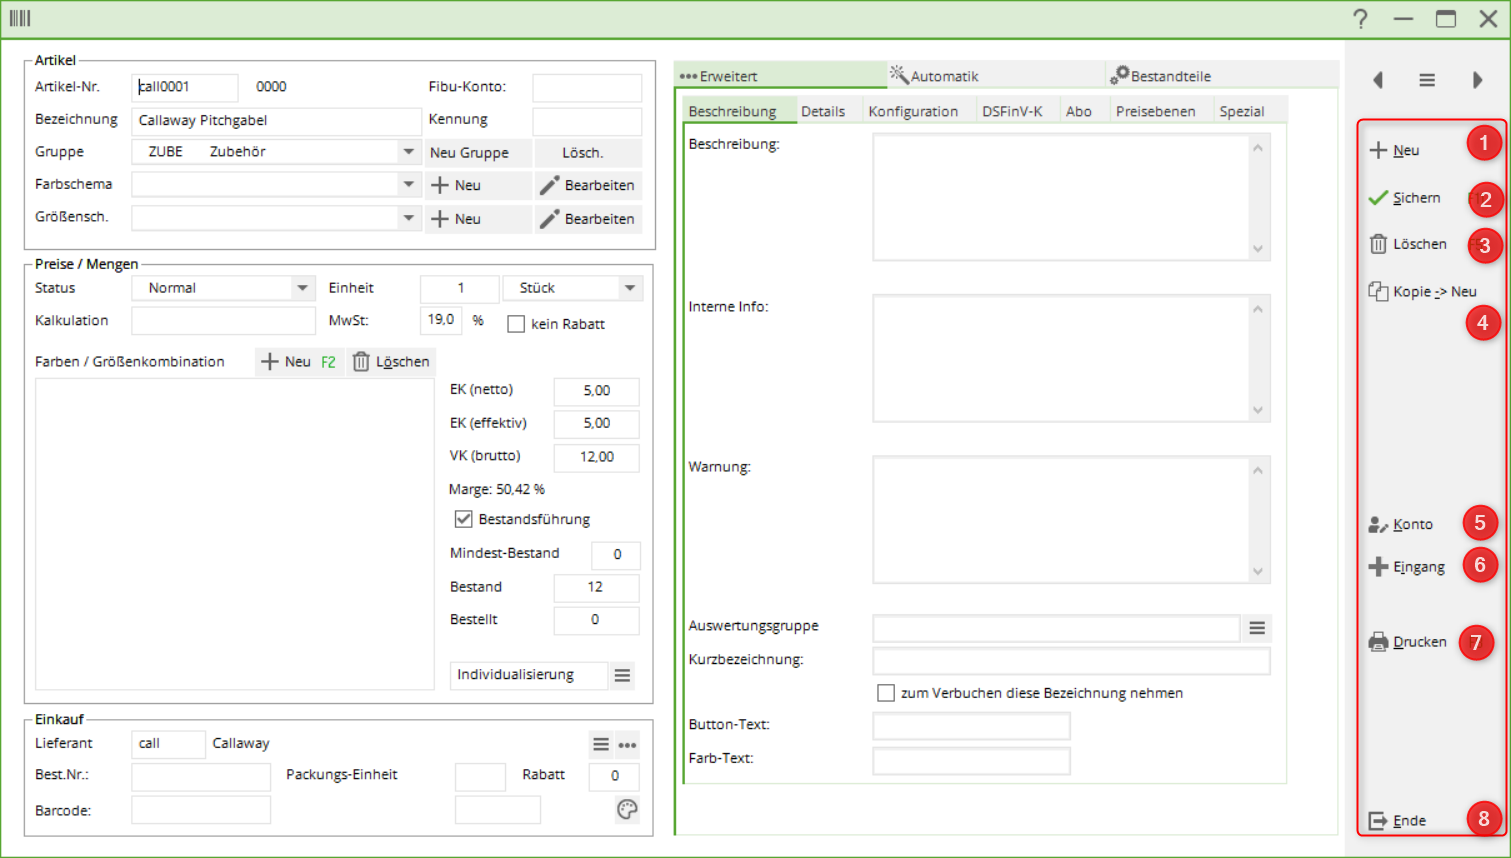
The article number can have a maximum of eight digits, you are also welcome to use fewer digits. These eight digits can consist of numbers or letters, but you should never use upper or lower case letters. never should never be mixed. Article numbers are usually assigned schematically. For example, they begin with the first letters of the product group or the supplier. Examples of article numbers would be logo0001 or call0001 or 66660001. No special characters should be used, especially no full stops. Here is an example for „Callaway pitchfork“.
To create a new article of the same product group, it is very practical to work with the * or +. This assigns the next free article number: call* or call+.
FNA account
In this field, you can enter the number of the accounting account to which the item should ultimately be assigned. This is necessary for the transfer of sales to an accounting interface (additional module: Accounting export ).
Description
Determine a suitable name for the article, for example „Callaway pitch fork“. This should be a short and unique item name. Long article names may not be printed in full on labels or receipts. In the item list, the product groups are sorted alphabetically and the items within the product group are sorted alphabetically.
Identifier
Here you enter individual identifiers that provide you with information, for example, on a label printout or in the article type. The delivery period is often entered here in encrypted form, e.g. to determine any discounts during sales.
This identifier means: Item delivery in March(=3) 2021(=21).
You can also filter the sales statistics according to the identifier. To do this, enter KENN:xyz in the „Filtering“ tab in the „Booking text:“ field (second from top). (Instead of xyz, enter your desired identifier)
TIP The article identifier ARTDET means that booking details can be seen in the daily closing. This means that the bookings for the relevant article are listed individually in the daily closing (in the article statistics). This can be useful, for example, if the accounting department wants to see which voucher numbers have been sold or redeemed on the basis of the daily closing.
Group
The product group to which the article is to be assigned is selected or created here. This entry should be carefully considered, as various statistics can be generated for individual articles or merchandise groups. The total daily sales of the various product groups are listed in the cash balance. Some examples of possible product groups are
- BALL = Balls
- BAGS = Golf bags
- ACCESSORIES = Accessories
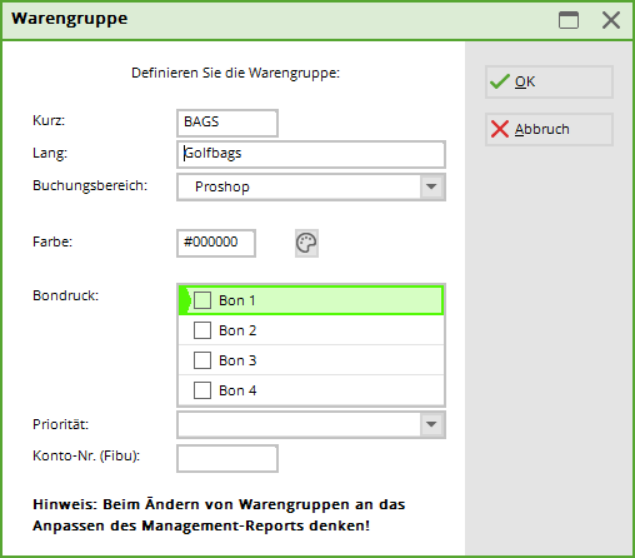
To create a new group, click on the button New group Gruppe:
For the „Golf bags“ group, for example, enter Short enter „BAGS“, for Long „Golfbags“. Also select the booking area (see also Edit booking areas ) and a suitable colour. colour. If you are satisfied with your settings, press OK and PC CADDIE creates the new product group. To delete an existing group, use the Delete.

Colour scheme
Here you can select individual colour schemes for the articles or create new ones. By selecting a colour scheme, you have the option of creating sub-items. These are useful, for example, for women's trousers in green, red and white. Here you do not need 3 different articles, but only one main article with the 2 sub-articles. If you only want one main article, no colour scheme is necessary. The best example is the normal colours. With the button + New button to create a new colour scheme:
Select an existing colour scheme from the list and change it if necessary with Edit.
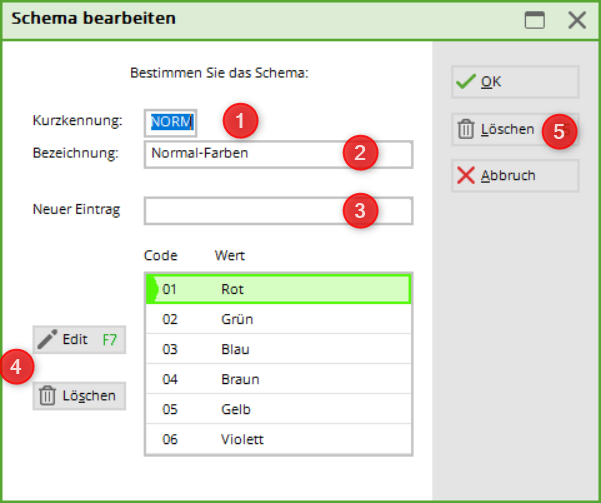
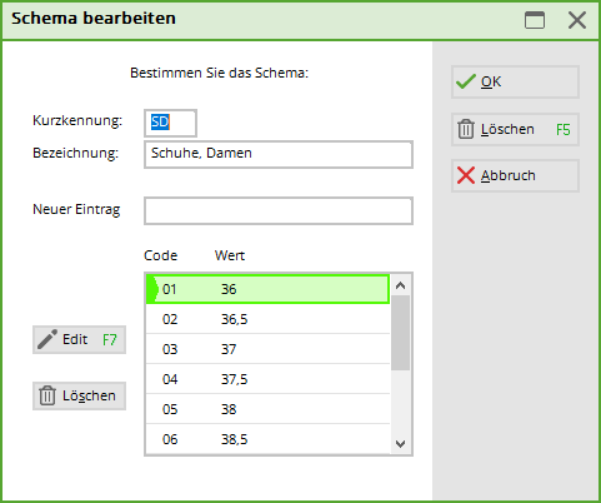
- First determine a short code and then enter a suitable
- designation and then enter a suitable name.
- In the field New entry field, create the desired colours one after the other. Confirm with Enter or Add. The colours are created in the order 01 - 99 (a maximum of 99 variants are possible).
- With Edit (F7) you can edit selected colours, change the identifier or meaning. With the left Delete - button to delete individual colours
- With the right Delete (F5) button to delete the entire colour scheme.
Pointless colour schemes should be avoided, as the query with the selection list appears with every article booking.

Sizing.
The sizing scheme gives you more options for creating sub-items. If you only want one main article, no size scheme is necessary. The combination of colour/size scheme gives you many different colour and size options for Proshop articles, for example women's trousers in sizes 36, 38 and 40. If you want this, the size scheme is defined in the same way as a colour scheme. Here is an example of a women's shoe size chart:
Prices/quantities/status
Status
PC CADDIE provides you with the following selection options:
| Normal | This stands for the usual single item. A label with barcode is printed. |
|---|---|
| Text query | Suitable, for example, for a „Miscellaneous“ item with a fixed price but without a specific description. The „Description“ is queried when the article is selected. |
| Sum query | For articles without a fixed price, e.g. a general article „Magazines“. A price query is made when the article is selected. |
| Small (no label) | No label is printed, but a small item list with the corresponding barcodes can be output for the checkout (ideal for small items such as pitch forks, balls, tees, etc.). (see also Small articles sheet |
| Bagtag printing | A customised bag tag is printed directly when an item is selected, e.g. for green fee, range fee, trolley or similar. |
| Voucher sale | This status is selected when a voucher is sold (see Voucher management ). |
| Voucher redemption | This status is selected when a voucher is redeemed (see Voucher management ). |
| Cash book | This status applies specifically to cash book items (see Cash book ). |
| Discount | Booking of an additional surcharge: e.g. an article with this status and a „sales price“ of € 10.00 books a surcharge of 10% on the total of all previously booked articles (e.g. percentage surcharge for credit card payment) |
| Reduction total | Booking a reduction/discount: an article with this status and a „sales price“ of € 10.00 books a discount article in the amount of 10% on the total to be paid, i.e. on the sum of ALL previously booked articles |
| Reduction last item | Booking a reduction/discount: an item with this status and a „sales price“ of € 10.00 books a 10% discount item on the last item booked in the checkout (e.g. member invitation green fee) |
| VAT. Adjustment | This status is only required for VAT changes (e.g. a bottle of water sold as an out-of-home drink). |
| Hidden | This status is only used for special articles and is normally created by the PC CADDIE Support Team. |
| Payment method | For all payment methods, such as cash, credit card, EC card, credit card or similar. These are then also listed separately in the daily closing. |
| Inactive | For all items that are no longer sold and may be added to the stock again later (seasonal items such as sun cream). You can print out sales statistics at any time. Inactive articles can be moved to the corresponding archive area when archiving so that they are no longer visible. |
| Serial number management | This status applies to articles with serial numbers. |
Unit
PC CADDIE provides the following sales units:
- Unit
- Subscription
- Pack
- metre
- litres
- Kilogramme
- Pair
- Set
- Dozen
- hour
- bottle
- Barrel
- Subscription 2.0
Calculation
The corresponding sales and purchase prices are entered in the Proshop. The Calculation line can generally remain empty. The margin is always calculated from the respective gross sales price.
The formula to be entered in the calculation is always derived from the entered net purchase price.
If you would like to use a specific calculation, simply enter the following in the calculation field, enter the digits 1, 2 or 3 and confirm with Tab.
The following formulae are stored:
- 1 = VK=EK*(1+?%)
- 2 = VK=EK+?
- 3 = VK=EK/?%
The question marks must then each be replaced with a number. The VK (gross) is then calculated automatically.
VAT.
The generally set VAT rate (under Settings - Programme settings - General settings) is applied here. In the event of individual deviations, a corresponding VAT rate can be entered here for this item only.
No discount
This can be activated as required - e.g. for items with a low profit margin. These are not taken into account when discounting the sale.
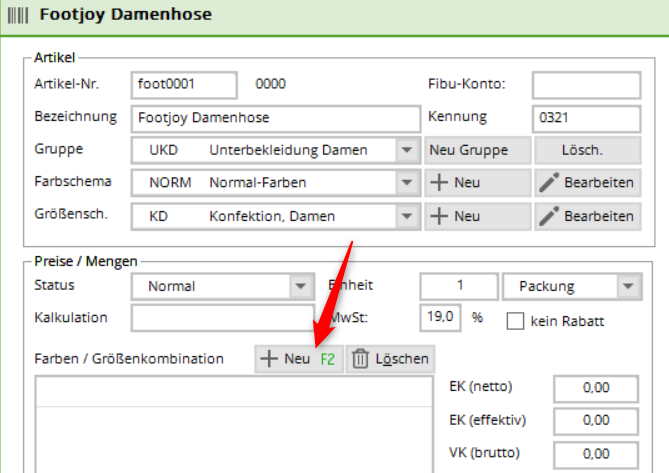
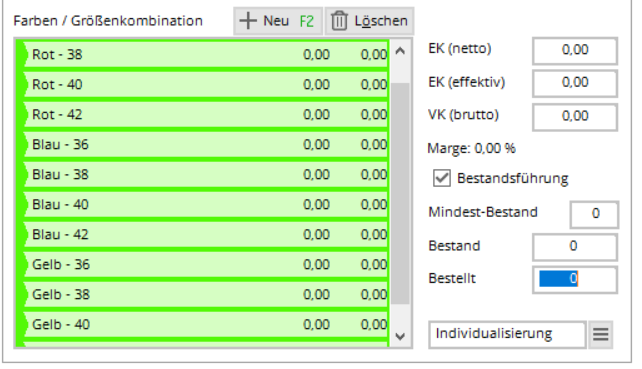
Colour/size combination
You create your sub-items with the help of colour and size schemes.
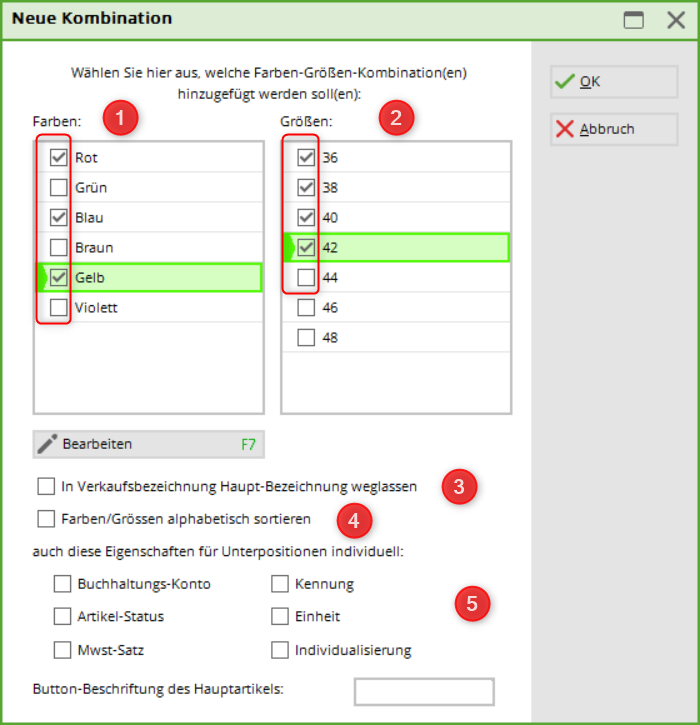
With New or F2 you will receive the schemes selected above:
- By selecting the appropriate colours and
- the sizes you will receive these sub-items.
- If you do not want the main description of the item to be printed, e.g. for receipts, you can tick the box here.
- To sort the colours and sizes according to the alphabet
- If the accounting account or the item status or the VAT rate or the identifier or the unit or the individualisation should be different for the sub-articles, you can tick the appropriate box here.
The sub-items are created:
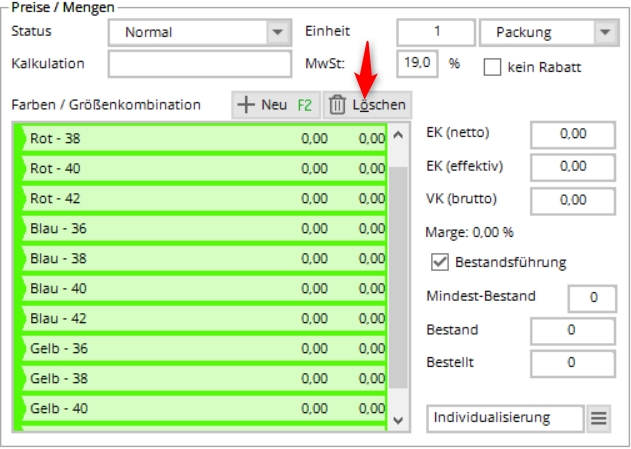
With the help of the button Delete button, you have the option of deleting individual sub-items. However, this is only possible if this sub-item has not yet been posted (goods receipt or goods sale).
EK and VK
The purchase price and sales price are calculated automatically. The net purchase price is the pure net purchase price of the item. The effective purchase price is the purchase price plus packaging and/or postage less any discounts granted on the list price.
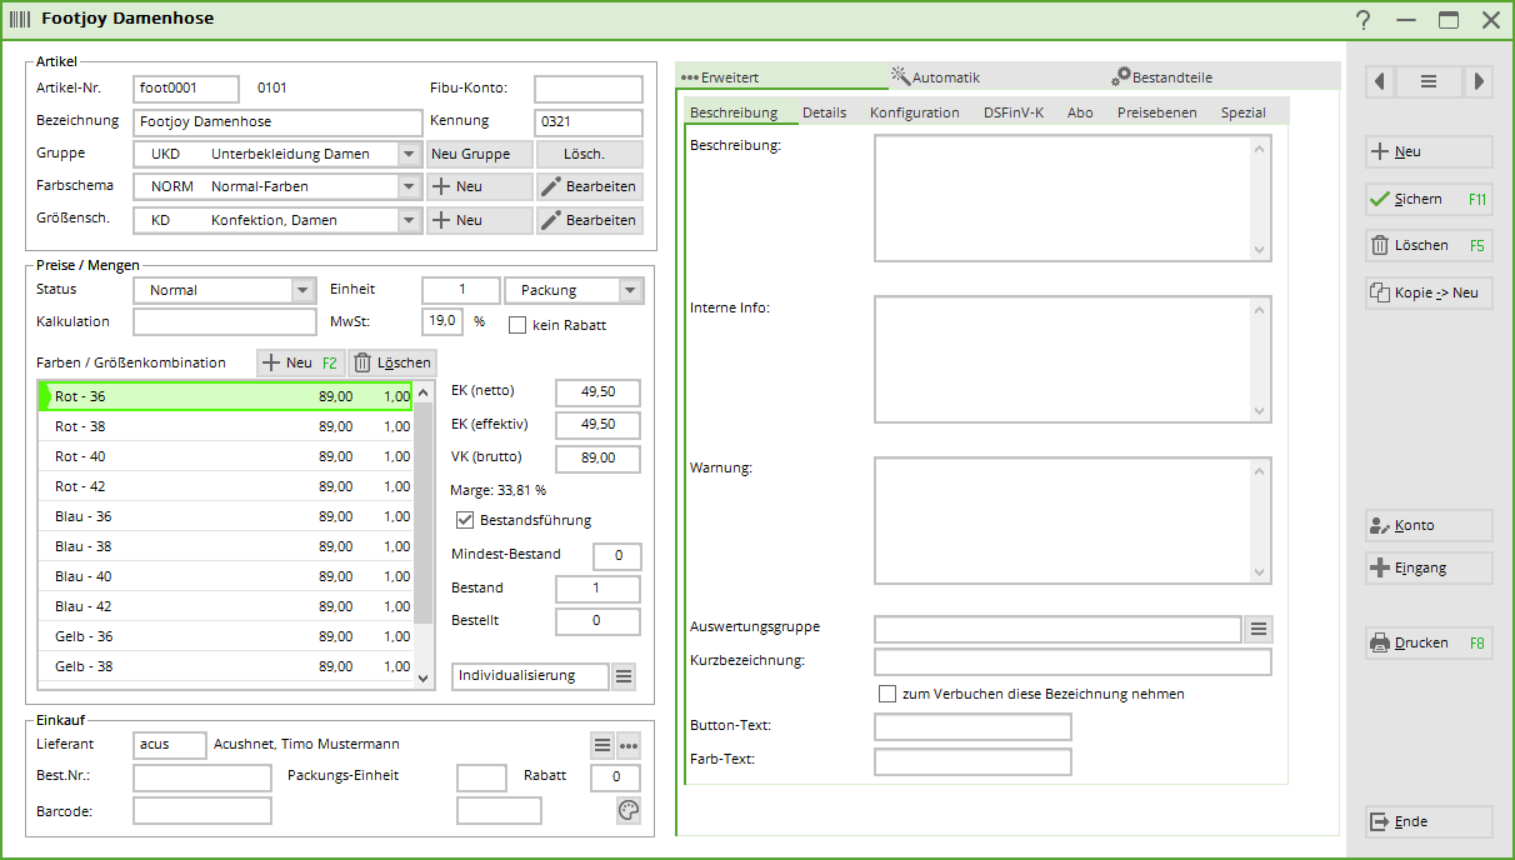
The margin is always calculated from the gross sales price. In our example € 89,- gross, € 74,79 net (19 % VAT). The margin is € 25.29, which in turn corresponds to a margin of 33.81 %.
The finished article could look like this:
Minimum stock, Stock, Ordered
If the Inventory management checkbox is ticked, the fields below are automatically activated.
Minimum stock
If the numerical value entered here is reached, you will receive a warning when this item is sold. If you do not wish to manage minimum stock levels, „—-“ remains.
Stock
You enter the opening stock using the Stock field, the further receipts of the article via the Receipt. Further receipts are entered via the menu Article, Inbox menu at any time.
Ordered
This is purely an information entry. It does not correspond to the number of items that are printed in an order list.
Purchasing
You can enter the purchasing information here. Select the supplier, enter your order number, packaging unit and any discounts granted by the supplier.
Under Barcodeyou can, if you wish, also scan the barcode printed by the supplier. This means you do not need to print out an additional label, for example for ball boxes or gloves or similar.
Buttons: New / Save / Delete / Copy--New / Account / Inbox / Print
In addition, this window offers you further input options on the right-hand side with the following buttons:
1. New This is used to create a new item.
2. Save You save the settings for this item.
3. Delete Here you can delete an item. (
4. Copy → New Here you can create a copy of the article.
5. Account The account shows you the movements of the article (see paragraph below)
6. Receipt This button is used by the merchandise management system; goods receipts are posted here. (see paragraph below)
7. Print gives you various print options
8. End closes the window
Account
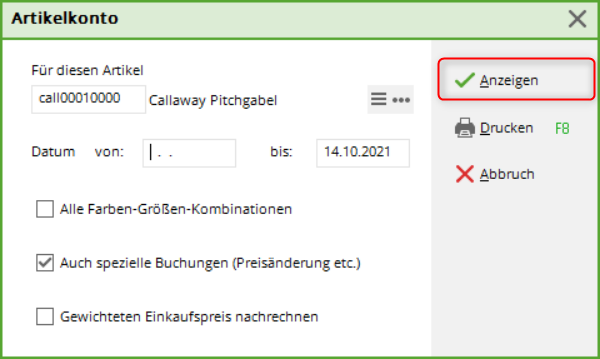
Click on Account and then on the button Show. Here you can see all the bookings that have been made for this item up to that day: Purchases and sales:
Entrance
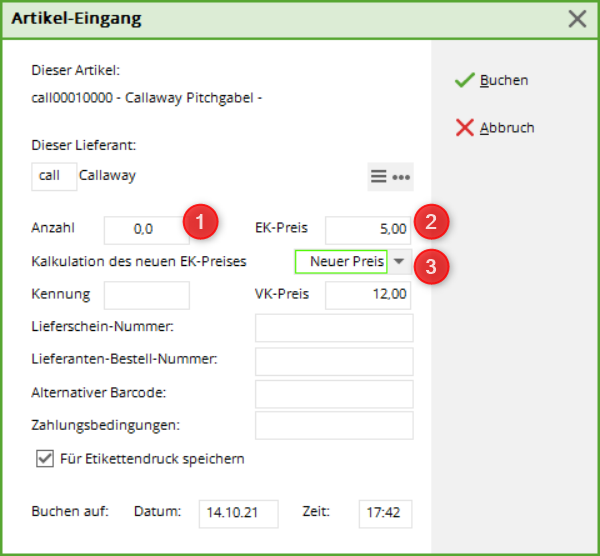
The supplier is adopted according to the entry in the article window. After entering the number of goods received and entering the purchase price, the following selection is available to you:
- New price - the new purchase price is defined as the effective purchase price
- Average - The average between the two purchase prices is calculated and defined as the effective purchase price
- Calculated - The following is calculated: Old article stock with old purchase price plus new goods receipt with new purchase price divided by the total number of articles.
The other entries refer to the delivery note or terms of delivery. If you do not wish to print a label, uncheck the box.
With Book to complete the posting of the goods receipt.
Description
In the tab Description tab you will find further setting options:
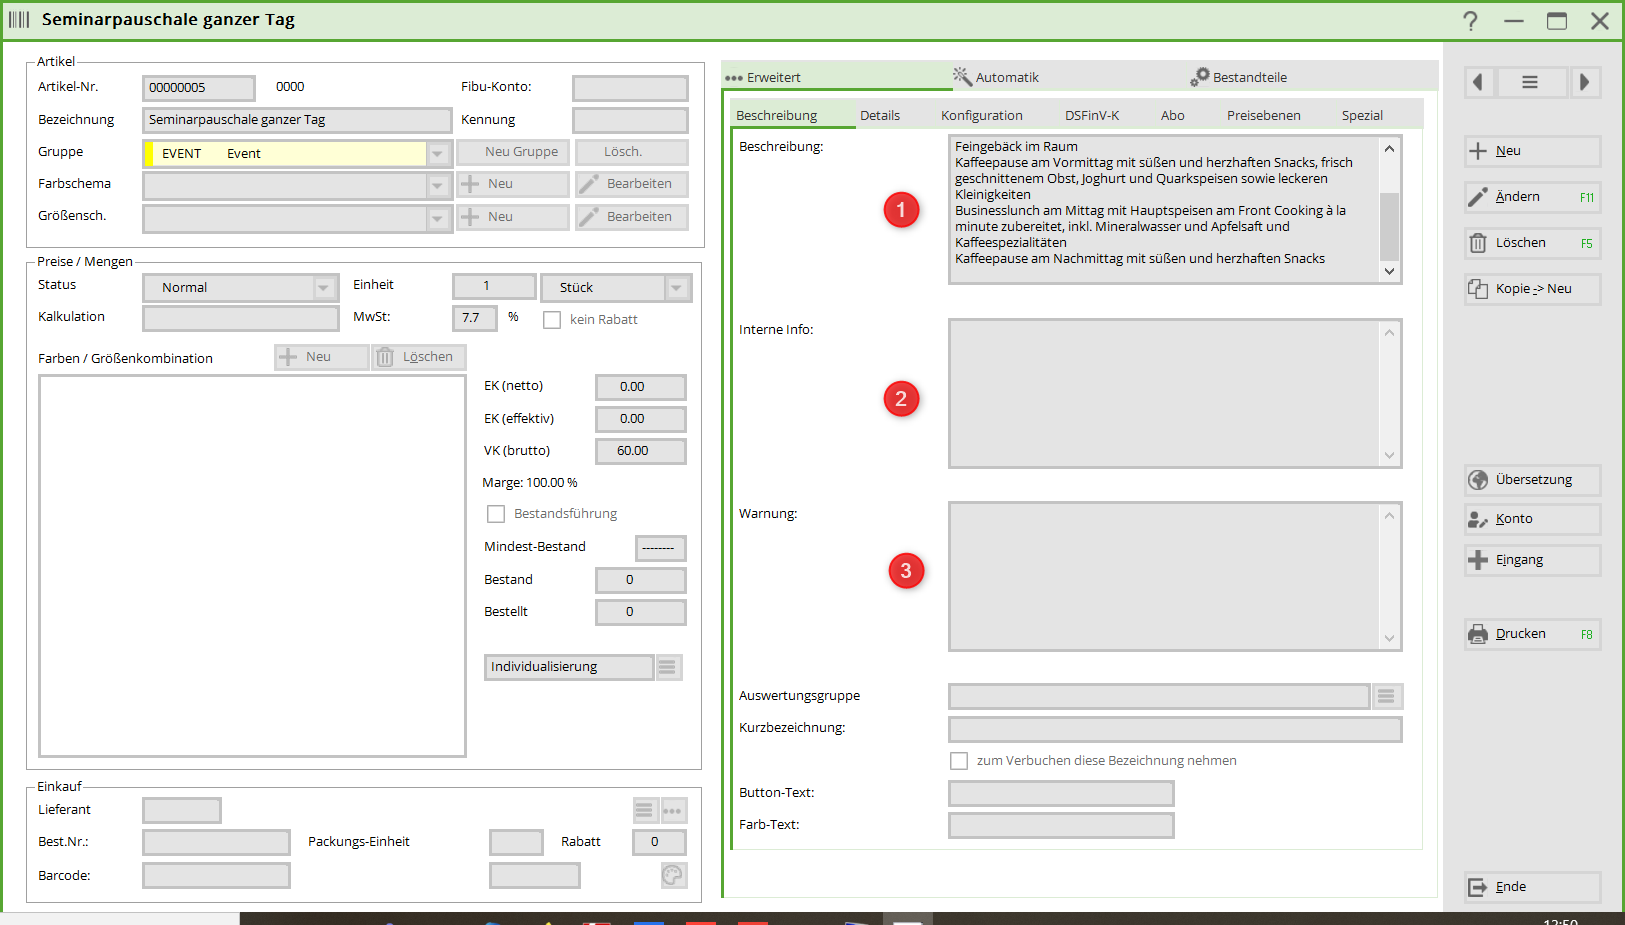
e.g. a meaningful description is required for ERP, which appears automatically on offers/contracts.
- Description for the customer
- Internal description
- Warning. This pops up as soon as the article is called up.
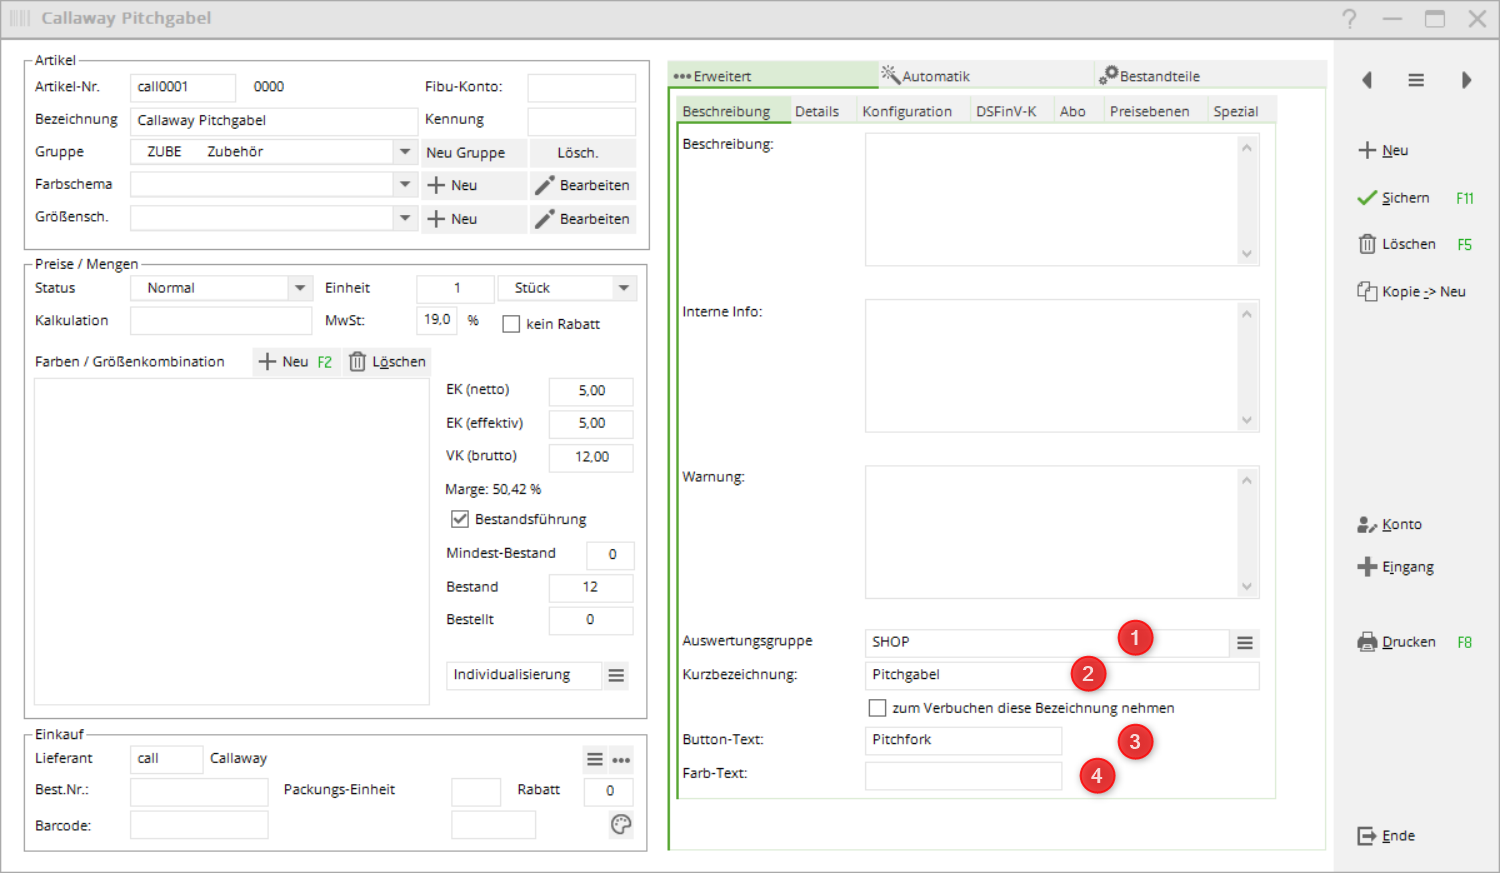
The lower area is important for handling in the cash register:
- Evaluation groupHere you can print separate analyses
- Short description: a different description compared to the article description, e.g. for receipts and/or invoices
- Button text: mainly used for quick selection buttons in the cash register
- Colour text: changed colour text compared to the colour scheme. Read more here more
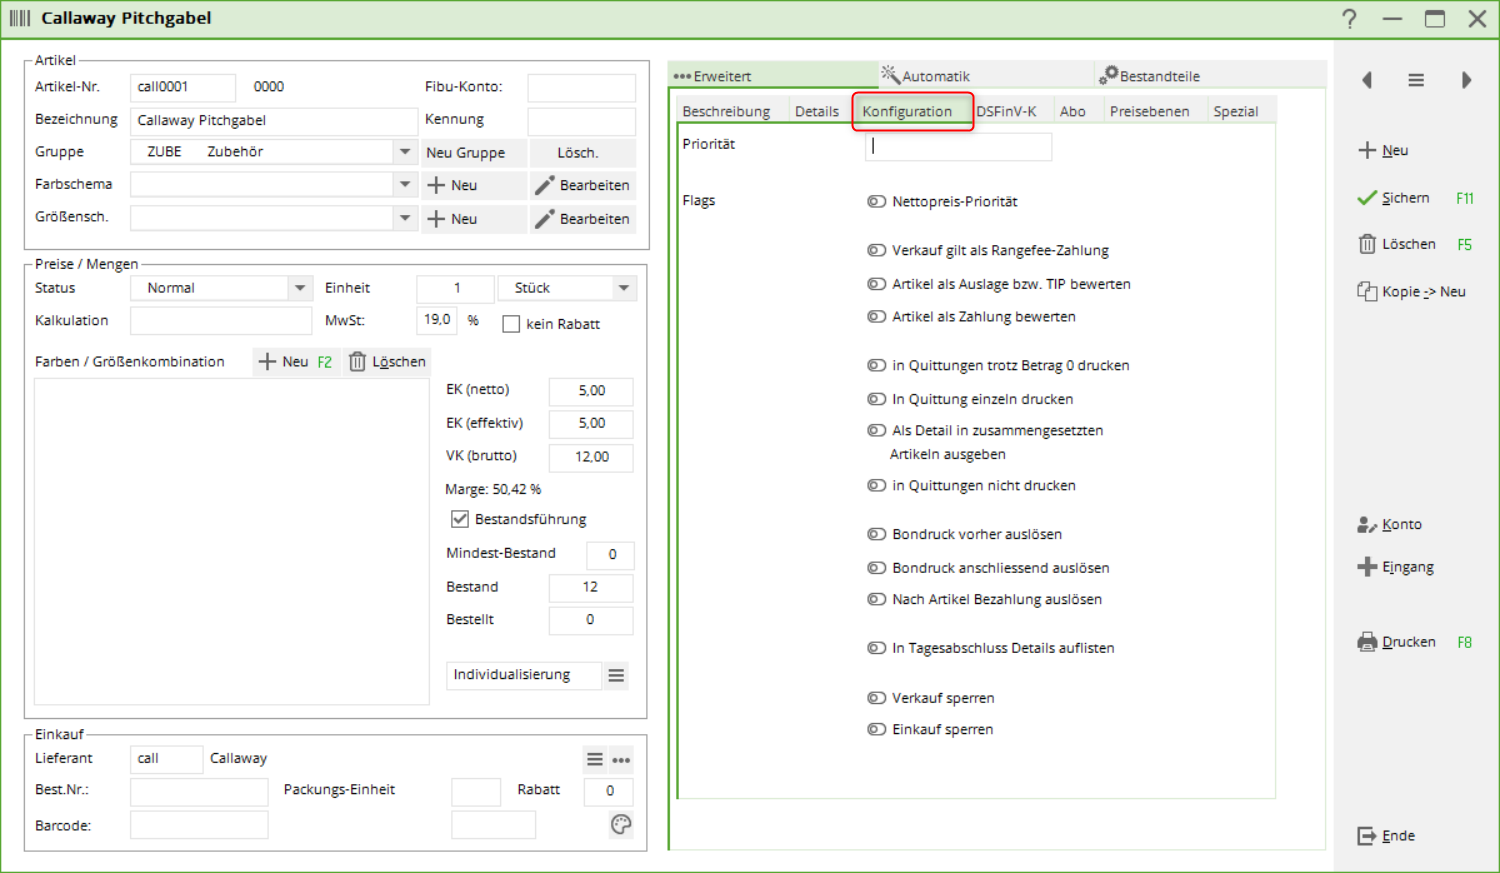
Configuration
In the tab Configuration tab, you will find further setting options:
This is mainly required in the catering trade, less so in the pro shop.
Rate article as display or TIP
Causes this amount to be deducted from the cash in the daily closing.
Valuate item as payment
For items that are not already set as a payment method by their status, this option has the effect that the amount is shown in the daily closing with the other payment methods. In terms of posting, however, such an item remains a normal (albeit with a negative sign) sales posting.
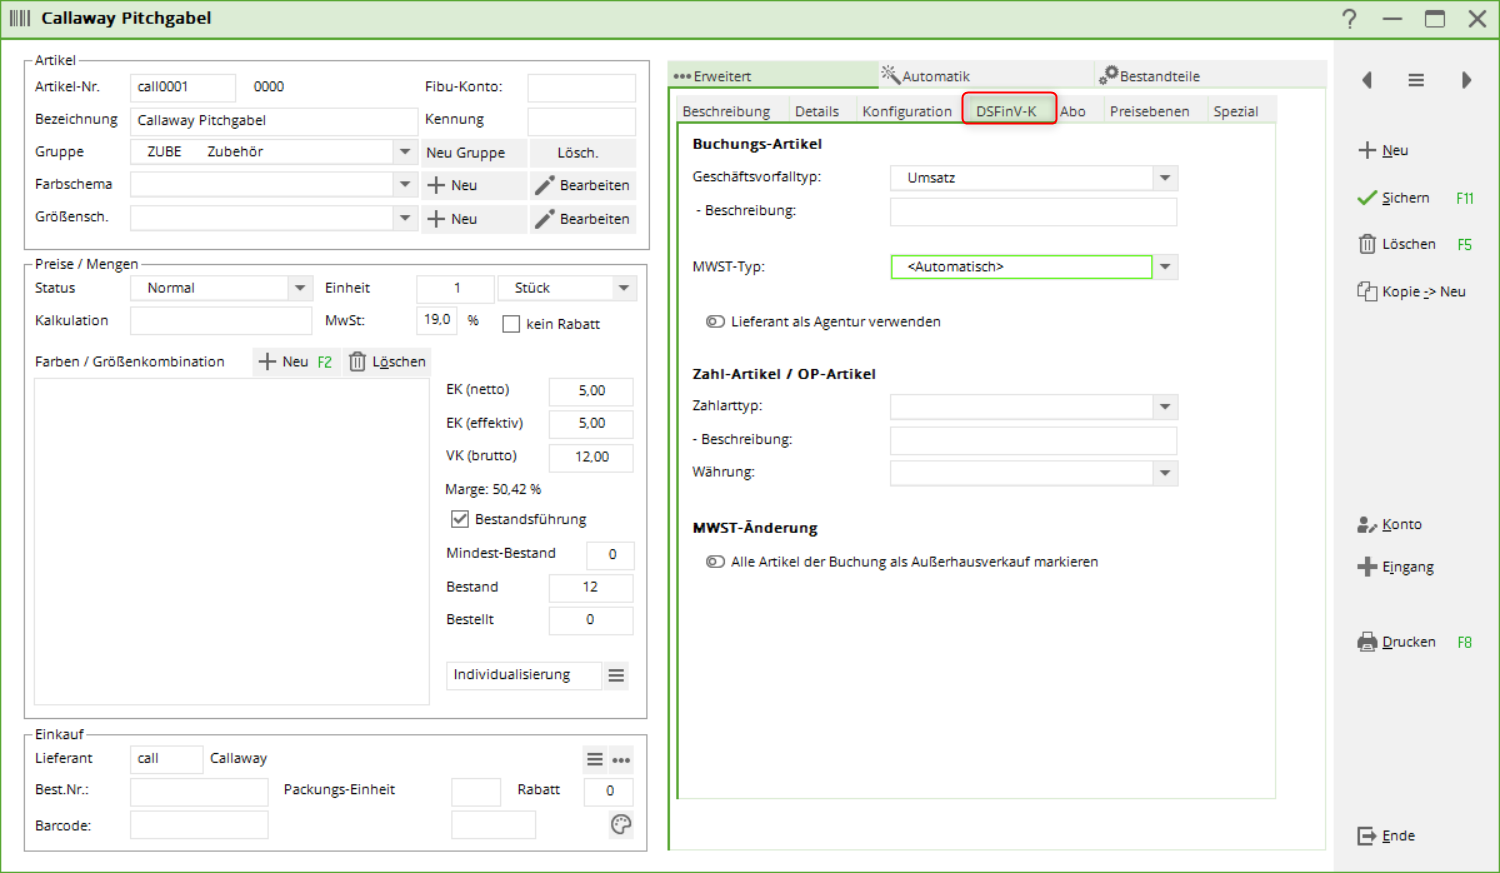
DSFin-V-K
In the tab DSFin-V-K tab, you will find further setting options with regard to the Cash Register Security Ordinance:
Please note the legal regulations on the Cash Register Security Ordinance, which have been in place since 2020. You can read the information required for entry here:Cash register
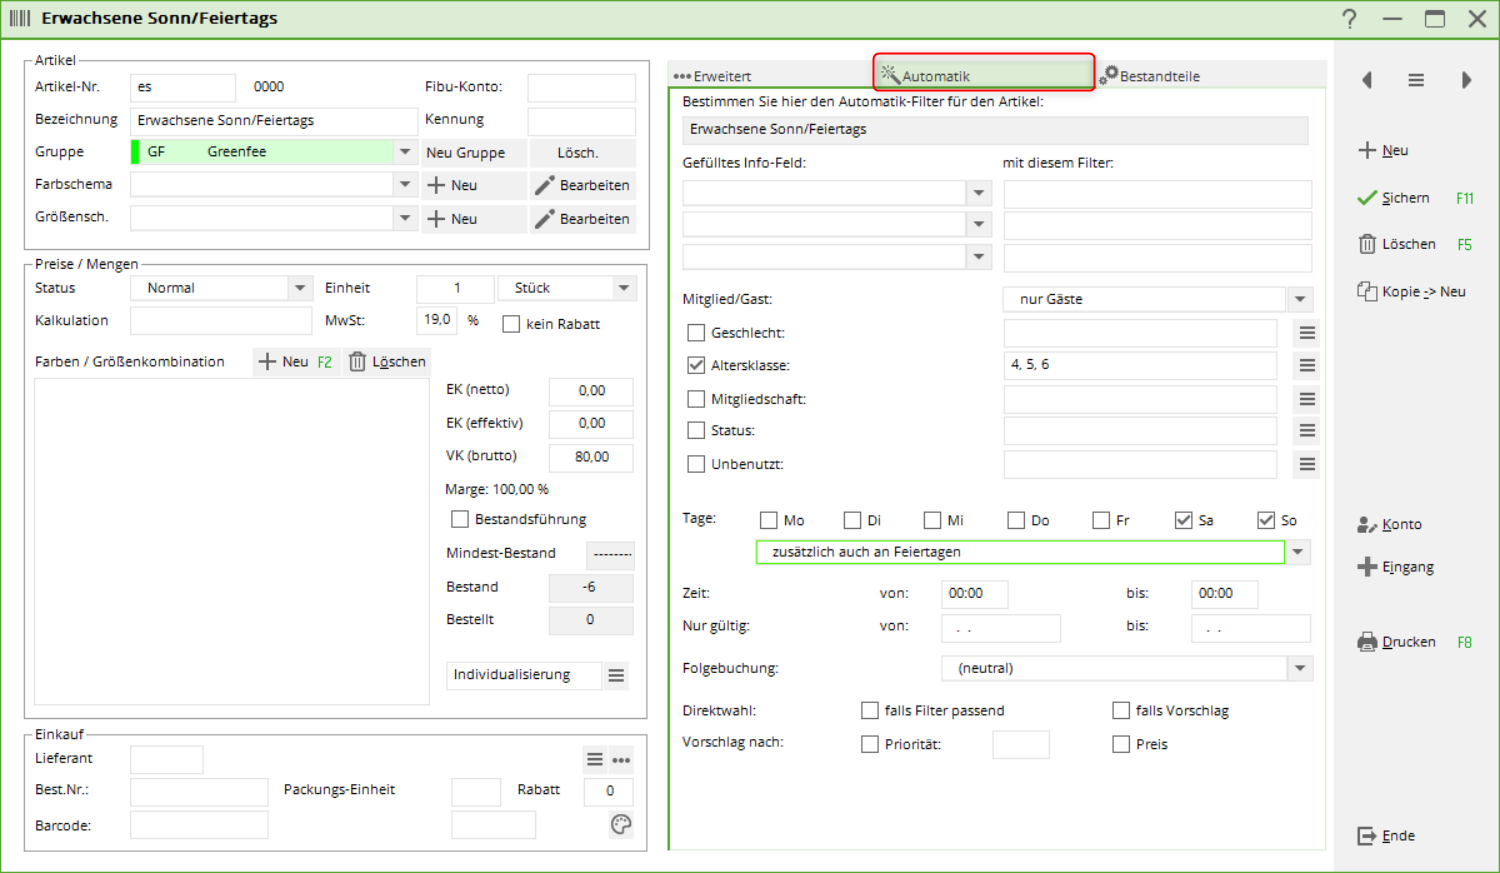
Automatic
In the tab Automatic tab, you will find the settings for the automatic green fees:
Here you define a blanket, automatic item allocation for a specific group of people. This is less needed for the pro shop, more for green fee bookings. Please read the description here: Greenfee article
Components
With this function Components function allows you to create composite items, such as a coaching lesson item, which is made up of a range fee and a coaching lesson amount.
Two „basic articles“ and one composite article must be created here. Please pay attention to the corresponding VAT. The basic articles may then have VAT and the main article 0% VAT.
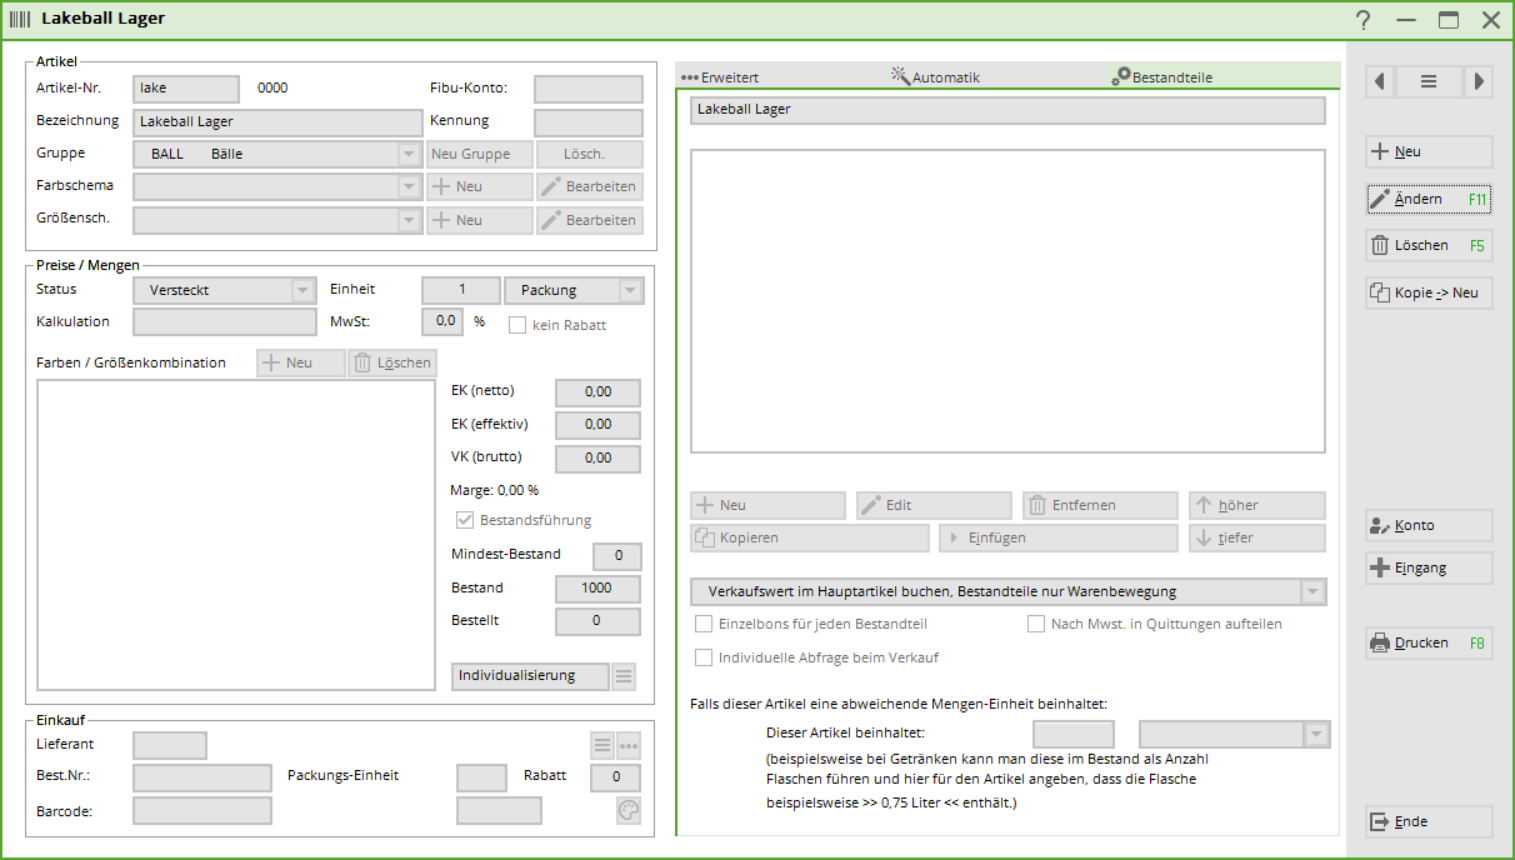
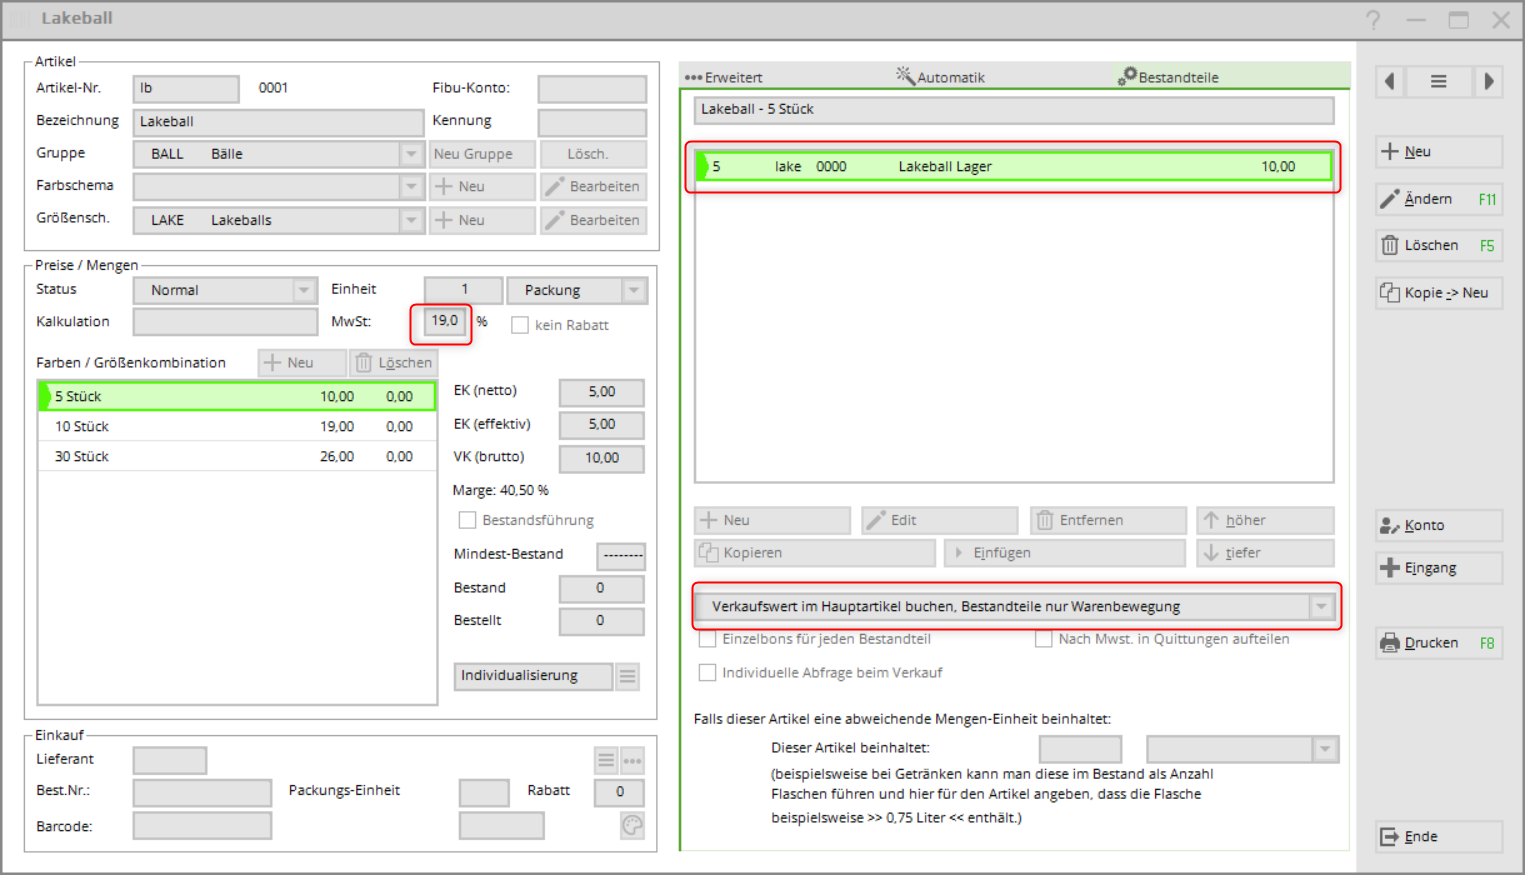
Furthermore, this can also be used to manage stocks of items that exist individually but are sold in different pack sizes. For example Lakeballs: To do this, you create two articles. Firstly, the purchase item with stock management, where you can purchase different quantities, e.g. 500, 1000 or even 2500 pieces. For the sales item, you create the different sales sizes, e.g. 5, 10 or 30 pieces. Now specify for each sales size how much of the purchase item should be debited.
The Lakeball stock item looks like this:
The Lakeball article looks like this:
Pay attention to the VAT and the correct setting Post sales value in main article, components only goods movement must be observed.
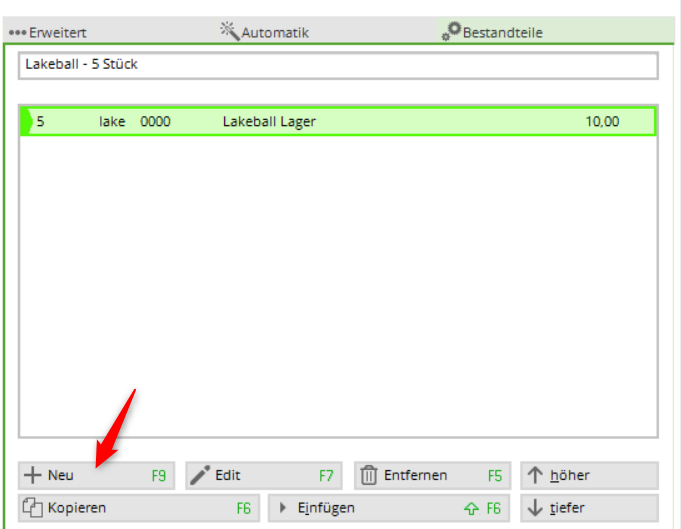
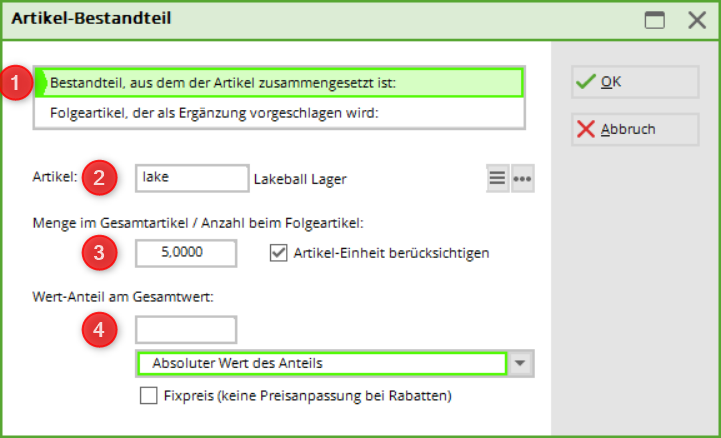
Via the button New button to select the purchase item.
- Leave the marker on „Component of which the article is composed“.
- Select your purchase item.
- Determine the quantity to be deducted from the stock of the purchase item when it is sold.
- If you do not enter anything here, the sales price of the sales item will be used.
These components can be set separately for each sub-item.
Print components on invoice from the OP area
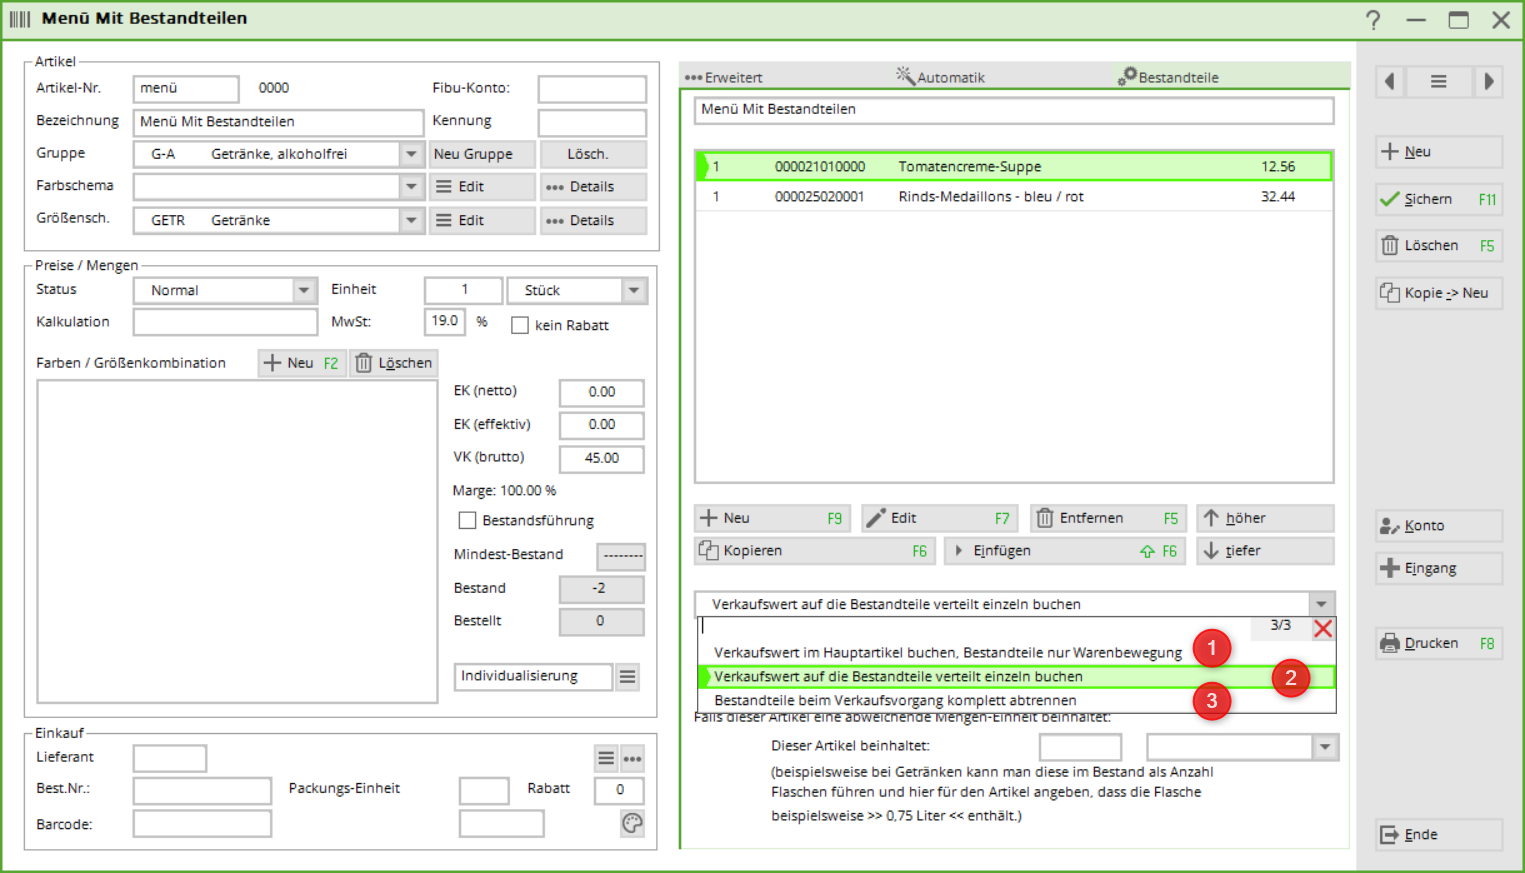
Information on further use of the article components can be found here bestandteile
- Post sales value in main article, components only goods movement - only the description is printed on the invoice
- Post sales value distributed to components individually - only the description is printed on the invoice
- Separate components completely during the sales transaction - components are printed on the invoice
Handling of colour information from suppliers
The colour designation varies from year to year and is very diverse. To ensure that the list of colours does not get out of hand, please proceed as follows.
Create a list of all basic colours including possible samples. For large shops, it may make sense to include light and dark colours in the description (e.g. light blue and dark blue). Ideally, this list should have a maximum of 20 entries. Here is an example:
Every imaginative colour specified by the supplier can be assigned to a basic shade. (This makes it easier to compile statistics on the popularity of colours in sales).
Now create the article by entering the goods according to the delivery note and save it:
In the right half of the window in the Description tab, the Colour text field now comes into play. The colour of the supplier is entered here…..
….. which will be printed on the labels and receipts
Configure quick selection
Read information about the Quick selection
Operating the PC CADDIE cash register
Read information about Operating the cash register here.
Voucher management
With the help of this function you can easily organise the sale and redemption of vouchers and track the corresponding sales, see Voucher management .
Subscription management 2.0
- The advantage of subscription management 2.0 is that a subscription is no longer managed in a person's account, but has its own database.
- It is very easy for customers to print an evaluation of all their purchased and redeemed subscriptions.
- Subscription 2.0 also offers the option of limiting the item sold to a specific date or period, e.g. a validity period of 365 days for the subscription, in which case any unredeemed subscription credits expire.
- The Abo 2.0 item is also transferable - either to the customer's family or to any guest. All of this can also be seen on the overview that you can print out for the customer with the name, date and time.
- If you want to limit a redemption, e.g. redeemable twice a week or month, this is now possible.
- ABO 2.0 makes life in the office much easier and makes many Excel lists unnecessary.
Create article
1. enter article number
2. enter article description
3. create or select product group
4. create colour/size scheme
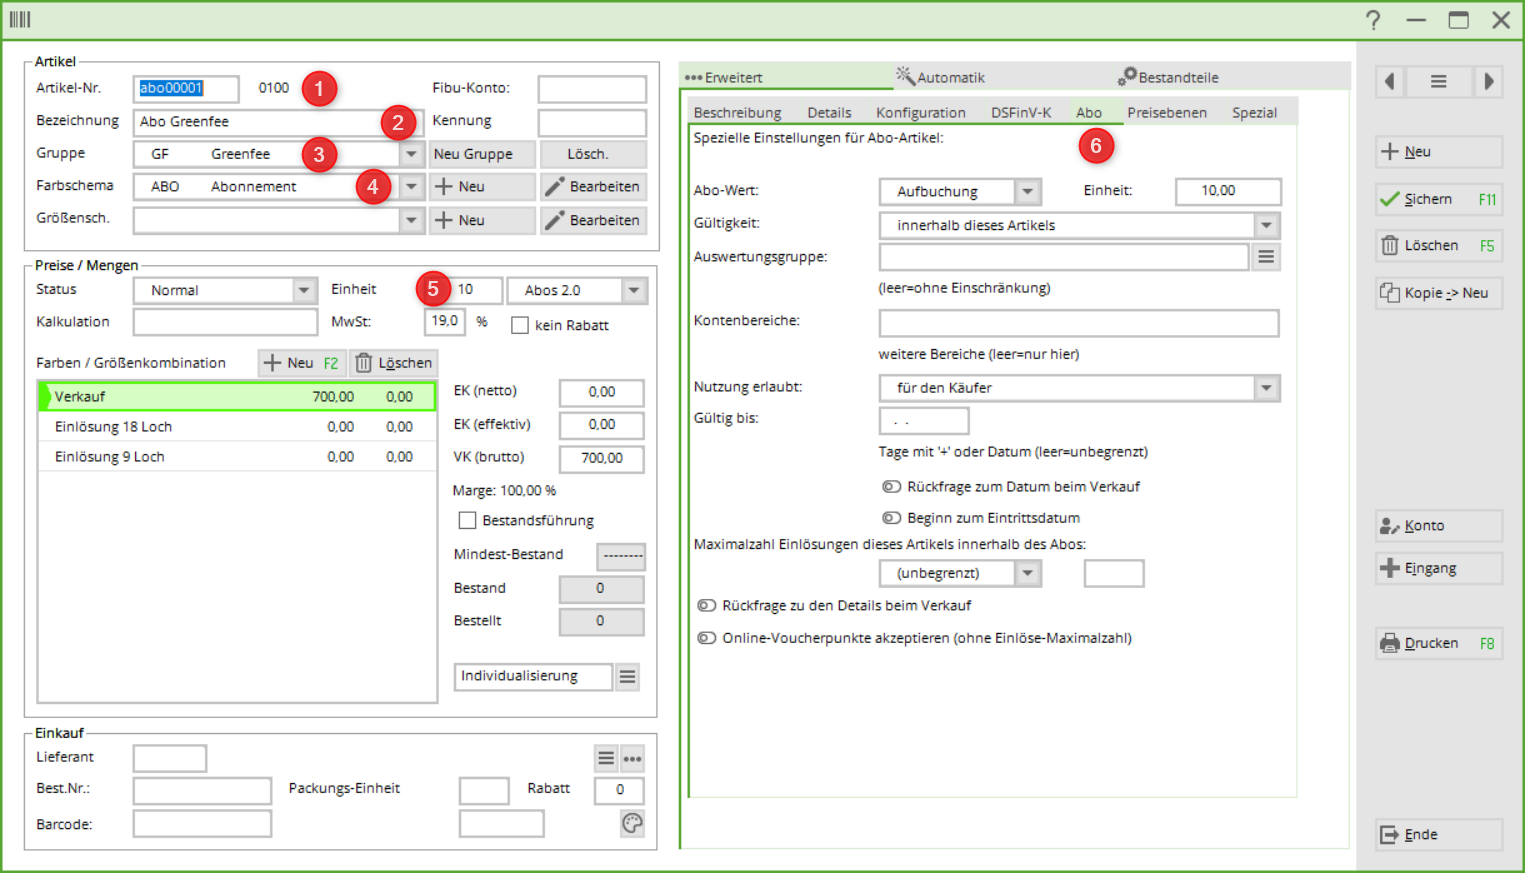
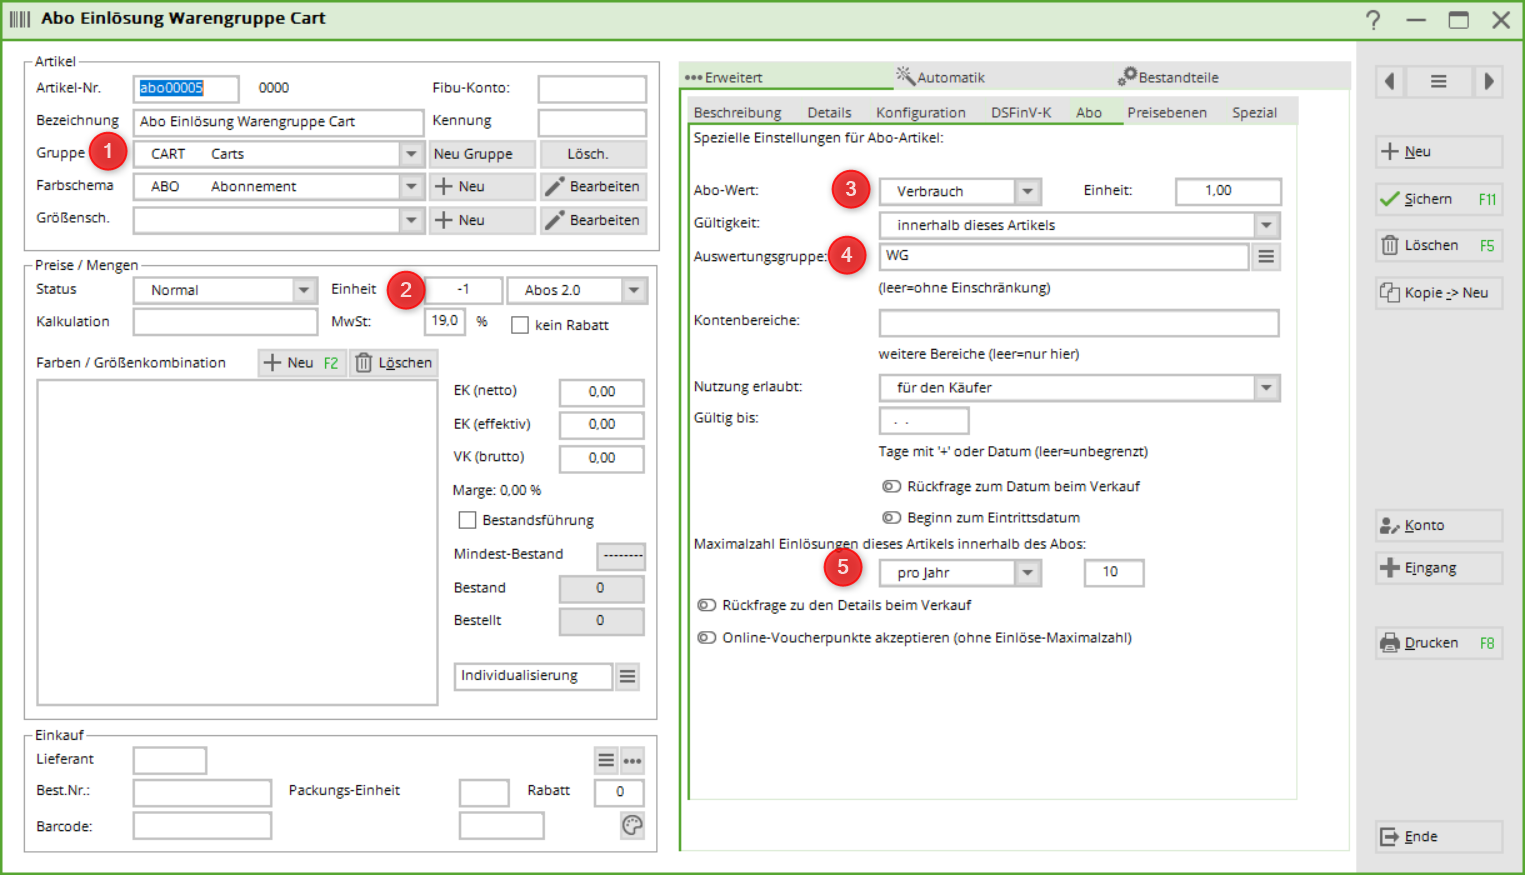
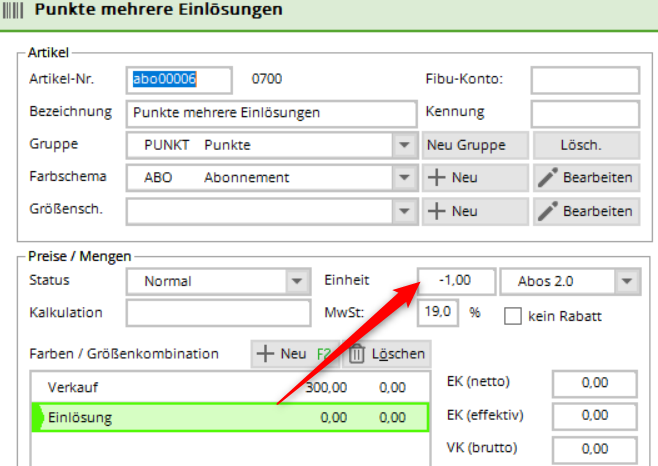
5. select unit and subscription 2.0 (new subscription management). The following is important here: Unit on sale: e.g. 10-card, i.e. 10. Unit on redemption: -1 or -0.5.
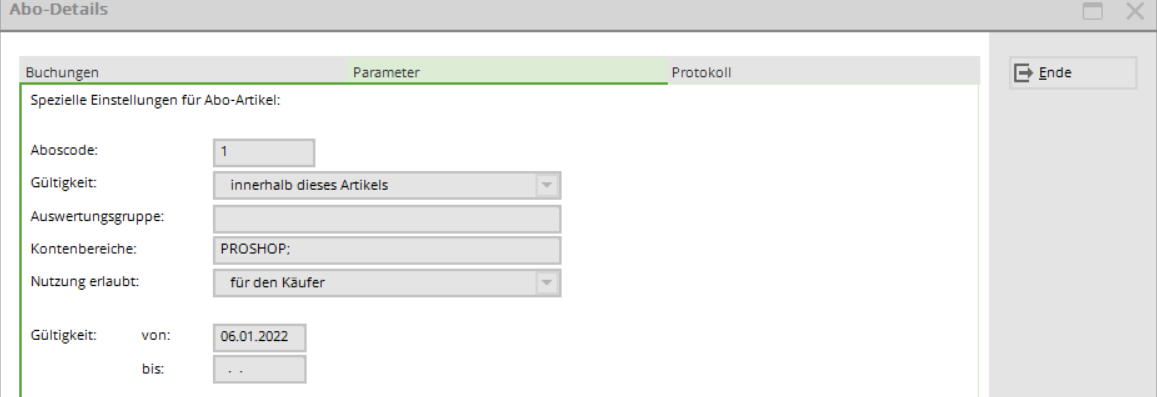
6. there are further special settings here, especially with regard to a validity date, until when the subscription is valid.
The main setting is applied - both for sales and for redemption.
Subscription sale
1st subscription value:
Whether sale or redemption, is taken from the main item mask
2. validity:
- for all articles (e.g. for different product groups)
3. evaluation group - for different product groups, the common evaluation group must be entered here. (Only displayed here with special function. Otherwise under the „General“ tab)
4. account areas: can be redeemed in different account areas. (Only with special function - please contact support and only if the evaluation group matches)
5. use permitted:
- for the buyer's family (family summary)
- for everyone (e.g. member brings guest and wants to deduct the GF from the subscription)
6. valid until: Validity of the subscription
7. enquiry about the details of the sale.
The details created in the item are displayed during the sale. However, these cannot be changed.
Subscription redemption
1. negative unit (-1 or -0.5 etc) automatically causes the subscription details to be saved as a redemption.
2nd subscription value is taken from the main screen. Unit is converted to positive
3. maximum number of redemptions of this item within the subscription:
Redemption at the cash desk
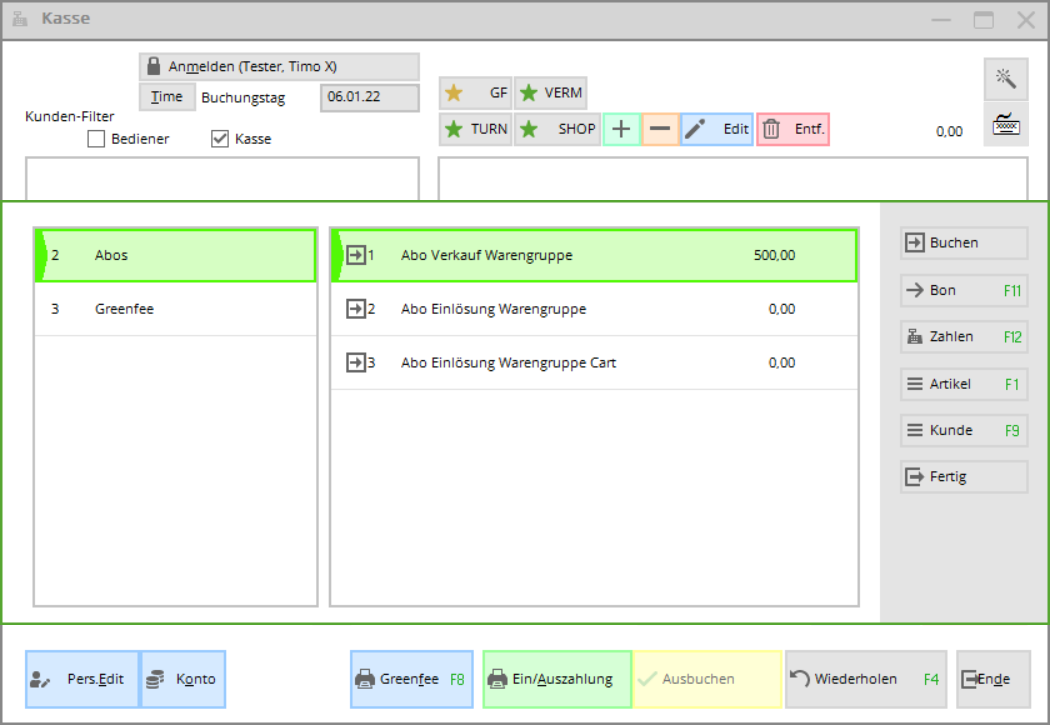
Call up the person in the cash register and then enter the desired subscription item. The overview of the member's travelcards will open.
1. subscription code: Subscription number
2nd person: Person who purchased the subscription
3. subscription item name: item name
4. date until/on: validity
5. available: Remaining credit
Correction of a subscription/remaining credit
As soon as a travelcard has already been redeemed (even if only once) or the daily closing has already been completed, this travelcard can no longer be cancelled. The sale of this subscription can also no longer be cancelled.
The sales item cannot be set to minus in the cash register either.
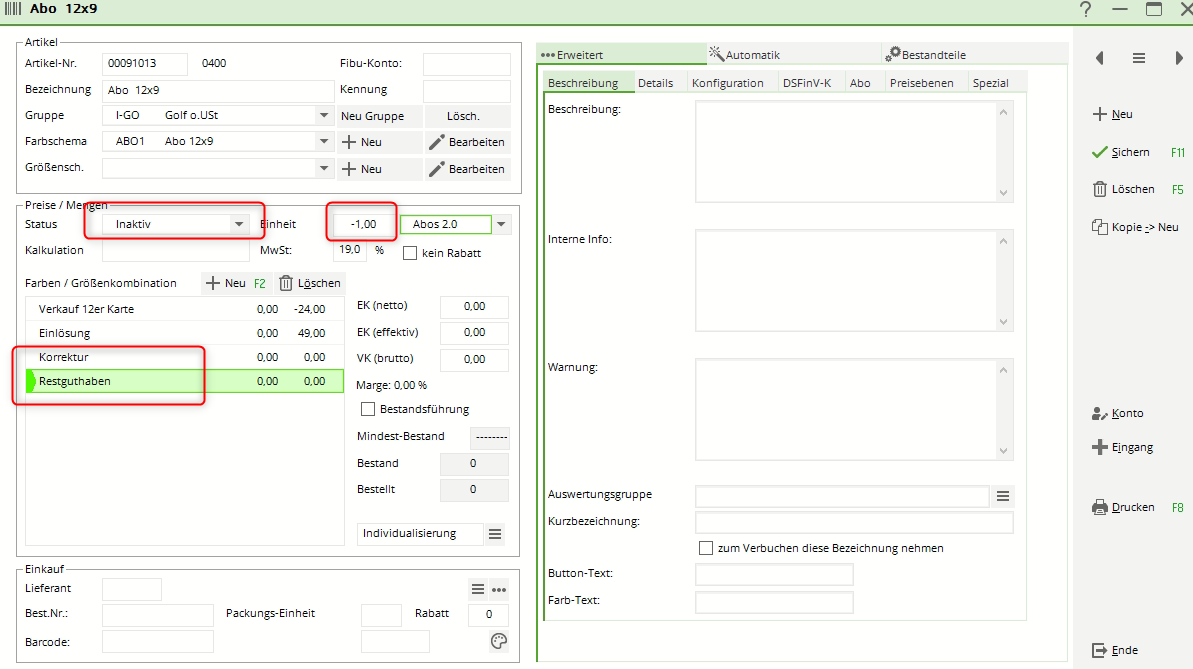
Another sub-item is required for a correction. This must be adjusted before the booking - both the unit and, if applicable, the price (repayment in minus). This is the only way to address the subscription database.
The item Remaining credit and Correction are specially set to inactive.
If there is a correction and/or remaining credit redemption, this must be deliberately changed in the article. The unit can also be adjusted at the same time.
E.G.
Member still has 7 remaining credits
Change the item unit to -7 (instead of -1 as it is now) and the remaining credit is cancelled in one posting.
Please remember to set the item to inactive again afterwards so that it is not accidentally taken from the cash register.
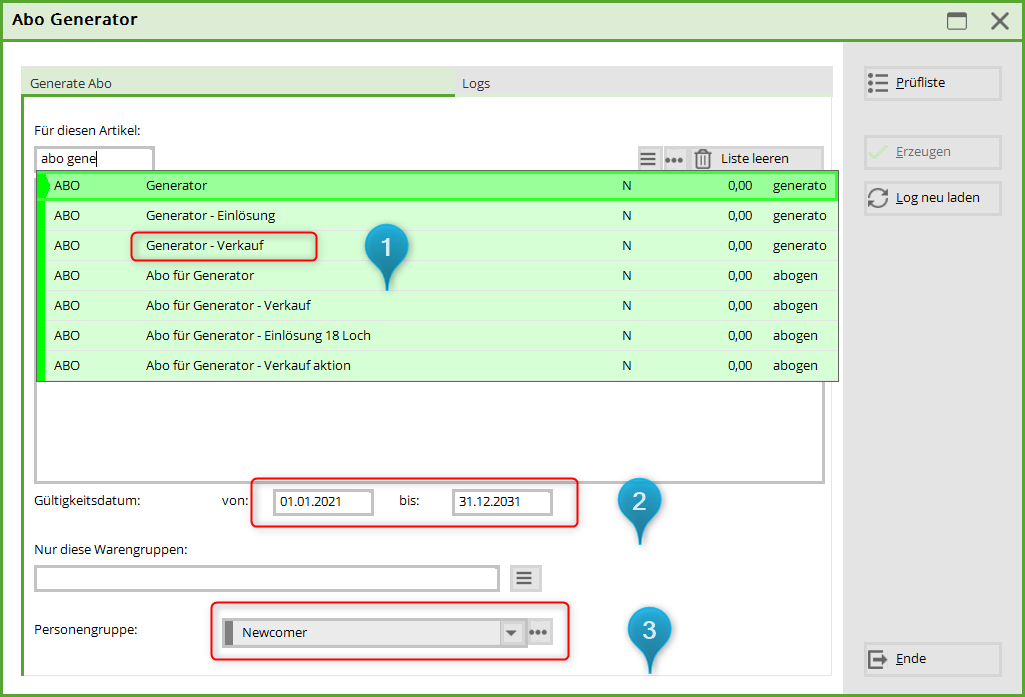
Importing a subscription for a group of people via generator
The generator can be used to assign any free subscription item to a selected group of people.
Please note the following points.
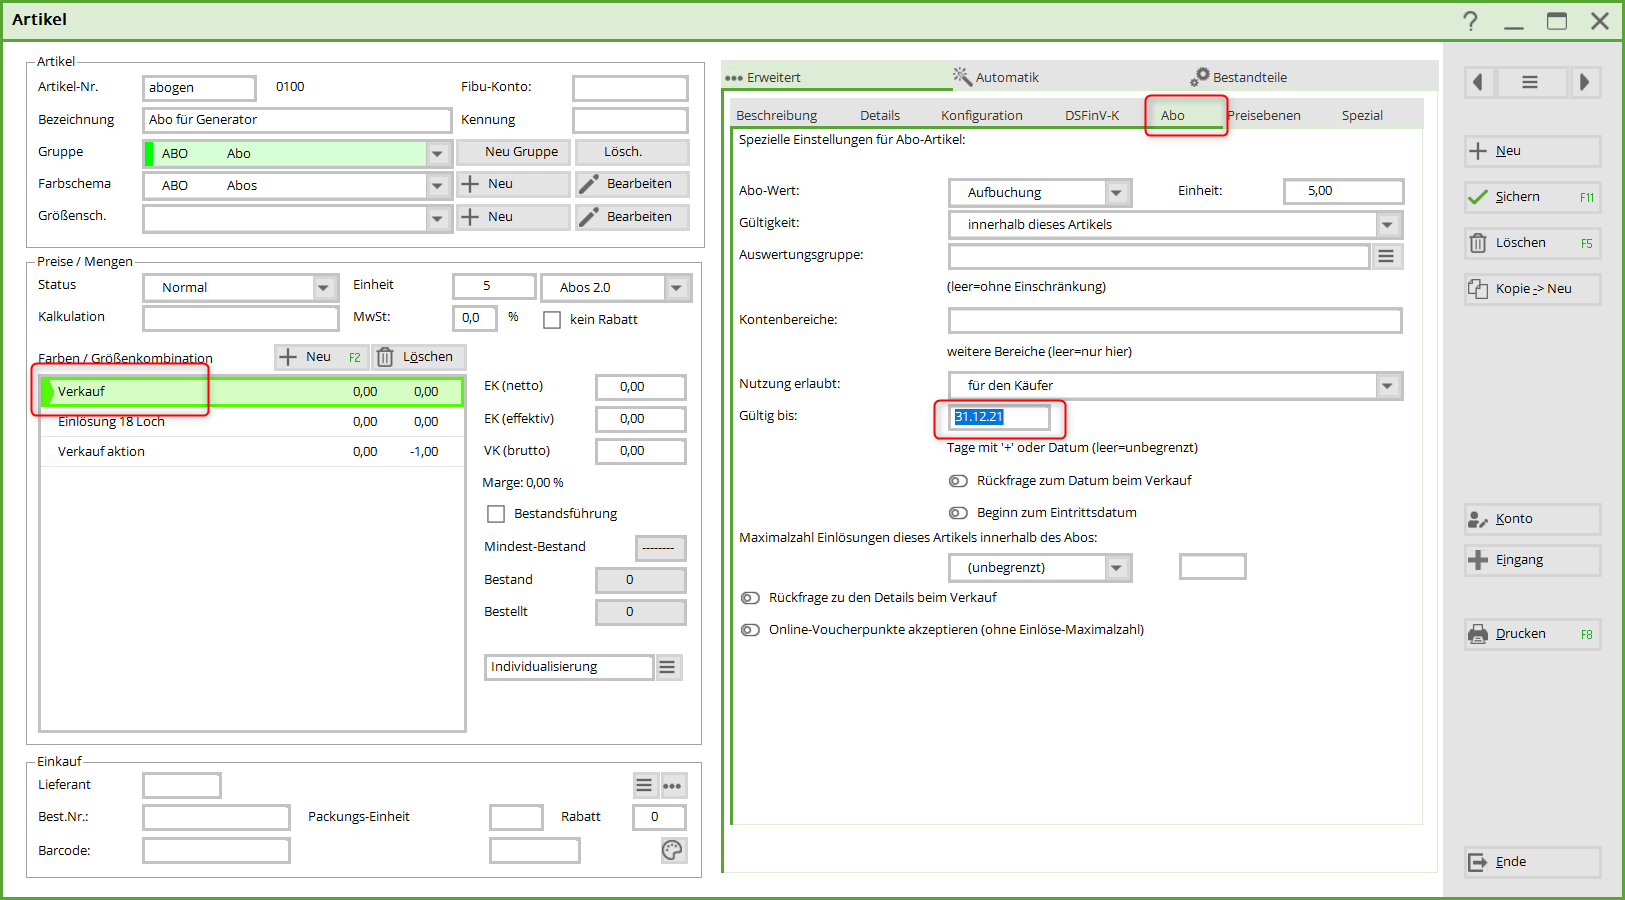
- Create, edit and delete the article via Article/new and extend the validity in the sales article under the Subscription tab to the valid end date.
- Create and save the desired group of people
- Open subscription management and select generator
- IMPORTANT:
Select the sales item directly!
Enter the expiry date!
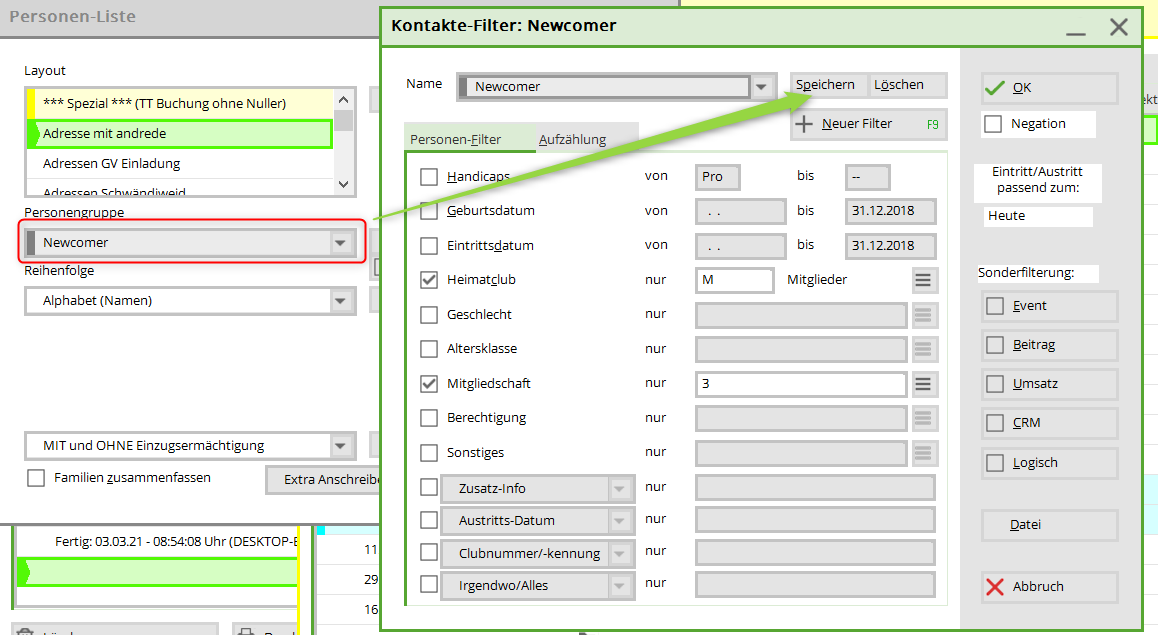
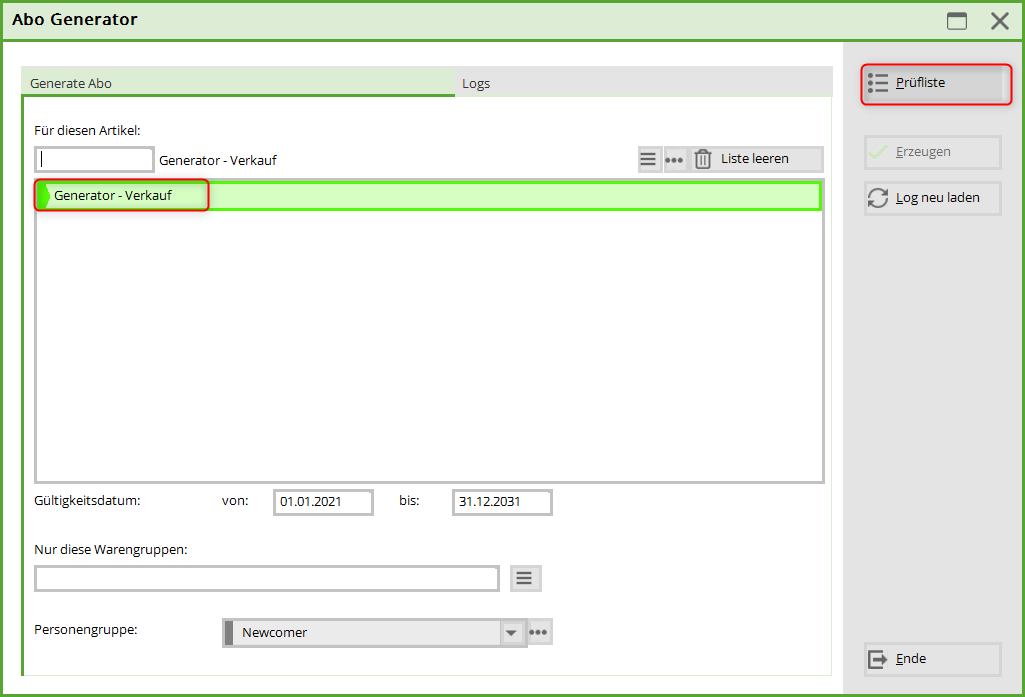
Select the person group (do not create the filter at this point, then it will not work!)
Then click on Checklist. It takes a while until something is visible. Please wait! Do not click again. It works in the background. Print the checklist on the screen.
The „GENERATE“ button only becomes active once the list has been printed. Click it to import and confirm the request. You must wait again. After a certain time, depending on the amount of data, until Pc Caddie imports the subscriptions.
Subscription examples
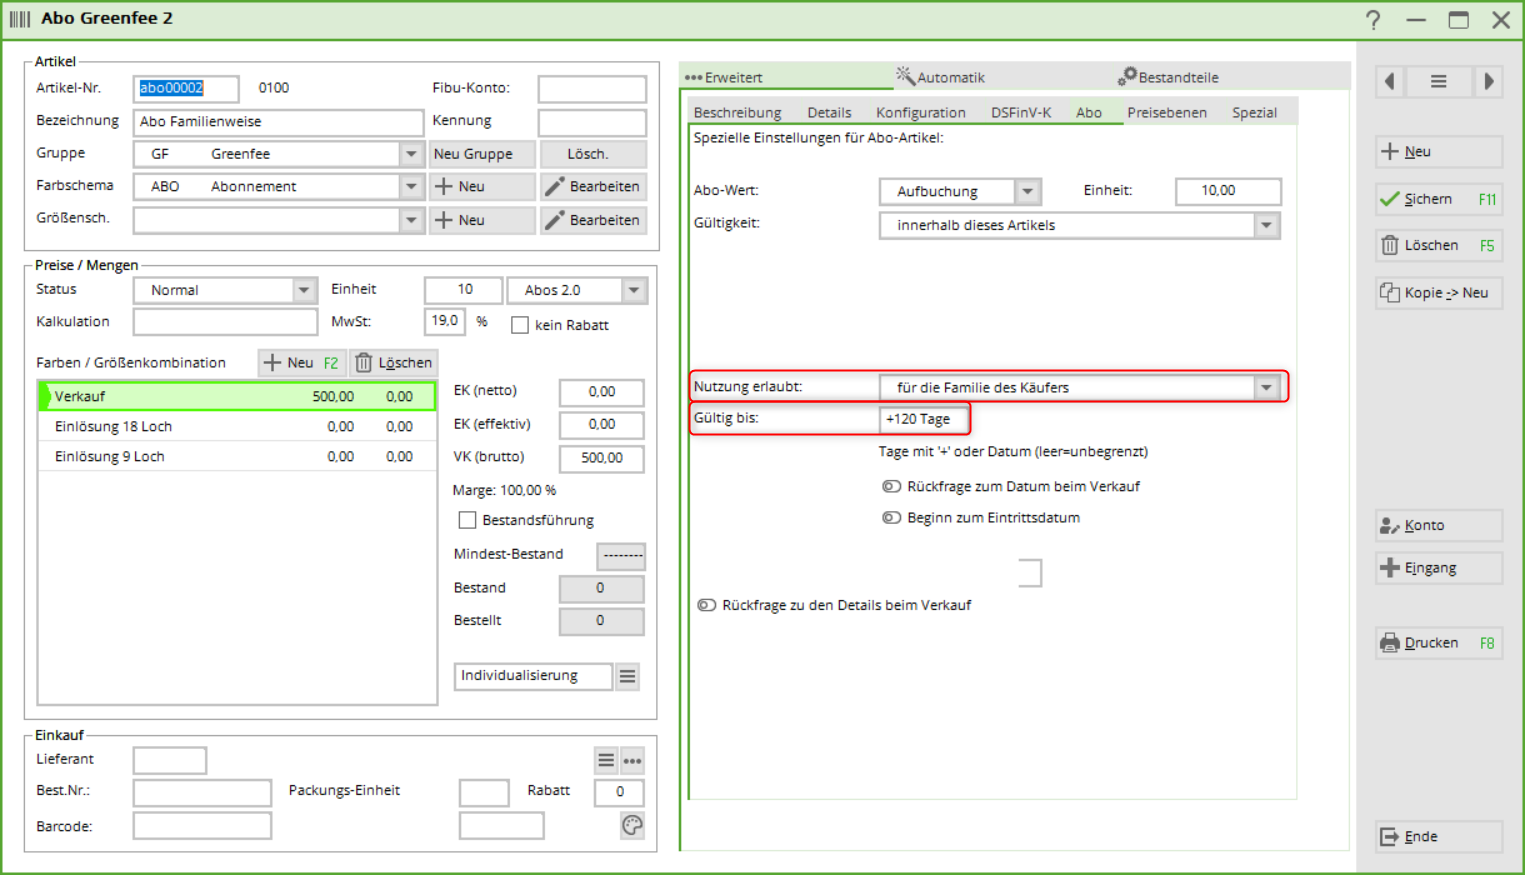
Subscription for the whole family
Select under Details: for family. In this example, the validity is set for 120 days from the date of purchase.
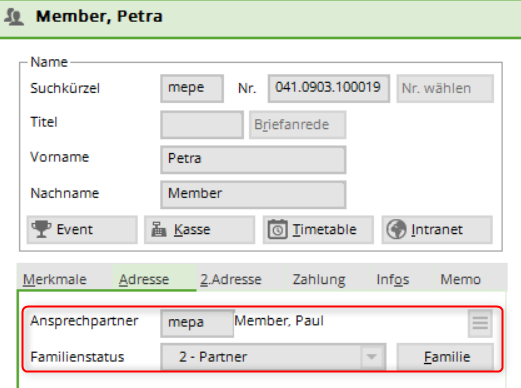
It is important that the families are grouped together correctly.
Subscription in different product groups
Example: Sale: Driving range product group
Redemption: Driving range product group: 20 x redemption of range fee Product group carts: 10 x redemption e-cart
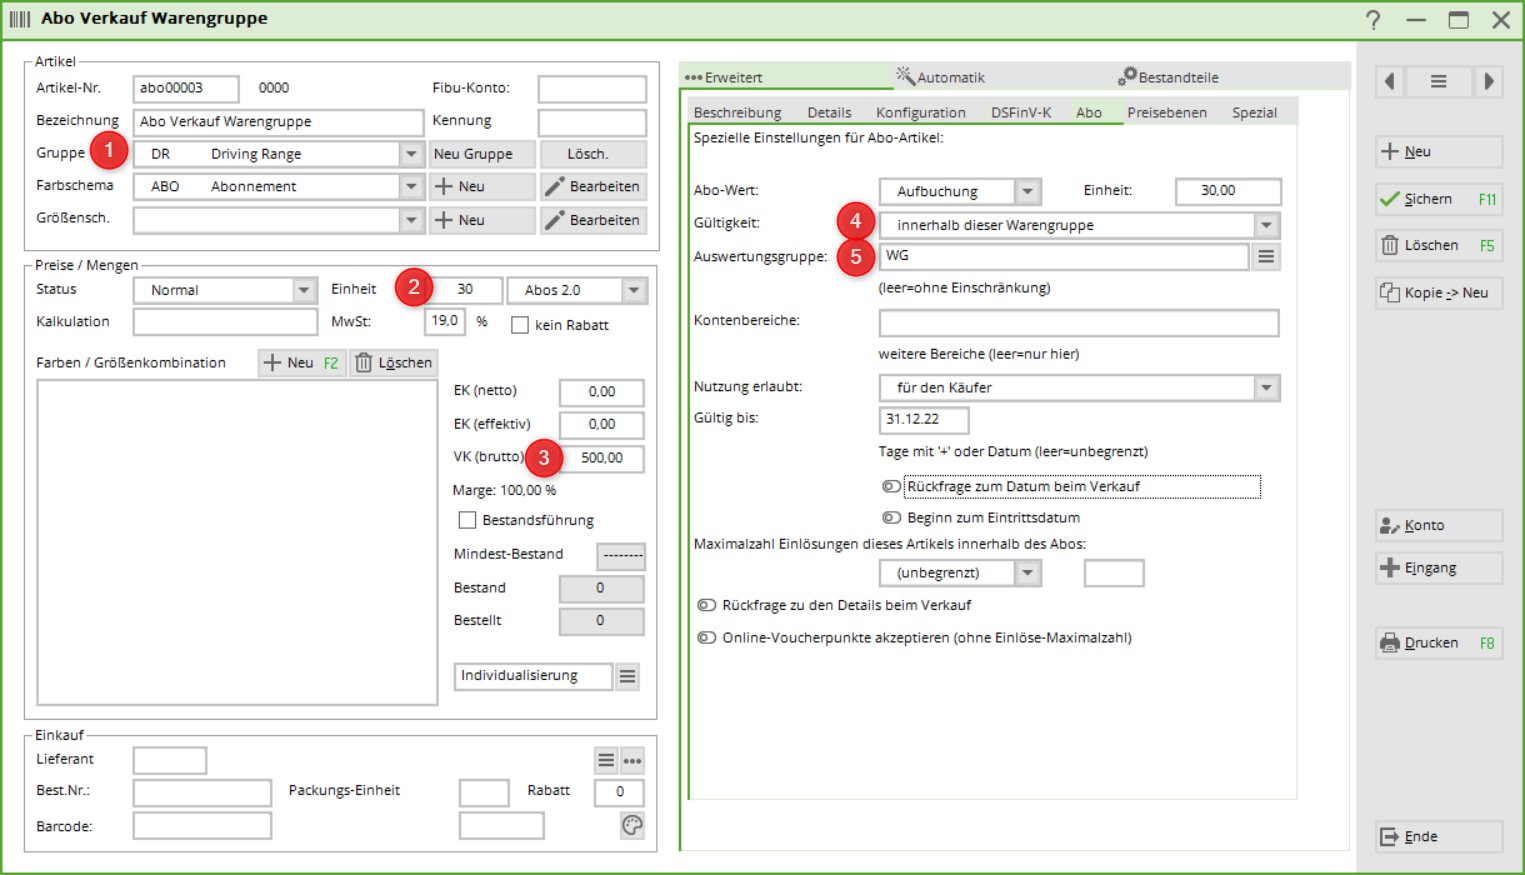
3 articles must be created. 1x sale with WG Driving Range, 1 x redemption with WG Driving Range and 1 x redemption with WG Carts
Sales article:
1st merchandise category for sales items
2. select unit & subscriptions 2.0
3. price
4. validity „for all articles“
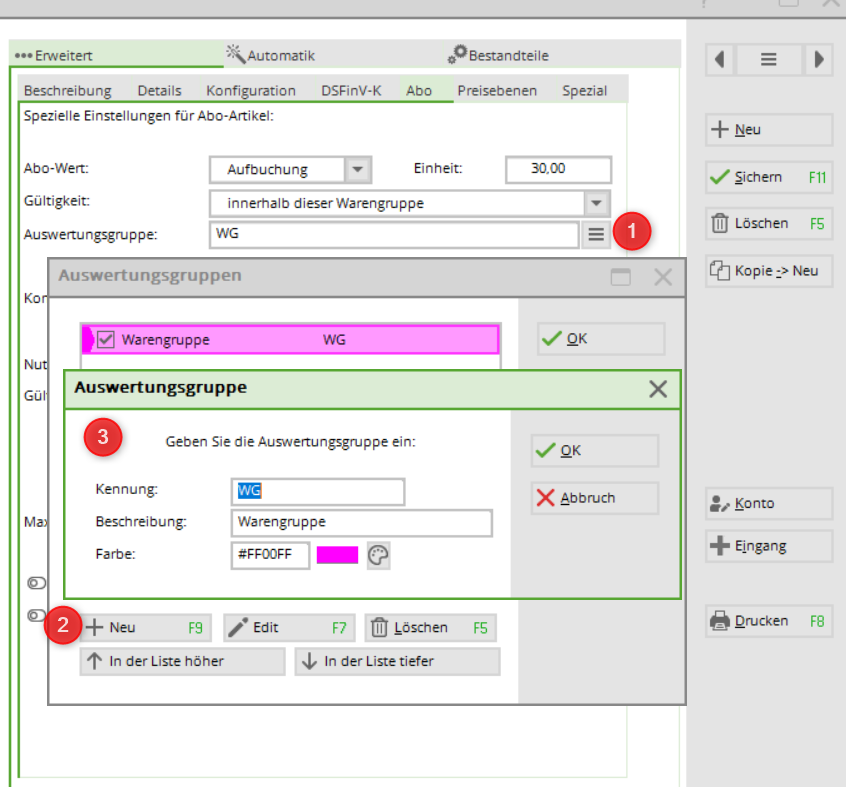
5. evaluation group: WG
(1. open list, 2. button: NEW, 3. name evaluation group)
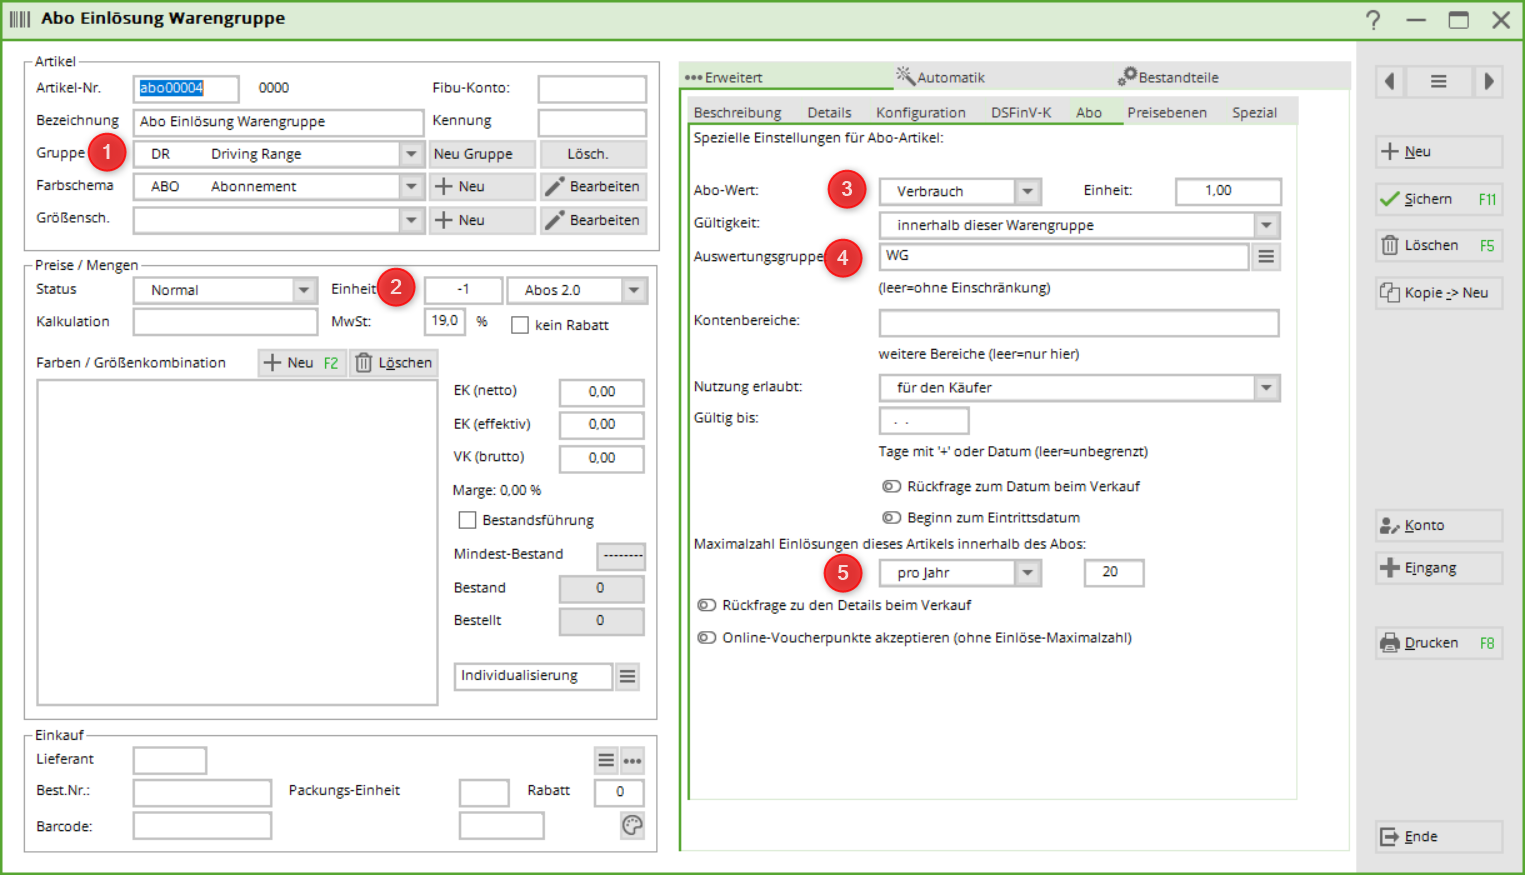
Redemption item no. 1
1st product group for redemption items
2. enter unit
3. subscription value - is automatically transferred from the main item
4. enter evaluation group
5. maximum redemption of this article within the subscription: 20 x per year
Redemption article 2
1. product group of the redemption item
2. unit
3. subscription value - is automatically transferred from the main article
4. enter evaluation group
5. maximum redemptions of this article within the subscription: 10 x per year
Practical tip: Create a useful quick selection - this makes handling in the checkout easier
Subscription with different redemption options
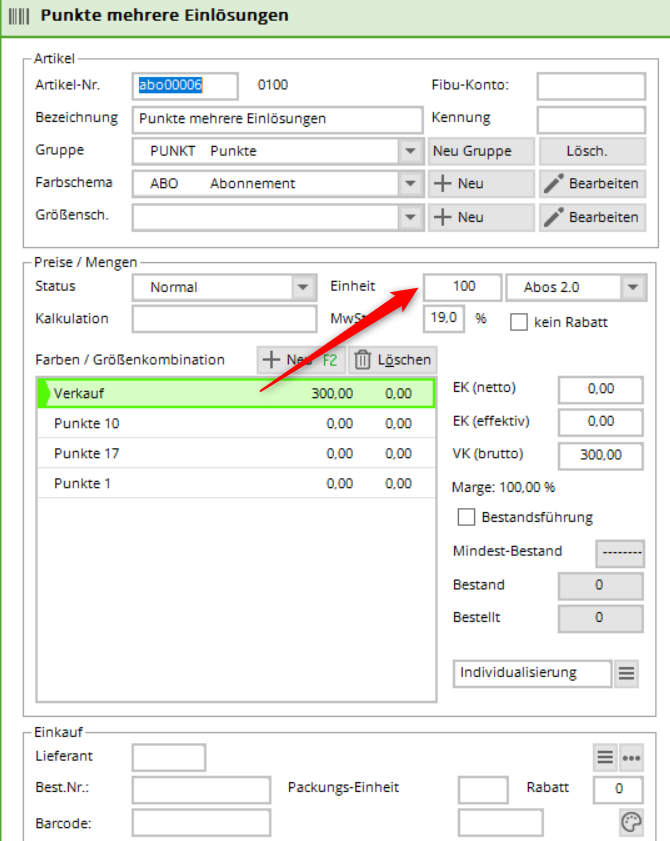
E.g. points system. Sale: 100 points at Euro 200.00. For this, the guest can play both at the weekend and during the week. play. Different points are deducted, 15 points at the weekend, 10 during the week. For DR he can buy balls for 3 points.
If there are only a few redemption variants, as in the example here, 3 balls. The article is created as follows
Sales item
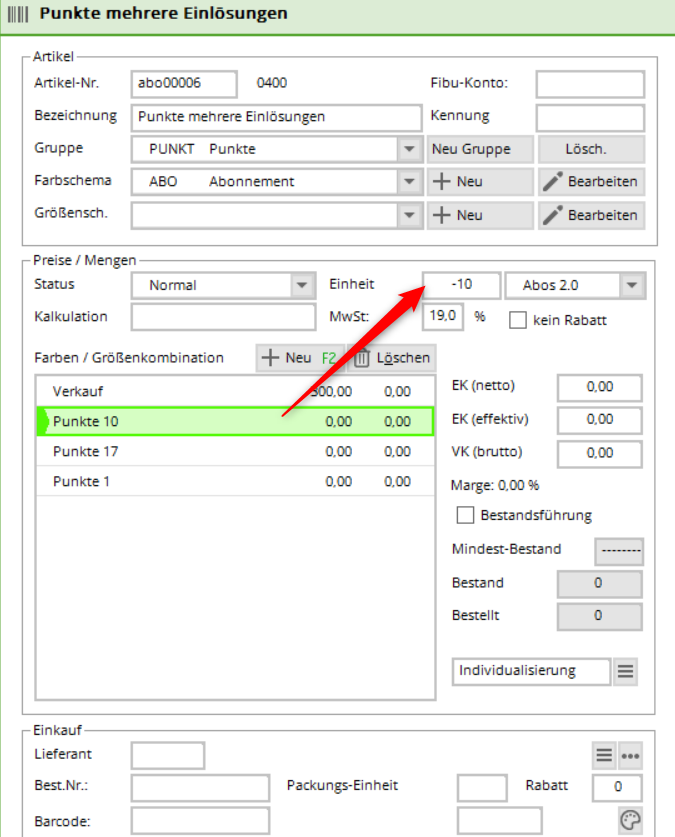
Redemption item - first variant:
Redemption 10 = -10 under unit
Redemption 17 = -17 under unit
Redemption 1 = -1 under unit
Redemption item - second variant:
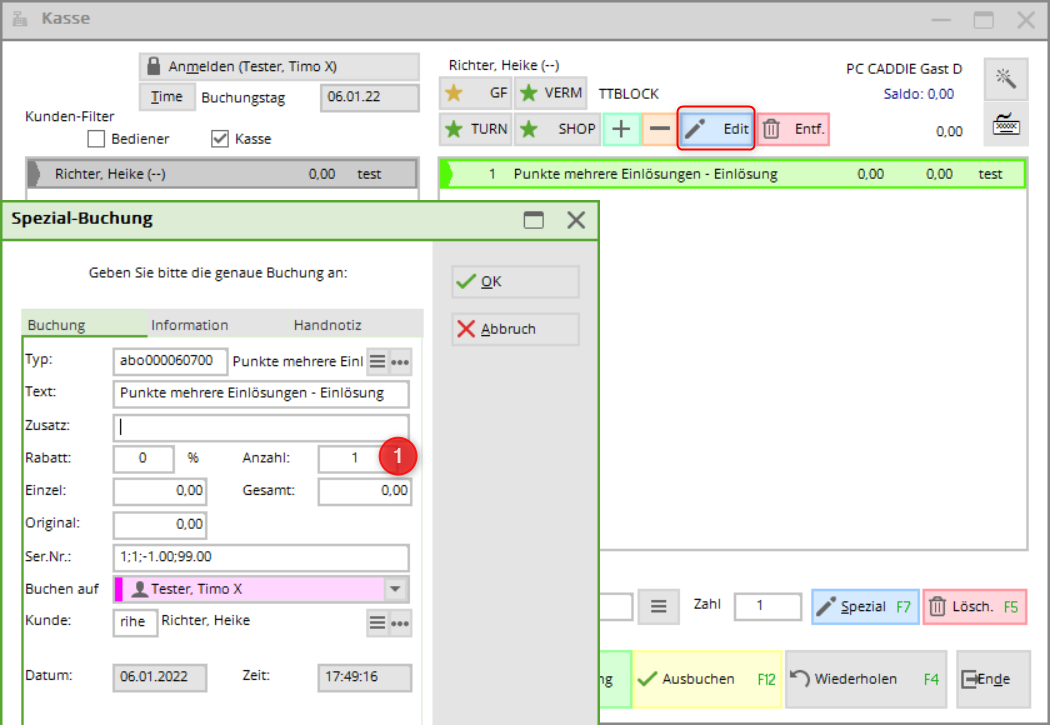
Only one redemption item with -1 unit is created. In the checkout, the value must be set to the desired value using the  button to the desired
(1) number individually each time. This way you are independent with the number of points.
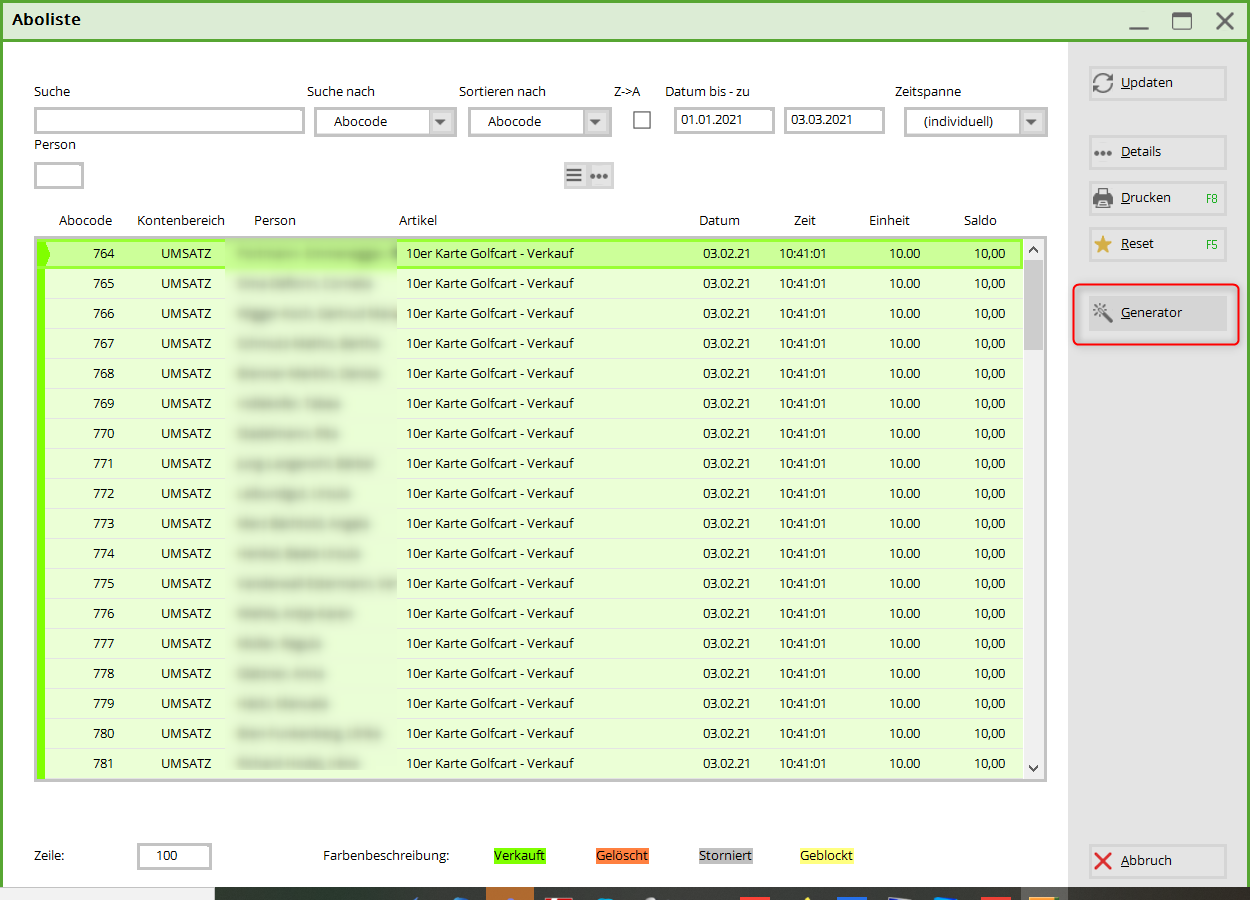
Subscription management overview
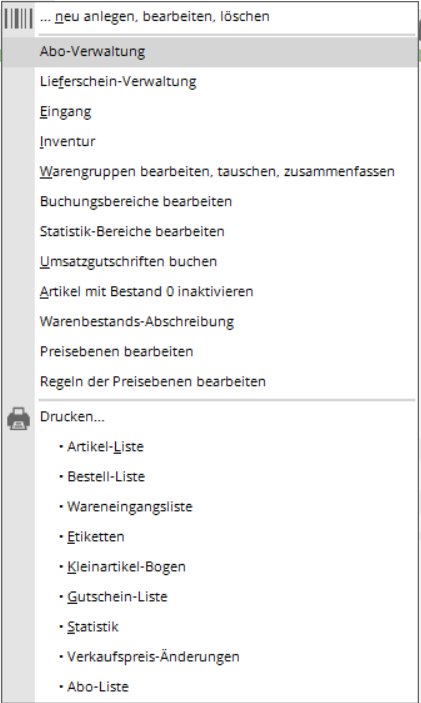
You can find the overview under the menu item
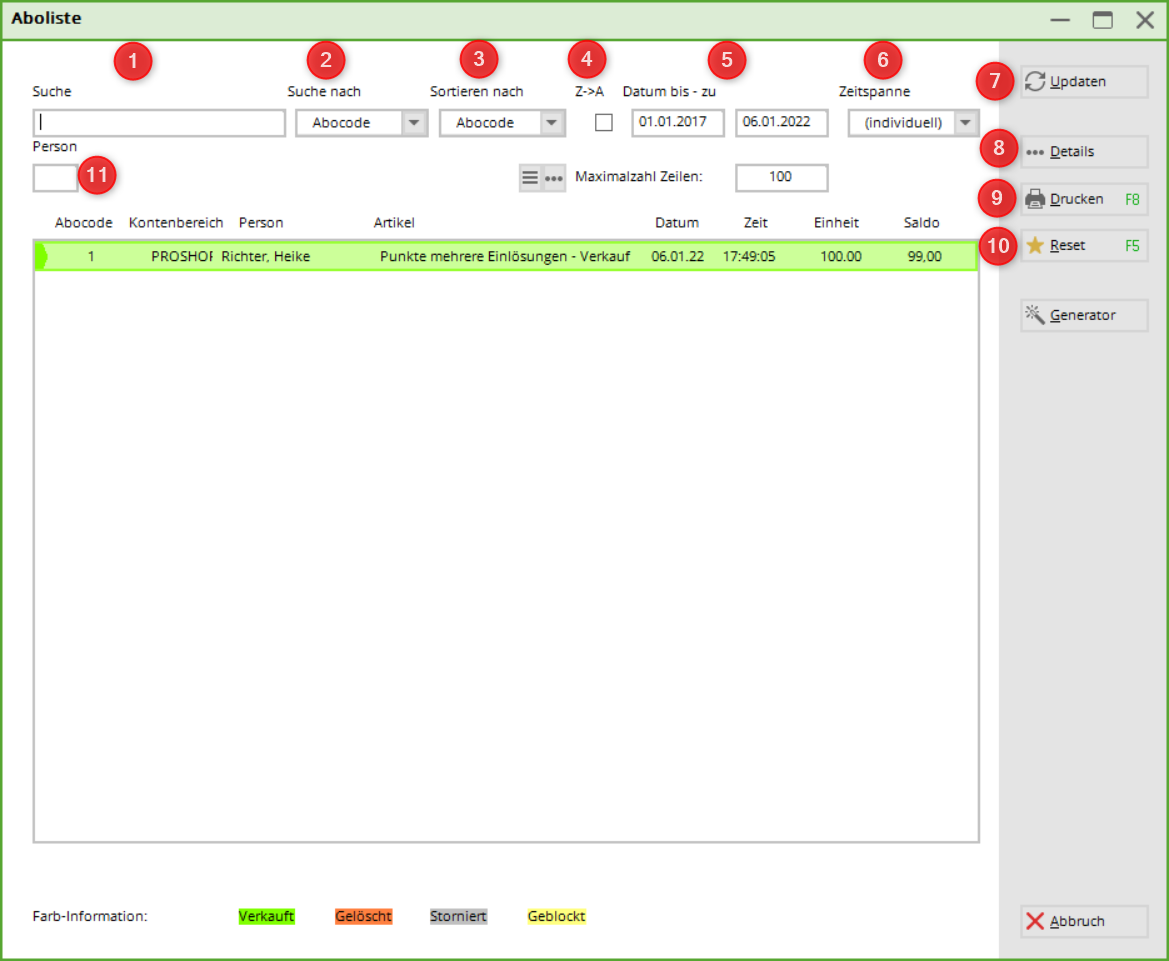
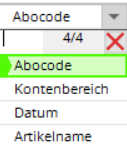
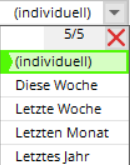
1st search: You can search by article date, subscription code etc.
3. Z→A: Reverse the display order
5. date: validity from - to
7. update: Selection is updated (also with Enter)
8. details of the respective person/subscription
9. printing
10. reset: Resets all settings to their original values
11. person: Search for individual person
12. sum, how many lines are displayed (can be changed. Attention, the dialogue takes longer with a higher number)
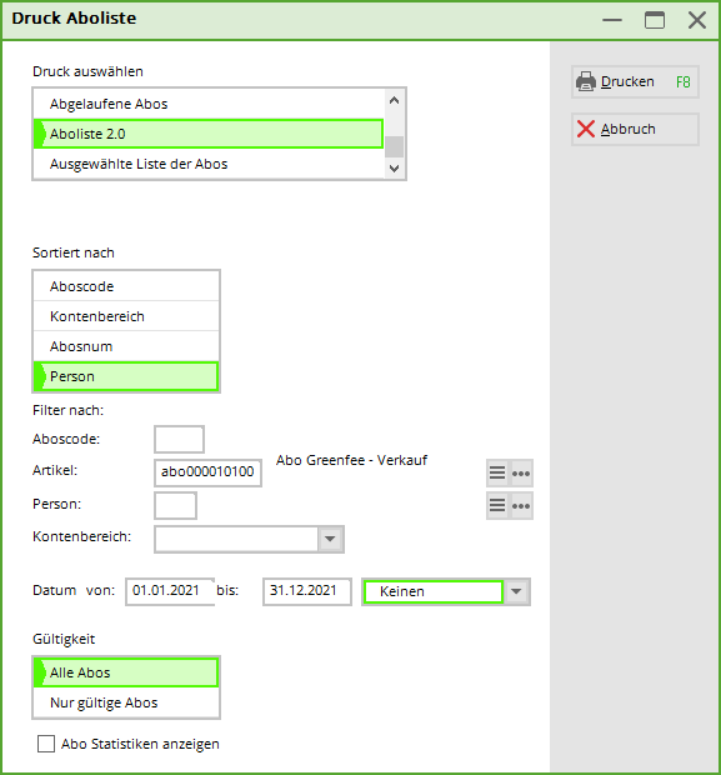
Print the subscriptions
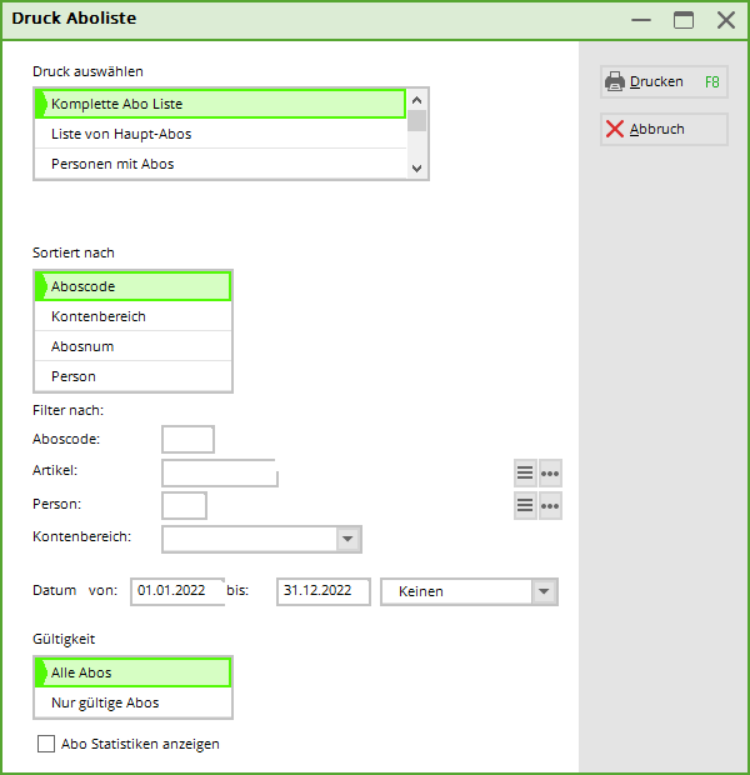
Here you can print various analyses/views of the subscriptions.
Example 1: Complete subscription list, 01.01.2017-31.12.17, All subscriptions
Example 2: Persons with subscription, 01.01.2017-31.12.2017, All subscriptions
Example 3: Subscription list 2.0 = Subscription list
All persons of a selected article with initial stock/redemption & remaining stock as of TODAY
Print remaining subscription balance on receipt
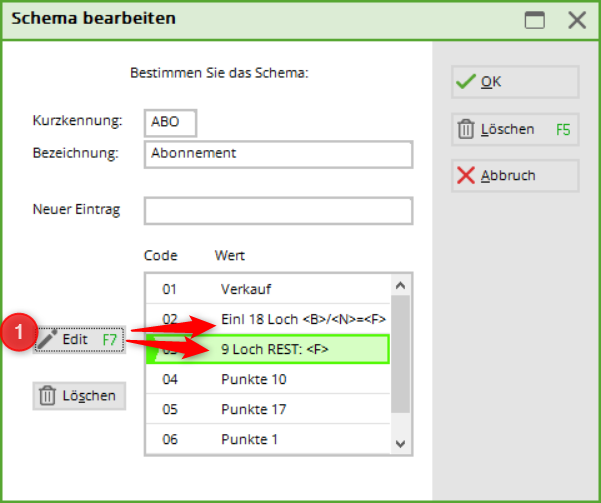
If you want your customers to print the remaining subscription balance on every receipt, this must be created as follows be created.
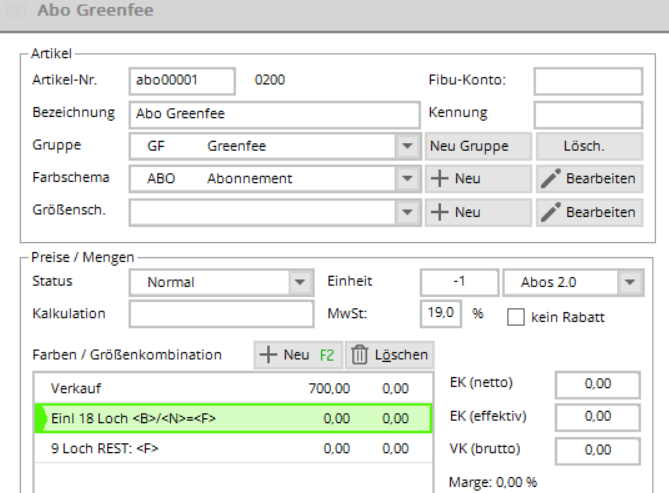
Add the description in the article under colour/size combinations (1).
The article will then look like this:
The letters have the following meaning:
| B | Available stock or the current credit balance. This is always adjusted |
|---|---|
| N | Unit which is deducted on redemption |
| F | Remaining stock |
| E | Validity end date |
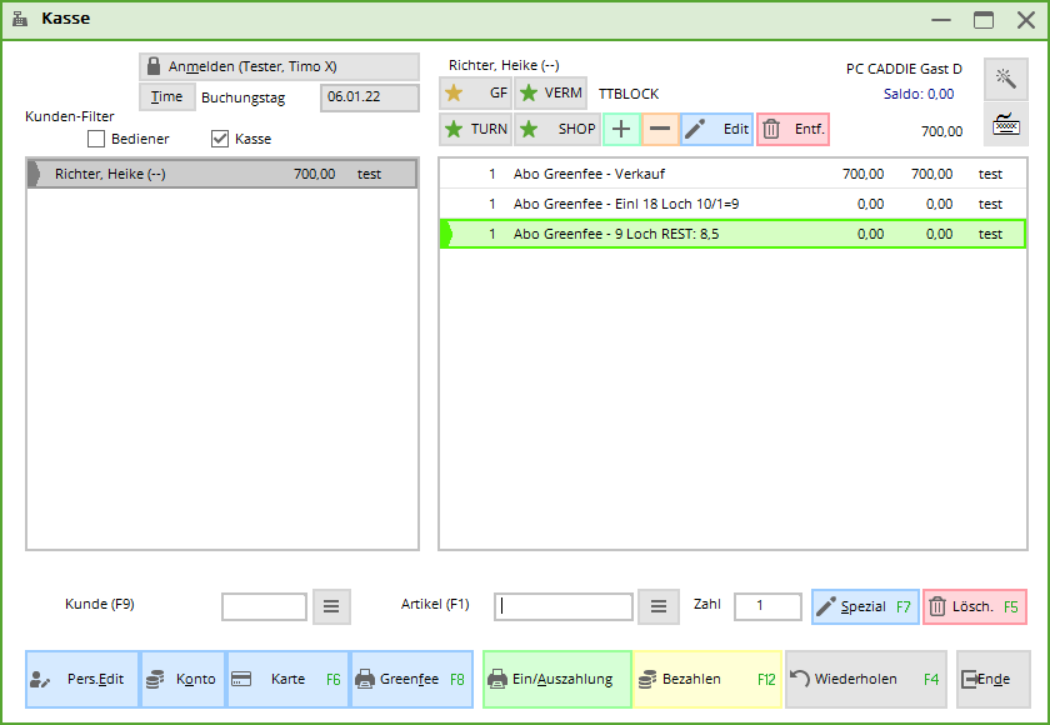
It looks like this in the cash register:
This is how it may look on the receipt:
Subscriptions are also taken into account for online bookings with payment
A price rule must be created that precedes the rules for the „normal“ green fee prices. This means that the rule for the subscription must be higher up in the list of rules than any of the green fee prices.
When a booking is made, PC CADDIE checks whether the corresponding subscription item has been booked in the player's account. If there are still units remaining, the subscription redemption item is displayed. If all units have been used up, the subscription rule is skipped and the appropriate price rule comes into effect.
But beware! The units are only redeemed at check-in. It is therefore quite possible that someone can book start times in excess of the remaining units and does not have to pay for them directly online and the correct price is only displayed in the timetable when checking in on site.
If this is not desired, an additional rule could be created, for example, which only allows advance bookings for subscription holders.
DSFinV-K settings
Information on DSFinV-K can be found here: DSFinV-K
- Keine Schlagworte vergeben

