
Inhaltsverzeichnis
Accounting export
The accounting export module in PC CADDIE makes it easier for the accounting department to work with sales data. With just a few mouse clicks, files can be created for export and imported into the respective accounting programme.
Some preparatory work is necessary at the beginning, although these are only one-off settings.
The following preparatory work must be observed.
Please discuss these two points with your accounting department:
- On the one hand, it must be clarified with the accounting department which customer numbers have been used so far (possibly in the area of CASH/SALES may have been posted without a customer number). In certain cases, PC CADDIE can output the member numbers as unique customer numbers using a formula. It therefore often makes sense to start with new customer numbers when introducing the accounting export, also to avoid unnecessary follow-up work, such as the manual updating of customer numbers.
- Secondly, you must enter the FNA account numbers in the product groups and/or posting items. To do this, you can enter cost centres and tax keys if required.
Selection of export formats
PC CADDIE can output your accounting data in the following export formats:

Please contact us if you have any questions about SAP export.
Please note | From 2018, the mailing format and the previous accounting format (ASCII) can no longer be processed in the DATEV accounting programmes. The mailing format is EV and ED files or DV and DE files. (The current ASCII formats under DATEV pro are not affected).
Please switch to the new data formats as early as possible.
LEXWARE
For the Lexware export, select the format „ASCII with tabs“. This is a „text file“. In Lexware this is then called „ASCII / Text“ in the import path. „ANSI with tabs“ would also be possible.
DATEV 7.0
Control key up to 4 digits
Currently (as of October 2023), the Datev 7.0 format is only necessary if you need tax keys with more than 2 digits. With DATEV 7.0, you can enter these with up to 4 digits.
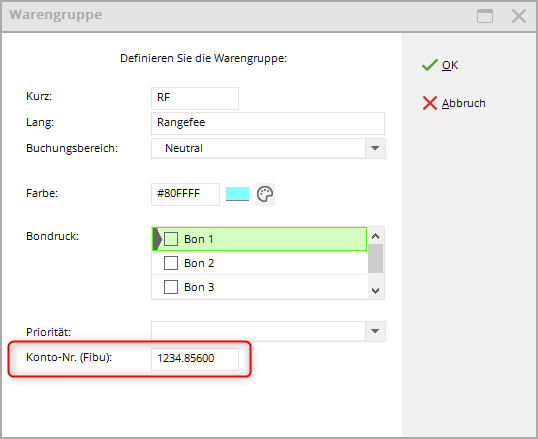
In this example, the tax key 1234 and the 5-digit Fibu number 85600 are entered in a product group. You can of course also enter these individually in articles:
Sphere key
53.123456/123/2
In this case:
53 would be the control key
123456 the Fibu account number
123 the cost centre
2 the sphere key

53.123456/2 - in this case, the sphere key would be entered in the KOST1 field in the export if no cost centre is used.
DATEV 5.0.
General information
The accounting export for the DATEV format 5.0 takes place via a csv file.
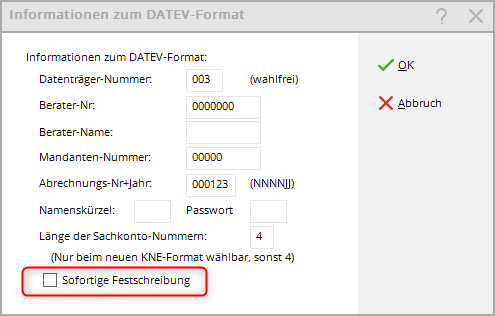
Fixed entry indicator
As soon as you output, you can decide in the following window whether you want to deliver the immediate fixation to your accounting department (this is delivered as fixation identifier 1) or whether you want to export without immediate fixation (this is delivered with fixation identifier 0).
In most cases, the box is not ticked and the accounting department decides after the import when the data is „frozen“.
Account holder
Info: With the transfer of debtors, the name of the account holder is also transferred if this was entered in the personal data in the „Payment“ tab with the bank data (e.g. for a child). The account holder can therefore be different from the name of the debtor (person) themselves.
Use document field 2
With a special setting it is possible to use the voucher field 2 with the due date if the postings are also output on the invoice date. Please contact our support team if you require this function.
This special setting can also be used for the additional voucher date of the cash book in the cash area!
For this setting, it is also important that the „Post to invoice date“ checkbox is ticked in the other special settings.
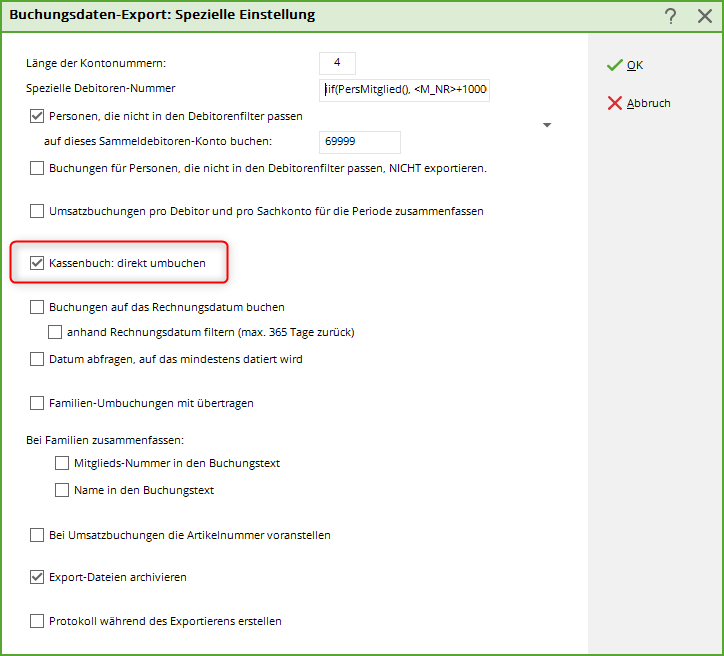
Transfer cashbook directly
There is also an additional option in the Special settings (only with DATEV format)
The tick Cash book: transfer directly ensures that cashbook documents are always exported individually, even if you have ticked the box „Summarise sales postings per G/L account and customer“.
The cash book vouchers are posted directly from the FIBO account to the cash payment type (without the diversions via the collective customer)
The function has has priority over „Summarise sales postings per G/L account and customer“which is very practical, as cash postings are often exported individually for each voucher.
Checklists
Please note the new function for Checklists!
Export with original documents
Ask our support if you need this function.
The export of invoices as PDF in addition to the posting exports is possible for contribution accounts (not for cash accounts)
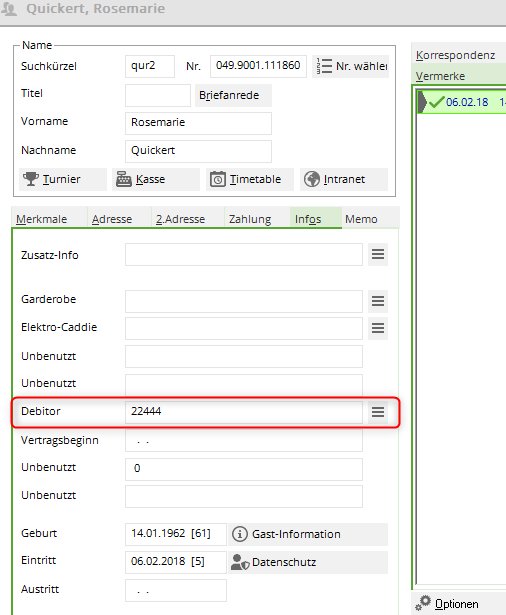
Debtor numbers
In many cases, PC CADDIE can use the member numbers as unique customer numbers with a formula. The formula is installed for you by PC CADDIE Support. There is then less follow-up maintenance work for the customer numbers. If there are open items for non-members - for example for the cash account area - additional customer numbers are required.
The customers can be transferred to the accounting programme with an address during export.
If the accounting department wants to use its own number range, these numbers can be entered in an additional info field. Please note that customer numbers must then always be maintained manually in PC CADDIE. If your accounting department specifies a free number range, this can be created for selection in an info field (similar to boxes).
If you do not have this field, you can set up the additional field according to these instructions: Additional fields of the contacts.
FNA account numbers
It is also possible to enter complete FNA account numbers for entire merchandise categories if you go to Sales - Contribution types/articles - Edit/swap/delete merchandise categories Edit the merchandise categories:
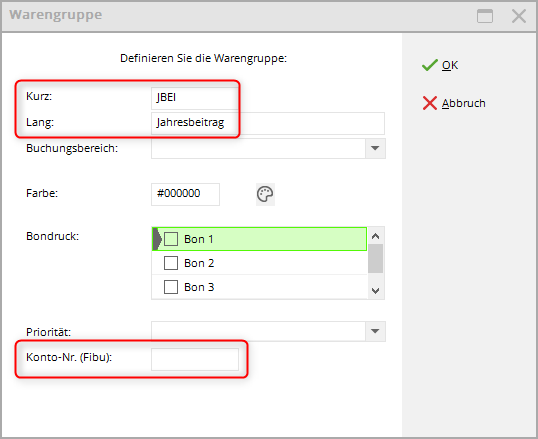
To ensure that the corresponding sales items are posted to the correct FNA account number, these numbers must be stored either in the merchandise categories or in the items (if numbers are stored in the merchandise category, you only need to store numbers in the items if they are to be different from those in the merchandise category).
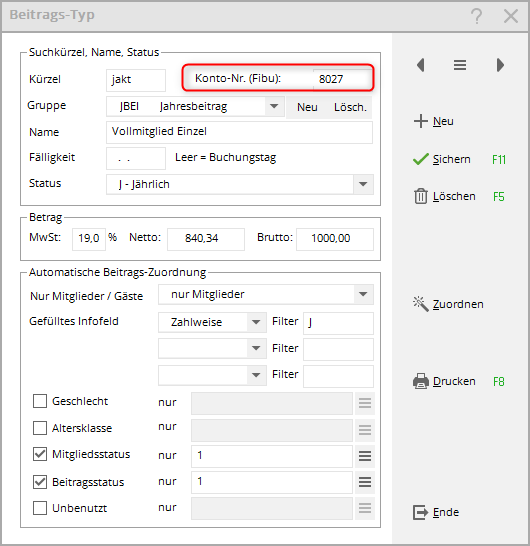
If you also want to export the payments, enter the appropriate FNA numbers in the payment types. You will also find the payment types in the article list.
In contribution account areas such as CLUB or GMBH (or similar), the field for the FNA number can be found here:
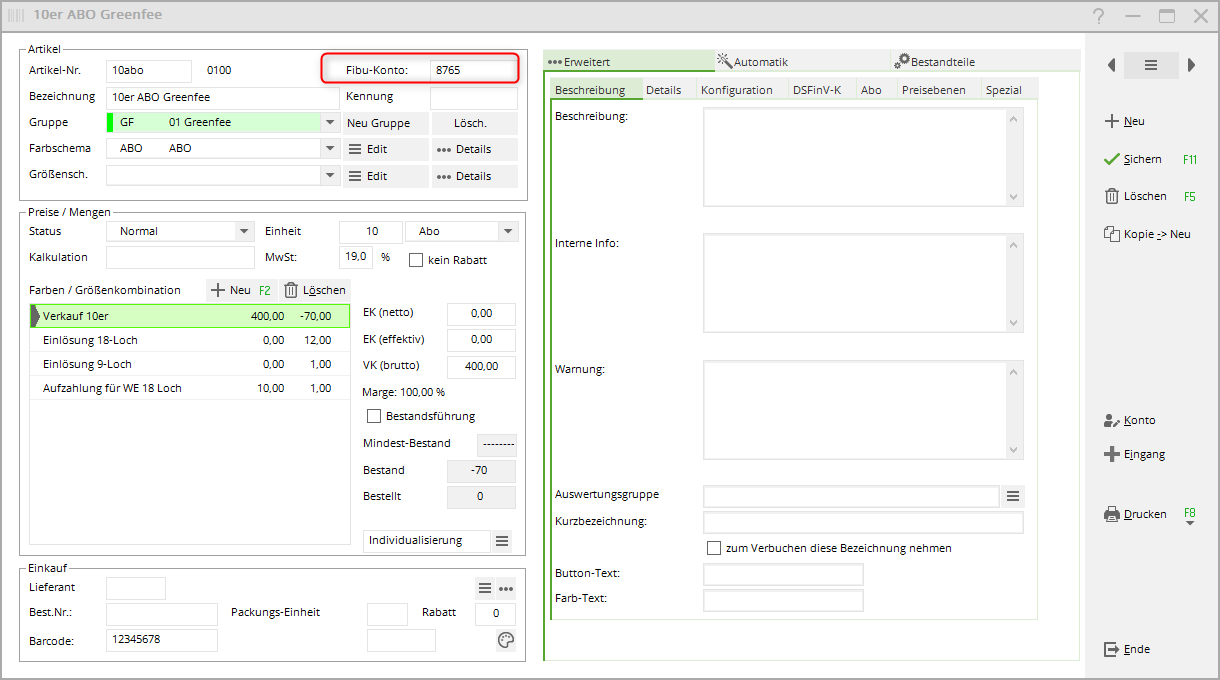
In cash account areas such as SALES or CASH (or similar) you will find the corresponding field here:
Tax code/cost centre
The tax key and cost centre can also be entered in the FNA account number field.

- 12 → Tax key
- 3456 → FNA account number
- /789 → cost centre
Enter two cost centres
From PC CADDIE versions 02.10.2023 it is also possible to enter a cost centre 2.

- 12 → Tax key
- 1222 → Financial accounting account number
- /6 → cost centre 1
- /789 → cost centre 2
Print article lists with Fibu numbers
Cash accounts
Print cash register items with Fibu numbers via „Items - print item list“ and tick the box under special filters:
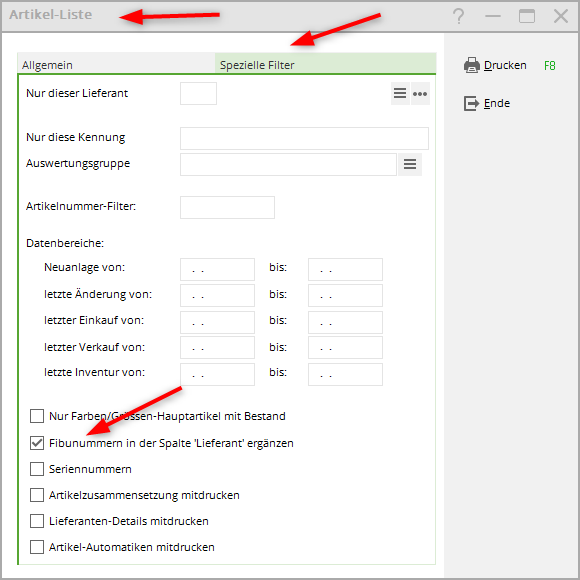
Contribution accounts
Print article lists from contribution accounts, e.g. in the open CLUB area via „Sales - Contribution types/articles - Print list/labels“ and sort by product group. The fibre number is always printed.

Create export file
Once all the preparatory work has been completed, the actual accounting export can be started. The export is created separately for each account area (e.g. CLUB, TURNOVER, GASTRO etc.) Under Turnover you will find the programme item Accounting export.
The following window opens:
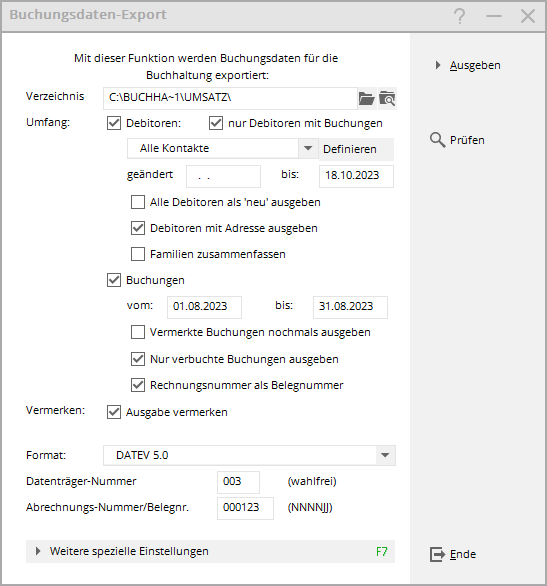
- Directory
Path for the export file. - Scope
Normally you only need customers with postings. - All contacts
Restriction of the person group possible, if this is desired and appropriate, discuss this during installation, especially for cash registers with open items, a formula is used to control which guests are to be posted to the collective debtor. - Changed… until 18.10.23
All changes to customers up to the current date should be recorded. - Output all debtors as „new“
This marks the exported customers as „NEW“. - Output customers with address
If this is desired. - Summarise families
If this box is ticked, the bookings are posted to the customer number of the main contact person; if it is not ticked, the booking remains with the individual person - Postings e.g. from: 01.01.23 to e.g. 31.01.23
Please select the appropriate period. - Output noted bookings again
PC CADDIE marks the bookings in the sales accounts with a yellow star. If you want to repeat the export, tick the box here. - Only output posted bookings
Postings that are still in yellow in the sales accounts (no invoice created yet) are not exported. - Invoice number as document number
If this is desired, please tick the box. - Note
This tick sets the yellow star in the account. - Format
This is where you set the format for your accounting programme when installing the module. - Data carrier number/billing number
Sometimes this information is necessary so that your accounting programme can read the file, e.g. the current year. For the accounting number, it is important that no more than 68 numbers can be assigned per year, i.e. numbers from 000123-006823 for the year 2023.
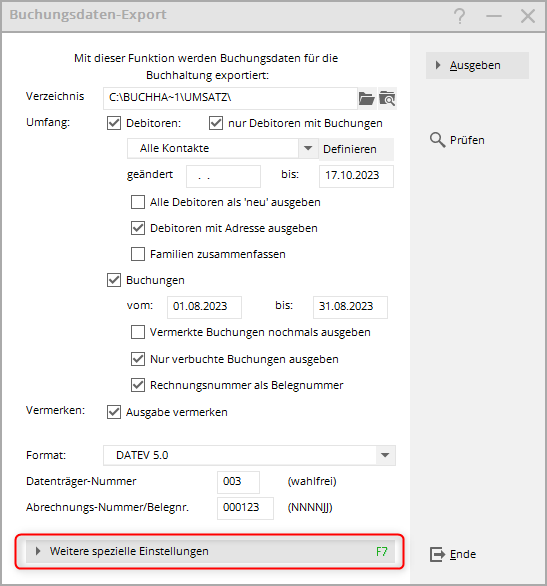
On the second page of the settings, click on the button Further special settings the following window opens:
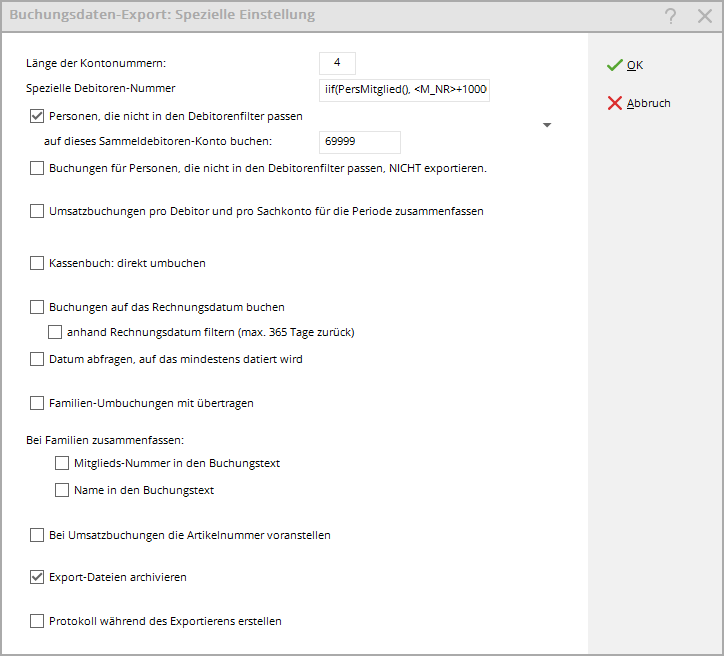
- Length of the account numbers
This is the character length of the fibre numbers, with Datev these are usually 4 or 5 digits long, normally the account numbers are always 1 digit shorter than the customer number. - Special customer number
Depending on the decision as to which customer number is used, the formula for the customer number output is entered here. In the example above, automatic debtors are used for members, but there are also guests with debtors (the formula cannot be seen in full here due to the length and will be determined by PC CADDIE for your data if required). - Post persons who do not fit into the debtor filter to this collective debtor account
This is very useful, especially for cash accounts, so that you can post all guests who do not have a customer number to a collective customer. Please coordinate the customer number for the collective account with the accounting department. This information is also useful in other account areas so that postings from persons without a customer number can also be exported. - Postings for persons who do not fit into the customer filter, not exportieren:
This tick is not normally set. - Sales postings per customer and per article for the period zusammenfassen:
Especially in the cash account area SALES or CASH this makes sense, as you usually summarise each day. If, for example, you post all guests to 1 collective account, you can use this to summarise the individual items in one total. If you only want to summarise certain items (e.g. ball ticket bookings), please place an S. (for total) in front of the FIBO number, e.g. in the item in the FIBO number: S.1234 - Set bookings to the invoice date
In this case, the invoice date is exported instead of the item date. Please bear in mind that the tick is unfavourable if you have printed the invoices in the „old year“. - Filter booking output also by invoice date
If the invoice also contains items for which the booking date is outside the exported booking period, these items are also exported. - Query the minimum date to be dated
If the invoices were printed in the „old year“, you can also use this to control the date to which postings are made. - Transfer family transfer postings with
This is used to additionally export the transfer postings from the partners/children to the main contact person (unnecessary when summarising families). This tick is useful in cash accounts, especially if, for example, a green fee is booked on account via a hotel. - For summarise families, membership number in the booking text
The membership number is also exported. - Name in the booking text
The name is also exported. - Prefix the article number for sales postings
- Archive export files
The files are archived automatically. They are automatically moved from the original export path by PC CADDIE to a subfolder with the name of the account area. The export files are also marked with the date and time.
By clicking on the button Export button, the file is exported to the path entered.
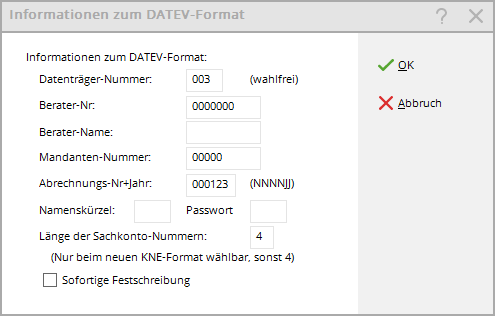
Carefully fill in the following window with the data from your tax advisor:
The files (with Datev there are 2 files, the posting batch and the customer file) are then available for importing into the accounting programme.
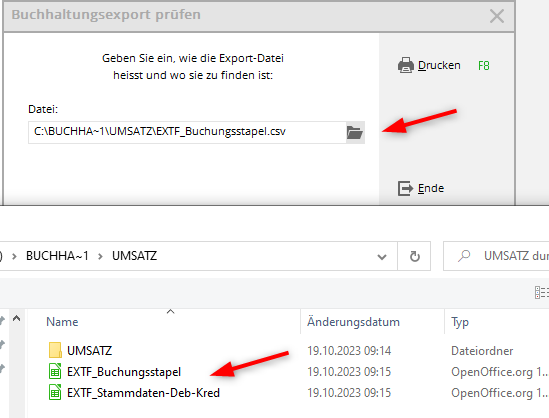
Open/check the export files
Checklists for DATEV
Once you have exported in DATEV 5.0 or DATEV 7.0 format, you can print checklists:

Select the file for the issued debtors according to your set export path.
The file with the posting batch is preset. You can choose whether you want to view the customer file or the posting batch:
… and print - here is an example of a customer file:
- the „Valid from“ column is filled with the person's entry date in PC CADDIE if you output the customers „with address“.
- many more fields are output (according to the Datev interface), this checklist only gives you an overview of the customer numbers (account) and which persons they are.
- if you want to view the file in full, open it with Excel or Open Office, for example
In this example, the customers were output without an address, the customer numbers in this case have 6 digits (the Fibu accounts would then usually have 5 digits in addition, but 4 digits would also be possible (depending on requirements and installation).

The following is an example of a posting batch:
In this example, the account numbers (Fibunumbers) have 4 digits and the customer numbers have 5 digits.

Turnover statistics for non-exported bookings
You can also check whether all postings have been transferred under Turnover/turnover statistics under the Filter tab. Exported and non-exported postings can be selected there. Read more about the Checklist after the Datev export.

Transfer PDF of the invoices
It is not possible to transfer individual invoices as PDF files in the accounting export. Use the function for this:
Sales/data export audit
It is best to select „ALL INVOICES“ in relation to the date range of the invoice creation!

The created file is located in the output directory and can be transferred to the tax consultant.
Troubleshooting
Missing postings in the file
Check whether the Fibunumbers have been entered in all articles, also use the sales statistics to find the articles (non-exported entries). Add the Fibunumbers and re-export the missing bookings. You can find the setting =>here
Empty file
If the file is empty and you have entered all of the fibre numbers in the articles, you may have already output the booking period as a test. It may then help to tick the box „Output noted bookings again“. Bear in mind that if you tick this box, all bookings for the specified booking period will be output again.
- Keine Schlagworte vergeben
PC CADDIE AG
Bachtelweg 3
6048 Horw/Luzern
Schweiz
Kontakt
![]() Fon +49 2642 9854110
Fon +49 2642 9854110
Fax +49 2642 9854199
![]() Fon +41 41 5110600
Fon +41 41 5110600
Fax +41 41 5110699
![]() Fon +43 13 55667788
Fon +43 13 55667788
Fax +43 13 55667799
Mail support@pccaddie.com
Web www.pccaddie.com
Support Online-Module
PC CADDIE://online
GmbH & Co. KG
Fon: +49 2642 9854120
Fax: +49 2642 9854169
Mail support@pccaddie-online.de
Web www.pccaddie-online.de
Tägliche Supportzeiten:
April-Oktober
09.00 - 20.00 Uhr
November-März
09.00 - 18.00 Uhr