
Inhaltsverzeichnis
Timetable
We would like to briefly explain the purposes for which you can use the Timetable module. The timetable provides you with a wide range of functions:
- For example, you can enter and manage start times and coaching hours as a diary. This gives you an overview of all course bookings and reservations made by golf instructors.
- With this module, PC CADDIE also enables you to manage golf carts, seminar rooms, staff schedules, etc.
To open the timetable, please select Timetable/Timetable in the sidebar or click on the corresponding button in the toolbar.
![]()
Working quickly in the timetable
TIP: The following keys and key combinations allow you to work quickly and conveniently in the timetable. We recommend that you familiarise yourself with these combinations in order to work as efficiently as possible with the timetable. You will be able to work much faster and easier with the keyboard than with the mouse:
| 1 | 1 Day view |
|---|---|
| 2 | 2 day view |
| 7 | 7 day view (players visible individually) |
| 8 | 7 Day view (whole day visible) |
| 9 | 14 Day view (whole day visible) |
| a | Evening (18:30) |
| Alt + t | From the cash register to the timetable view |
| b | Change areas |
| d | |
| Enter | Book |
| f | Early (8:00 a.m.) |
| F11 | Show automatic actions |
| F2 | Show calendar |
| Home or Pos1 | Switch to „Today and Now“ |
| i | Book |
| k | Edit courses |
| m | Midday (11:30 a.m.) |
| Mouse button | Move start times |
| n | Afternoon (15:00) |
| PgDn, PgUP | Scroll through the timetable |
| r | Change grid |
| s | Search for a booking |
| Shift + a | Show all areas |
| Shift + d | Special view |
| Shift + double-click | Show opening period of a filter |
| Shift + mouse button | Copy |
| Space (space bar) | Multiple booking |
| t | Switch from the timetable to the checkout window |
| v | Display views |
| w or c | Import competition participants (tournament start list) |
| z | Jump to another date |
Zooming and horizontal scrolling with the mouse wheel in the TimeTable
- with ctrl/ctrl + shift pressed, you can zoom horizontally with the mouse wheel
- with ctrl/ctrl pressed, you can zoom vertically with the mouse wheel
- with shift pressed, you can scroll horizontally with the mouse wheel
Move/scroll the day buttons below the timetable with the mouse wheel

- If you click on the TODAY button with the mouse, the bar jumps back to the current day.
- If you click on the POS1 (Home) button on the keyboard, the bar jumps back to the current day.
- As soon as you reopen the timetable, the current day is active again.
- As soon as you click a function key that triggers a POS1 internally, e.g. the number 7 or 8 to display the number of columns, it sets the row and the timetable to the current day.
Timetable view or icons
Regionality is displayed in the timetable as follows

Right-click on the booking for the following functions

Open
so that the bookings can be processed
Copy
Click, then right-click on the new date and select Paste:

In this window, select whether you want to copy the entire flight or just individual items:

Copy players to tournament
If small groups spontaneously decide to take part in a tournament, they can simply be copied into a tournament

then select:

- all players are displayed, tick the desired players
- If a tournament has already been created, select it here
- If the tournament has not yet been created, create a new one using this button
Move
Click and select the area, day and time to which the booking should be moved

Book
With this function, the selected players in the flight can simply be paid together:

tick the desired option and confirm with Pay.
Book participants in the timetable
Start from tee 1
Open the timetable area and type „w“ on the day of the tournament. The following window opens:

If all players in the start list start from tee 1, leave the field Start holes only empty.
Start from tee 1 and 10
If you want your tournament to start from tee 1 and tee 10, for example, you can book the players of the tournament into the timetable in several steps.
First, enter the players who are to start from tee 1. To do this, fill in the field Starting tee only field as follows:

This ensures that only the players who start from tee 1, e.g. at 10 a.m. (if the tournament starts at 10 a.m.), are entered in the timetable.
The players from tee 10 will only arrive at tee 1 after approx. 2 hours (depending on the course conditions).
Book the players starting on tee 10 now with the appropriate time offset 2 hours later in the timetable area:

This ensures that the players from the tournament are booked into tee 1 at the correct time in the timetable. This procedure allows you to show your players a correct and professional start time display on a screen. You also benefit from well-maintained data when creating statistics for your timetable.
Edit areas
To edit or create a timetable area, first click on the top left on the button
 or select in the main menu Timetable/Areas bearbeiten:

In this dialogue, you can configure the reservation areas (courses, pros, tee mats, wellness applications, carts, rooms) and select them for display. To record working hours with PC CADDIE, you also create your employees here. If you are working with the timetable for the first time, select „New“ (F9) to open a new area. If you want to change an existing area, click „Edit,“ to access the input mask for an area:

Basic settings
Search abbreviation Please enter a suitable abbreviation for the area under search abbreviation. For example, you can enter 1801 for the „18 hole course“.
 The selected search abbreviation cannot be changed afterwards. Therefore, please ensure that you select a neutral abbreviation, especially for the golf instructors.
Sorting The timetable areas are normally sorted alphabetically. If you wish a different sorting, this can be defined via this field. Areas that do not have a sorting specification are placed at the end of the list.
Name Under Name, you can enter a suitable name for the area. In our example, this would be „18 hole course“. The name can be customised later.
Grid Here you specify which period should be displayed in the respective timetable area. Depending on the time of year, this period can be adjusted without existing bookings being lost. Earlier or later times are only faded out visually.
Standard duration You define a standard duration if the grid does not correspond 1:1 with a standard booking. For example, you have a 30-minute grid for a Pro, but a normal lesson lasts 60 minutes. By defining the standard duration of 60 minutes, PC CADDIE automatically books two blocks for one lesson.
Limit number Enter the maximum number of people that can be entered in a booking here.
Bookable in advance Define the number of days that the area can be booked in advance. Different time periods can be defined for members and guests.
In the event that advance bookability is also defined by timetable rules, PC CADDIE takes the smallest value from these two settings.
Number of holes For courses, enter the respective number of holes here.
This function is important if you are working with booking restrictions: e.g. if a guest player may reserve a maximum of 36 holes per week, see chapter Set timetable rules.
Course identifier If you have several 9-hole courses that are to be combined in different ways, give the individual courses an individual identifier (A-C). This identifier can be used to create different course combinations. Please contact PC CADDIE Support if required.
Status Avoid deleting timetable areas. Work with the various statuses to ensure that you can still view areas that are no longer used.
The statuses primarily affect the view of the online modules.

Address data record In employee plans or areas for golf instructors, the corresponding data record of the person can be stored here.
Course data record Enter the course data belonging to this area here.
This function is informative, but important if you are printing bag tags with scorecards.
Booking groups
Create different booking groups if you have several timetable areas. This allows you to create a clearly organised selection.

Create new booking groups
New booking groups can be created as described below
In the booking areas window, you can use the „Edit“ button to button to create a new area group:

The area window opens. The „Select“ button then opens the window with the timetable groups:


A new area group can now be created here using the „New“ button:

After confirming with the „OK“ button, a new group is available for selection:

Sunrise and sunset
TIP | PC CADDIE offers you the special option of displaying sunrise and sunset in the timetable. This helps you to quickly inform your customers about the hours of sunshine.
To activate this function, open the timetable. Click on Timetable/Edit areas.
Select the space and click on Bearbeiten:

Enter your club course data record for regional timekeeping below:

The following screen will open.

Click on the globe next to the Location field:

Click on the button Sunrise/Sunset button and confirm twice with OK and once with End.

Finally, the following window opens, in which you select the appropriate location and click OK again.

Then click twice on OK, to return to the timetable. You will now see the sunrise and sunset marked in colour.
This shows the time transition to sunrise:

This is what the time transition at sunset looks like:

Show hint line for sunset
You can also display a sunset timeline in the timetable, which shows you, for example, whether a player can finish his 18-hole round before nightfall.
To do this, the following special parameters must first be activated:
| TIME_SUNLINEACTIVE | This parameter activates the information line |
| TIME_SUNLINEMARGIN:240 | This parameter determines that the time line is always displayed 240 minutes before sunset. You can vary the number yourself. |
| TIME_SUNLINECOL:65280 | This entry defines the line colour. 65280 is the decimal colour code for the green. |
| TIME_DARKCOL:12632256 | This entry defines the timetable background colour (night colour) between sunset and sunrise. 12632256 is the decimal colour code for dark grey. |
| TIME_SUNLINEHEIGHT:6 | This parameter defines the thickness of the hint line |
If all specifications are stored in PC CADDIE, a timeline is displayed (after a restart of PC CADDIE) as in the following screenshot:

Information
Use this area to enter information about the current timetable area. This text is for information purposes only.

Booking
Now click with the mouse on the option Booking or press the button Scroll down. The lower half of the input screen switches to the booking display:

Article and price are stored if you have stored an automatic function for the items that should also be used in the timetable. The first choice in this list is the standard item. If no automatic is stored in the following articles, the standard article is used.
If timetable rules are active, these have priority when selecting items.
With Book for „Individual“ should normally be set. The other options are rarely used today and are defined primarily for trainer areas if a booking is to be charged to several people.
For the trainer timetable, use Proportional time, if half a lesson only costs half the price.
Make sure that the grid and an article are installed accordingly.
Allocation priority Define the carts that are to be prioritised for the cart system here. If this field is empty, this area is moved to the end of the prioritisation list.
Period of use and pre-booked The cart system shows you here how long a cart has been in use or has already been pre-booked. If you pay attention to the usage, PC CADDIE will calculate the duration of use of the respective cart. The carts are then sorted according to their usage - the longest usage periods are at the end of the list. This means: locally, the free cart with the lowest duration of use is at the top of the list and for online bookings, the top free cart is always booked.
Attention: The special parameter: PCC_REMOTECONTROL blocks this!
Subsequent booking

A follow-up booking is necessary if, for example, you want to book a new follow-up tee time on the 10th tee after 2 hours (or the follow-up round on 9-hole courses). Follow-up bookings are symbolised by a grey background colour in the timetable view. You can enter all the necessary details for the follow-up booking in this input screen. In the booking screen, a plus after the name indicates that a follow-up booking exists for this person (for example, from tee 10 or on another course).

The follow-up booking itself is labelled with the copy symbol. Person bookings that have been copied directly on the same day also receive this symbol.

Cancellation

Example in the screenshot means: Cancellations can be made up to 3 hours before tee time (members), up to 5 hours before tee time for guests.
In this dialogue, specify when a booking can only be cancelled, which article should be automatically suggested by PC CADDIE and what percentage of the amount should still be charged to the customer.
For example, a general cancellation fee → 100% of the fee would apply here; or you define that a late cancellation of the tee time should cost X% of the cheapest green fee price. In future, PC CADDIE will use your entries as standard for cancellations in this area and post them directly to the account as an open debtor.
Please note that the cancellation deadlines in the timetable area for subsequent bookings must be „brought forward“ by the time available to the players for the first 9 holes. For example, if the second 9-hole starts two hours after the start time on tee 1, the cancellation deadline must also be extended by 2 hours. Otherwise it can happen that the 2nd 9-hole can still be cancelled online, but the main booking remains valid. A cancellation confirmation will be sent, but the main booking will remain in the timetable.
Option A/B/C
Options A, B and C have a counting function in the individual timetable areas, e.g. for hire sets or electric carts.

Designation Describe the object to be counted. Counting takes place as soon as the corresponding option has been selected in the timetable.

Maximum number
 How many objects are available in total?
Consider whether this object should be counted across all areas. I.e. option A in this case would be to count the electric carts in each timetable area. Otherwise, the options can be defined individually in each timetable area.
Article Select the article to be booked for the corresponding option here.
Book through in this booking group If this function is activated, PC CADDIE searches in the respective area group to see if an area is free and suggests it. For example, you book option A on the 18-hole course. Option A corresponds to the booking group Cars. When completing the booking, PC CADDIE searches all carts to see if one is available at that time and books it directly.
Time interval This refers to the time interval to the original booking. For example, if you book a tee time at 2.00 pm, the car can be picked up at 1.50 pm. The value -10 would then be entered here.

Delete and view Click on the icon to open the delete function. Deactivate option = Option is deleted. Above you can see, for example, which carts are reserved. Can therefore also be used as an info window.
Publish

If your club works with the Internet and/or terminal, you can use this screen to specify whether the area should be made bookable on the Internet and/or the terminal by PC CADDIE.
If this area is intended for time recording, tick the „Use for time recording“ box at the bottom left to activate it.
For example, if you have created 20 carts or 50 rental clubs all as a single area, it is recommended to activate the option „Do not show in selection“. Having all these areas individually selectable only makes the long list confusing. If this is activated, these areas disappear from all selection situations and the areas can only be selected via the group. Only via „Timetable/Edit areas“ do they all appear again.
Once you have made all the entries according to your wishes, confirm with OK. Repeat the process for all areas that you want to open or edit in your club. The timetable data is synchronised with the data of the respective portal (e.g. 1golf1 or ÖGV) via the portal integration.
Personal check for association players

* Hook Personal check for association players Checks players who come from a country that can be checked via the interface . If this check fails, they are not allowed to book online.
* Players who come from a third country for which there is no verifiable interface are not checked and can book.
If you want to make booking easier for players , deactivate the association check.
In order to prevent the automatic creation of duplicates, a person must be created whose abbreviation ttdg (first name dummy, surname PCCO Guest). In addition, the tick for guest bookings via Teetime Dummy Guest must be activated in the Club Manager under Teetimes in the settings.
A guest without a data record is entered in the timetable instead.

To prevent bookings by persons who cannot be checked, you can have PCCADDIEonline activate the specification of the home club as mandatory or create a timetable rule locally.
= Checkable countries: Germany, Switzerland, Austria, Liechtenstein, Luxembourg
Views

In the rider Views tab, you have an overview of the available timetable views (see also the chapter Define timetable views (Views) ). Here you can simply click on the views in which the timetable area should be displayed.
Delete multiple bookings and flights
For correct timetable statistics, it makes sense to delete all bookings for the day or a certain period of time if a course has to be closed due to meteorological influences. This can be done manually, flight by flight, using the Delete all button in the booking screen…..

… or using the search function in the timetable.


This function can be used to search for and delete individual bookings (1) or blockings and filters (2).
You can define a time period in the dialogue on the right via the button for the advanced search (3) and all bookings are displayed flight by flight:

Select the bookings to be edited with the mouse and either delete them or move them to No Show. To be on the safe side, you must confirm that you are really sure what you are doing 

Install carts booking
You can now automatically book a carts in addition to a tee time both online and locally.
The option to book carts online is only possible with the online app and only in responsive design.
Offline, the following settings must be made in the timetable:
To be able to use this function, please contact our support team. They will set the appropriate special parameters for you. Then you can get started as follows:
Create carts in the timetable
First, the carts must be created in the timetable:

It is important here that a booking group „Carts“ is also created.
Copy area settings
You may wish to make changes to the areas over time.
So that you do not have to do this for all cart areas individually, you can also copy the change to the other existing areas.
To do this, make the necessary changes to an area and confirm with „OK“. Then hold down the „ctrl“ key (or the „ctrl“ key on international keyboards) and click on the „Edit“ button.
The following window opens:

In the „Source and destination“ tab, tick the boxes for the areas to be copied to.
In the „Scope“ tab, you can specify everything that is to be copied.

Create view for the carts
The second step is to set up a separate view for the cart booking:

Install course view for cart booking
In order for the carts to be displayed accordingly when booking tee times, the option for this must also be activated for the corresponding course. To do this, the option A must be set as shown in the following screenshots:


(1.) Enter the designation: You can also just enter „Cart“ here. However, the name „Cart“ is important here, as this is used as a code word so that the corresponding symbol for the cart appears online, which is then to be booked.
(2.) The following settings are available for selection:
- Bookings in this booking group then a carts is simply booked or marked in the timetable which is free
or
- Booking through after selection in this booking group means that a query appears in which a carts can be selected:

However, this prompt only appears if the option for a carts is activated manually in the timetable. The customer does not receive this selection when making an online reservation.
Show booking in timetable
If everything is set up correctly, a carts can now be reserved online. The booking then appears here via the „red“ light (option A) in the tee time booking for the customer, and a carts is automatically displayed as „reserved“ in the view:


Online booking
The selected option must be activated for online booking: Edit the corresponding timetable area in the Club Manager under Teetimes

and activate the option.

For the customer, the online booking window with cart reservation looks as follows. If the option for the carts is selected here, the „red“ light appears next to the customer's name:

Cart booking online for 9 or 18 holes
Attention: The course must be set up by PCCADDIE:Online in such a way that the customer must first decide whether he wants to play 9 holes or 18 holes. Only then will it work. If the customer only decides whether to play 9 or 18 holes when booking, only 1 time is valid for carts!

- Duration for 18 hole round
- Duration for 9 hole round
Working with the different areas
You usually switch between the areas via area or with the F3 or F4 buttons (you can also use the B key). With + or - you can zoom in or out (a zoom of 0.5, for example, doubles the size).
Read the chapter Define timetable views (Views) to find out how you can customise the display of the areas to suit your personal requirements.
Search

Press the button Search button in the timetable (or the S button) to search for a name (for example, if someone wants to play with a specific other person or if you want to delete all bookings for a specific person). You can also use the same function to search for text, e.g. to get an overview of all bookings with the name „Ladies“.

Confirm with Search and you will receive a booking overview on the screen:

Click on the button Print button (F8) button opens the following window:

You can use this function to print an appointment or booking confirmation for your member quickly and in a service-orientated manner.
TIP Is available under Settings/Programme settings/Club address, bank details under the button Extra the special parameter TIBU_PRNTNEW in the tab General tab, you receive an extended function:

This function can be particularly interesting if you work with hotels or tour operators and would like to send them a professional confirmation including individual fees or similar.
Please contact PC CADDIE support if you have any questions about installing the layout.
Book
We will show you below how you can make bookings in the various areas. If you want to book a trainer lesson or a start time in one place, simply press Enter or double-click with the mouse as soon as you are at the desired time in the timetable.
Please make sure that you are in the correct timetable area. The different areas should be easily recognisable by the selected background colours.
You can also drag larger reservations (blocks for tournaments etc.) by clicking on the desired time with the mouse. Now keep the mouse button pressed and move the cursor to the end of the desired reservation. As soon as you release the mouse button, the booking window will open. Using an example, we will now show you how you can book an appointment and the numerous options PC CADDIE offers you for each booking.
I. Change to the desired date
If you double-click on the date at the bottom right

or press the Z (=time), you can jump directly to a specific day

or use the F2 key to search for a day and change the view to it:

Otherwise, move through the timetable with the cursor or use the arrow keys „up, down, left, right“. If you want to make a reservation at a specific point, simply press Enter or double-click with the mouse button.
II. The booking window
Once you have selected a time in the timetable, the booking window opens:

Date Corresponds to the date to be booked.
Time Corresponds to the time to be booked.
Duration Corresponds to the duration of the reservation made.
TIP This duration can be adjusted manually or determined directly in the timetable by clicking on the earliest time of the reservation, holding down the right mouse button, dragging to the last time to be reserved and then releasing.
Search abbreviation Enter the name of the person to be booked here. Persons can be searched for as follows:
- Search abbreviation: 2 letters of the surname + 2 letters of the first name. E.g. for Peter Müller → müpe
- Surname and first name separated by a comma: The first 3 letters of the respective name are sufficient here; e.g. for Peter Müller → mül,pet or mülle,pete etc.
- Full first name or surname
- Phone number
- etc.
If you want to book a teatime for a guest who has never visited you before, use the button Guest, button to book this teatime.

TIP To enter a free text for the booking, simply type it into the search indicator field.

So that this text does not have to be entered x times individually, it is sufficient if you note the number of entries before the text. PC CADDIE then automatically writes this text into the booking according to the required number.

The fields Article, price and Book for can normally be left blank. These are filled automatically as soon as you work with stored article automations or timetable rules.
Via the button Book button to finalise the booking and return to the timetable.
Get into the habit of always closing the booking window with Book to exit the booking window. If you have reserved players and exit the window with Cancel, the booking will not be saved.
Entering additional information for a person
Double-click on the small blue „i“ in front of the name or the button Info button (F6), a new window appears:

In the tab Booking tab, it is possible to enter special information about the respective player. If a customer has such information in their booking, it appears with an asterisk in front of the name.

As a booking reference a person or company from the database can be entered as a booking reference. On the one hand, this is intended as information for you, on the other hand, PC CADDIE will ask you when paying whether the reference person or the player should pay (e.g. for groups invited by one person).
Bookings can be made as Provisional booking can be accepted.
If the tick is not removed by the deadline, the booking expires automatically (ideal for non-binding group requests).
The tab credit card tab currently has no function.
Under the tab Details tab, you can see the exact history of the booking with a unique data record-number.

The letters in the third field have the following meaning:
| nothing | = > Alt local |
|---|---|
| I | Internet PC CADDIE://online obsolete, now only intranet for tournaments |
| O | PC CADDIE://online |
| X | XML-Internet PC CADDIE://online |
| F | External system PC CADDIE://online |
| A | APP Responsive PC CADDIE://online |
| D | Mobile Device PC CADDIE://online |
| L | Made locally/on site |
| M | Multiselect booking (booked in a multiple selection (space bar)) |
| T | Tournament copy/import (entered as tournament import) |
| S | Self-service booking (terminal) |
| C | Newly entered by copy (drag&drop copied) |
| G | Booked via cash register |
| E | Exchange interface |
| R | RemoteControl (carts system) |
| P | Portal (golf.at) |
| W | Work (timer of CRM info dialogues) and working time recording (A:, Y:, …) |
| H | History=CRM |
| h | Hotel |
| r | only for DEL: Reservation cancellation, i.e. expired reservation deleted |
| o | Option ABC |
| n | NoShow automatic cancellation |
| m | Move, i.e. by moving (moved by drag&drop) |
| c | General change |
| s | Cancellation deletion |
By clicking on the button List of 'No Show' entries button (F6), you can view the dates on which Mr Muster did not appear. Associated data records (F7) shows you the data records that were also booked by the person entered.
Breaks

This area is particularly useful for your pros. In this dialogue, your golf instructors can individually schedule a lunch break where no bookings are possible.
Blocking

The same applies if you want to close the course for a certain period of time or if the golf instructors are not available for certain hours. Simply enter all the details in the mask.
TIP By clicking on the button Maximum button, the closure is automatically extended until the end extended until the end of the day.
Filter
The filter function can be used to reserve a booking for a specific group. For example, enter „Ladies team“ under Remarks to reserve a start time for the ladies' club team.


Under Info additional information can be entered. Under Word the following document (Function Sheet) opens, which you can use as an additional tool for each event:

If you would like to have your own document stored here, please contact support@pccaddie.com.
To ensure that all employees are aware of the document, please enter your name under Info it is best to enter a brief comment about it.
The individual participants for the booking are simply booked using the filter. The booking window is opened by double-clicking on the start time at which the filter is located. You can then book all participants as usual.
To avoid accidentally deleting a filter, there is a button Delete button in the created filter. By simultaneously pressing Shift and double-click (with the mouse button) to return to the filter (initial setting) and delete it.
Open filter booking in the timetable: Shift + double-click
Open filter booking in the timetable of the course event module: Shift + Alt
Further buttons in the booking mask
Distribute

About Distribute in the booking window, you can copy the current booking to several times. For example, if a customer wants a trainer lesson every week on Tuesdays.
Please note that if you distribute a filter, e.g. ladies' golf every Tuesday from 2.00 pm to 3.30 pm, and an error occurs, you must delete each filter individually.
Print green fee
If you manage the start times with the timetable and a customer appears to buy his green fee bag, you can open the window by double-clicking on the desired time. Then click in the booking window on the right on Print (F8) in the booking window on the right and you can directly print and book a green fee bag.

If, for example, the customer also wants a ball card, please note Proceed to checkout (F12) at the bottom of the payment window. You can use this function to continue the checkout process.

Post and pay
You can book and pay directly in the booking screen. An arrow indicates whether a booking has been posted or not.

If required, the booking can be deactivated again in the detailed information (click on the blue „i“).

III. delete booking
If you realise within five minutes of making a booking that you have made a mistake, you can easily delete the booking by pressing the button delete button. If your customer only cancels their appointment a few days later or you only notice an error afterwards, the booking cannot be deleted immediately. By double-clicking on Delete the following window will appear:

In this dialogue, you must now first enter a comment in order to be able to delete the data record. After you have entered „sick“, for example, you can cancel the data record by clicking on the various buttons depending on the situation Cancellation (the cancellation fee defined in the timetable area is posted directly to the customer's account), enter as a 'No Show' entry No Show or delete Delete.
No Show - Entry
This entry is very helpful for golf courses with a large number of green fee players. You retain control over no-shows, can easily manage them and, if necessary, invoice the customer directly. If a participant does not turn up for their appointment, PC CADDIE opens a new entry by clicking the Delete button (in the booking mask) opens the following window:
You can see in the first line how much time has already elapsed since the start of the appointment and in the lower half of the input window the customer's other data records. Click on No Show to save the no-show as a no-show entry.
View No Show entry
The No Show entries of a person can be viewed via the person mask. To do this, select the desired person and click on the Timetable.

The following window opens:

Now press the button No Show button to get an overview of the No Show entries for the corresponding person.

To obtain detailed information, click on Further details on this line (F7). Enter here if a no show was subsequently excused.

By clicking on the button Configure no-show counting button, you can configure the No Show entries according to your wishes and click OK to confirm: If the maximum number of No Show entries is reached, you will receive a warning. For bookings over PC CADDIE://online the members receive the following message „Not bookable - Please contact the club“.

Print list via No Show
You can create a no-show overview list by clicking on the menu item Persons/Person list and creating a list according to the following template:

You will receive a complete list for printing.

The first number indicates the total number of no-show entries. The number in brackets shows the number of excused entries. It is not possible to analyse a no-show list for a specific time period. The number in the evaluation always refers to your settings for the no-show count.
For the person filter, we recommend a logical filter so that only people who actually have at least one no-show entry appear on the list.


Here is the complete logical filter:
 to copy : 1) !=NIL) .AND. aNoShow[2] +aNoShow[3]>0)
Make deletions visible
All deletions, 'No Shows' and cancellations can be made visible in a separate area. In the timetable view, simply press the keys Ctrl + D (or also Ctrl + F12) and the corresponding query will appear:

Select the desired view. The timetable now displays either only Normal bookings, cancellations, 'No Show' bookings or cancelled bookings are displayed.
Please note that no lists can be drawn from these „background areas“.
IV. Multiple bookings
If a customer wishes to make several reservations at the same time, multiple bookings offer you an efficient booking method. Move to the desired start time in the timetable. Now press the space bar. The following dialogue opens:

In the first line, you will see the start time that you just wanted to book. Now navigate in the timetable to the other bookings you want to make for the customer and memorise them by pressing the space bar again. The bookings are listed consecutively in the window:

In the lower part of the window you can see how many bookings you have already selected and the maximum number of players. With Delete entry (F5) you can delete a booking and with Delete all (Ctrl + F5) deletes all entries. Once you have selected all the desired start times, please click on Reserve (F12):

In this dialogue, specify the persons for whom the selected times are to be booked. Under Reference you have the option of specifying who recommended your seat or forcing a query as to who will pay for the tee times.
Enter day information
Please double-click on the day's column title first:

The following window opens:

Here you can enter a day title can be entered and even a warning can be activated.
The above setting would look like this in the timetable:

If someone were to book a start time, the following warning message would appear:

If you would like the daily information to be displayed on PC CADDIE://online to be displayed - please contact PC CADDIE://online Support at support@pccaddie-online.de. This will then be activated for you.
Day identifier
The day identifier determines which courses are played on the current day. This is particularly useful if, for example, you have a 27-hole course on which the 18-hole rounds alternate.

You can also use the button Edit location assignmentbutton (F7) to define the following basic setting:

Here you can set the courses that are also used for the bag tag with scorecard.
9 hole courses - scorecard printing
9-hole courses that also print the scorecards for members as a bag tag or at the terminal with the green fee must make the following setting since the changeover to the WHS so that the ratings are recognised correctly and the strokes for the 18-hole round are printed correctly:
Firstly, the course identifier must be defined as A in the area setting of the timetable. You can access the setting via the menu item Timetable, Edit area:


Then double-click on the date in the timetable to go to the daily info view and edit the seat allocation:

It is now important that we load the 9-hole rating and the 18-hole rating correctly into the corresponding fields:

Only then can PC CADDIE print the scorecard correctly.
Automatic player check

If the tick is set for the Automatic player check is ticked, the intranet check is carried out once in the morning for the area you have opened.
The function can also be activated manually with the Check players now button.
WebSMS as daily information
Read here how to send a daily information via SMS: Send WebSMS to all timetable starters of a day.
Example from practice
Overview of the rounds played
At the end of the year, our support team often receives the question of whether it is possible to print a list in which the rounds booked in the timetable can be counted per player.
Below you will find a brief description of how to obtain such a list.
Please first determine the abbreviation of the selected course. To do this, please open the timetable via the button area

the following window:

Now you have to select PERSONS → PERSON LISTS to create a list layout for the desired list. Please select the following fields in the layout:
- <Z>
- <Name, Vorname >
You can now enter the field for the count manually as shown in the screenshot:
- <TT:1801;1810:01.01.17-31.12.17>
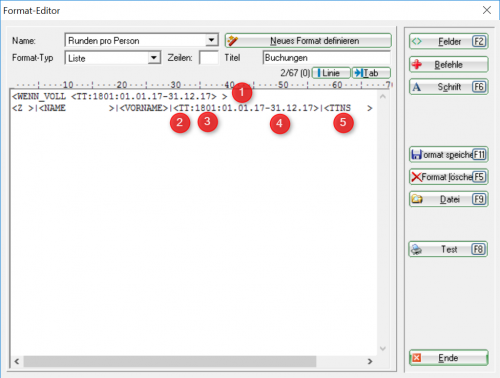
The following applies:
- Insert this command if you only want to have those players on the list who have played at least one round. If you leave it out, all persons will be listed according to the person filter, including those with 0 rounds.
- The display of the number of rounds is activated by the command TT: command.
- Abbreviation of the selected course(s) - this can also just be „1801“, for example, if you have only set a timetable range that is relevant for the count. If you have an 18-hole course where the second 9 holes can also be reserved or booked separately, then also add these abbreviations.
- Enter the desired period in which PCC should count the rounds played per person for you. The current year usually applies here.
- Optionally, you can also No-shows can also be displayed (the number in brackets corresponds to the number of excused no-shows).
Then please save the new layout.
You can now print the list of persons:


Booking online via Touroperator
Worth knowing:
- A tour operator can receive a larger preview released by the club in his view. They can then see 50 days instead of the default 10 days, for example.
- In contrast to the normal user, the tour operator does not primarily have to book in his own person, but only „additional“ players, so he only makes reservations for others.
- When retrieving the reservations, it is not the reservations relating to him that appear, but those made by him.
- In PC CADDIE it is possible to determine which bookings were made by which tour operator. A tour operator number/ID is stored online for this purpose.
- A tour operator can book trainers or other sheets.
Guest booking online with association affiliation
The home club must be entered in the online login

Enter another person with first and last name and home club (must be set by PCCADDIE:online)

In the local PCCADDIE, the tick must be set in the Timatable:in the area/Publish tab: Check for association players

In the local PCCADDIE the timetable rule must be stored for INTRANET

Guest booking online without association membership
Booking person does not have to specify a verifiable club in the online login, only a country & the handicap

Enter another person with first and last name. Home club is optional (must be set by PCCADDIE:online)

In the local PCCADDIE, the tick should not be set in Timatable:in the Publish section/tab: Check for association players

The box must be ticked in the Club Manager under Teetimes/Settings: Activate guest booking via Teetime Dummy Guest

A person with the search abbreviation: ttdg must be created in the local PCCADDIE

- Keine Schlagworte vergeben
PC CADDIE AG
Bachtelweg 3
6048 Horw/Luzern
Schweiz
Kontakt
![]() Fon +49 2642 9854110
Fon +49 2642 9854110
Fax +49 2642 9854199
![]() Fon +41 41 5110600
Fon +41 41 5110600
Fax +41 41 5110699
![]() Fon +43 13 55667788
Fon +43 13 55667788
Fax +43 13 55667799
Mail support@pccaddie.com
Web www.pccaddie.com
Support Online-Module
PC CADDIE://online
GmbH & Co. KG
Fon: +49 2642 9854120
Fax: +49 2642 9854169
Mail support@pccaddie-online.de
Web www.pccaddie-online.de
Tägliche Supportzeiten:
April-Oktober
09.00 - 20.00 Uhr
November-März
09.00 - 18.00 Uhr