
Inhaltsverzeichnis
List of persons
In the main menu, select Persons/Print…/Person list.

Most personal print and output functions work in a similar way to the list of persons.
For this reason, we will go through the various functions using the list of persons as an example. In the later sections, we will look at the differences in the functions Form printing, form letters, address labels, order ID cards etc.
 The definition of a printout in PC CADDIE always results from three essential questions:
- Layout - What should the printout look like, what information should be printed?
- Group of people - Who should be printed?
- Sequence - In which order?
Layout of a list
In the dialogue of the list of persons you will find Layout you will find a list of the possible list formats. Some formats are already predefined here during the initial installation of PC CADDIE. You can try out these formats one after the other.
Please note that formats such as „Green fee bag day“ or „Cash register, invoice“ are not intended for printing lists of persons.
If you want your own layout with customised information, you can easily create your own format with PC CADDIE by clicking on the Edit button. The following window will open:

The „Addresses, by family“ format shown above is perhaps a little too complicated for beginners. Nevertheless, we would like to briefly explain it to you, as this format demonstrates very well the numerous possibilities offered by the function:
The „Addresses, by family“ format is defined in such a way that the entire family is always printed together in a list, i.e. each family member is listed. However, the address is only printed once, for the family contact person. Only the first name is printed for the remaining family members.
Create new layout
We recommend that you familiarise yourself with this by trying it out. However, you should not worry about the text here, but click directly on the button  button - this will make designing your desired format very easy. Please confirm the following security enquiry first:

The following dialogue will open:

Everything is already set correctly here for the normal case. Just enter the title enter the title.
You should not anticipate the group of people in the title. For example, if you need an address list of senior citizens, you should only select what you want to print from the senior citizens, e.g. the addresses. The title should therefore be „Address list“ and not „Senior list“, for example, as you can use this format later for the ladies, juniors etc. as well. Since Specify person filter is normally activated, the information about who actually appears on the list is automatically added by PC CADDIE when printing. You can also enter a customised heading for the printout in the „Title“ field!
The lowest query Print entry only if this field is filled ist: is only required for caddie box lists, for example. Here you can specify in advance that a person is only printed if, for example, the „Caddiebox“ field is filled in at all (you could also create a person filter in the person group only for persons who have a caddiebox).
Usually you leave the selection here set to no restriction.

If you click OK and the following information Next you can select the fields (information) you require for your list one after the other:

Click Next, to continue with the formatting or click Cancel, if you have selected all the desired fields or would like to add more fields later.

TIP If you simply start writing here in the top left-hand field, you can quickly find the field you need:

Let's start with <Z> „Line number“. Click on Add and the next query follows:

Everything is already set correctly here, you just have to click OK to confirm. In exceptional cases, it may be useful to increase the field length here. For example, if you want to print long names in full, it may be useful to increase the value of the „Surname, first name“ field from the default 25 characters to 35-40. Ticking the „Line after“ box ensures a visible vertical line behind the field when printing. Alternatively, you can also tick the „Tab after“ checkbox, which ensures that the individual fields are not visible when printing. The fields are only placed in separate columns when copying to Excel if one of the two separators is set. The „Variable field length“ tick is rarely used for lists of persons.
By repeatedly ticking Add and OK repeatedly and, of course, always selecting a new field (street, postcode and city, telephone etc.) you can complete your list. After the last field has been added, click Done. You return to the format editor, where you can now see the format of a list line described by fields.

If you wish, you can also make manual changes here.
- make a field wider by inserting more spaces
- set missing separators between the fields
- insert a new field
- special, complex commands, e.g. footer or if-then formula (only partially used for lists, mostly used for forms)
- different fonts, e.g. bold, italic, large (used for forms, rarely for lists)
- Once the new list format is ready, save it under an informative name
- here you can test the layout (used for example for receipts or bag tags)
- close the format editor
TIP We recommend that you use an already defined layout to start with.
See special commands for the layout here:
| <FAMILIENWEISE> | All individuals in the family are listed. |
|---|---|
| <NICHT_FAMILIENWEISE> | The family is not listed with all individuals, there is only one entry for the contact person. |
| <FAMILIENWEISE_EINZELN> | Each family member is given a full line (with their own item number). |
| <FAMILIENWEISE_ALLE> | Special point, so that all family members are listed, even if they do not fit into the filter. |
| <ZUSAMMENFASSEN> | This command forces the family members to be summarised. |
Group of people

Now you have to determine for the printout which group of people should appear on the list. Let's take the list of senior citizens again as an example: You do not want to print all persons, but only the senior citizens. As with the layout, various filters are already predefined for the person group. Click on  to collapse the list.
The filters „All persons“, „All members“ , „All guests“, „All ladies“, „All gentlemen“ and „All suppliers“. So that you can quickly distinguish these filters from your own filters, the unchangeable filters in PC CADDIE green are highlighted in green. Custom filters, on the other hand, are highlighted in grey grey background.
The „Individual persons“ selection option is also very important. If you select this option and then start the printout, you will be asked during printing who specifically is to be printed. This is particularly useful when printing address labels or when reordering ID cards for individual persons.
All groups of people that appear below „Special“ are predefined examples, but can be changed by you. The person group „Seniors“ does not yet exist and must first be defined for our example. To do this, click on the button Define button. In the dialogue that appears, first click on New filter. The following window opens:

Simple filter
For the senior filter, we are primarily interested in the age group (the age groups are set in the person characteristics ), as this distinguishes senior citizens from other people. Set the following before the designation age group and enter only the number for senior citizens, generally „6“, in the empty field after the name. If you do not know the number, click on the button  button and then select the desired age group in this way.

Click on Save when you are happy with your filter. (For other filters you may need to enter or activate other details). You can now give the group of people a name. For our example, this would be „Senior citizens“. Confirm with OK.
List of persons monthly move-in
For a person list of monthly payers with direct debit, set the following if you do not have the payment method field:

The C refers to the club area and the m for monthly.
Person filter: Tournament evaluation by age group (AK)
Competitions contain invitations and evaluations for a wide range of age groups. Particularly for championships and league matches, the prize age groups are different and independent of the age group that PC CADDIE automatically assigns in the personal characteristics.
Better: You define an extra tournament person filter according to year of birth and, if applicable, gender. Regardless of whether you are analysing prizes for AK14, AK 50 or AK65.
Here, for example: The settings for a tournament person filter „Seniors AK50“ (as of 2015, gender-independent)

In this way, you can define several new price class person filters, save them and select them in the price evaluation. The definition can also be made directly in the tournament via the price evaluation, see: Price evaluation . But please do not forget to adjust the birth years from year to year!
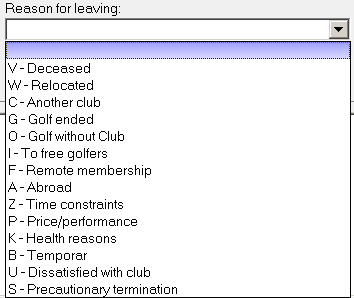
Person filter reason for leaving
Only possible in Germany!
For example, if you only want to know who has died, select „Reason for leaving: V“ in the filter. It is important that the Entry/Exit field matching …. is empty. Select the leaving date as required.

There are further filter options for reasons for leaving based on the letters. If you only select the leaving date, all people who have left will appear. You can also print the reason for leaving in the list layout!
Already somewhat more complex filters
With this filter, we have defined a group that includes all seniors - regardless of whether you are a member of your golf club or not. This is probably correct for tournaments with a senior prize, but for an address list it may also be necessary that you only need a list of active seniors from your club. To define this new filter, click again on Define.
Now also activate the member status and click on then select all membership types that are considered active in your club, for example „Member“ and „Honorary member“. You should also enter the following in the Joining/leaving matching the enter an „h“ for today. In addition to the membership status, this also ensures that no former or future members are printed (for former members the leaving date is before today, for future members the joining date is after today - such persons are not suitable in relation to today). In the field Entry/resignation matching the field in order to print exactly those persons who were members on 1 January of a year, for example!
All the details entered in this dialogue must be fully met for a person to be printed in the list (AND link). However, within a line, for example for membership status, one of the options separated by commas („Active“ OR „Honorary member“) is sufficient. Overall, this results in the following definition: „Senior“ AND „Member“ (OR „Honorary member“) AND Entry/resignation matching for „today“.
You can also save this filter if you need it again and again. For example, give it the name „Members, active, seniors“ so that you can easily and clearly find it again.
Special filter options
You can use the filter function for all other characteristics in the same way as for the age group or membership status. For example, you can specify that only people with handicaps between 0 and 15 should be printed. Or print only female persons.
However, we would particularly like to mention the outstanding options for filtering:
Filter by additional information
To do this, activate the bottom field in the person filter. This is usually followed by Additional info. However, by expanding the list you can also select many other options, such as postcode, city, leaving date etc.
For example, if you require a list of the club team, this field should be filled in as follows (see also the description of the field Additional info field in the personal data input window):

To print the persons who play in the club team OR the senior league (comma between the options):

And so the people who play in the club team AND in the senior league at the same time (plus between the options):

Read here how to Additional information invest.
Exclusion of an entry
The character for negation is the „!“: For example, if you want to print all persons who do NOT have „SEN“ in the identifier, the input must look like this:

You can also print only those persons for whom there is something in the field, i.e. for whom the field is not is not empty - simply enter an exclamation mark „!“:

People WITH and WITHOUT e-mail addresses
 Would you like to inform your members with e-mail addresses by e-mail and members without e-mail addresses by post?
TIP Set the filters as follows:
People with an e-mail address

Persons without an e-mail address

Filter by postcode
And this is how you define a filter for people in the postcode range from 52000 to 52999:

You can also define a filter for the ID card order:

Enter an exclamation mark „!“ to indicate persons for whom a badge should be ordered. Enter „<LEER>“ to indicate the persons who should not receive a badge or an „*“ to indicate those persons who are entered on the order
Filter by playing right
Filter members with full playing rights with the letter: U (U = unrestricted)
Filter members with limited playing rights with the letter: E (E = restricted playing rights)
Filter members without the right to play with the letter: K (K = no right to play)
Further options:
G = Gold
S = Silver
N = Neutral
V = VcG
From 2017 the following letters are essential:
F = Remote member
R = Regional

Negation of the entire filter
By activating the option Negation option, your entire filter is reversed:
For the following example of senior citizens, PC CADDIE will then print all persons who are not are senior citizens:

Special filtering
With the buttons below Special filtering on the right-hand side of the definition window, you can also restrict groups of people to certain tournaments, bookings or sales.

For example, if you need an address list or a circular for the participants of two tournaments of a golf week, click on Tournament  (not activated) and then select the desired tournaments (one or more):

Click on Select tournaments. In the following dialogue, you can activate the tournaments whose participants you want to print:

After you have clicked OK to confirm your selection, the initial window appears again. Please note that it is also possible to negate the selected tournaments in this window. Once the correct tournaments have been selected, you can close the window with OK to exit the window. If you have proceeded correctly, the selection Tournament should now be activated: 
TIP Write your tournament participants a message or an invitation to the next open competition here.
Under Special filtering you can also define your filter based on the entry. Click on the button Post 

The same applies to the area of Turnover 

TIP Here you can easily analyse who played golf with you last year and what turnover they made.
Special filtering Logical  should only be used in consultation with the support team.

Enumerations
You can also simply define a group of people to be printed as an enumeration. You do not define the group based on a specific characteristic, but simply by enumerating all persons in this group one after the other. After clicking on New filter on Enumeration. The display switches as follows:

Here you can simply list one person after the other by clicking on person and then pressing Enter to confirm. In this way, PC CADDIE will add one person after the other to the list. With Remove you can remove the selected person from the list. With the button Clear button deletes the list and the Up/Down buttons to change the positions of the selected persons. If you use the button button, a list of all persons is displayed:

Here you can simply select the desired persons by clicking on the box or pressing the space bar. The selection is indicated by a tick in front of the name. Click again or press the space bar again to deselect the person.

Personal filter Golfing together campaign 2017
To get an overview of the participants of this campaign, define a new person filter by clicking on the „CRM“ button:

Tick the „CRM“ box and select the appropriate category. Only 1 category can be selected at a time.

Just fill in the date range, save and confirm with OK!

Person filter: Round birthdays
The person filter „Round birthdays“ can be solved using a logical filter:

This is the command for the logical filter:
((YEAR(DATE())-YEAR(golf-member->member))%10)==0
Person filter: with or without images
The person filter „with or without images“ can be solved using a logical filter:

with picture:
xFILE(PersBild("FILE"))

without picture:
.NOT. xFILE(PersBild("FILE"))
Set print area
With the button From-To… button, you can determine at which person PC CADDIE should start printing and at which person it should stop. This definition is particularly necessary when printing stickers or invoices if the printout is to be resumed from a certain point after an interruption:

To do this, simply enter Start at… enter the search abbreviation of the person from whom the printout is to be started. In the field Stop at… field determines the person who is to be printed last.
Sequence
We have left the Filter screen and are back in the initial screen of the Personen/Drucken…/Personenliste:

It should be possible to select all important sequences here. Special mention should be made of „Birthday“ and „Date of birth“. If you select „Birthday“, the persons are printed in the order of their birthday in the year, i.e. regardless of their age. If you select „Date of birth“, the order is by age, starting with the oldest persons.
However, if you select an order other than alphabetical sorting here, you will receive a dialogue box after confirming with OK you will be informed that the list will be re-sorted. Select the button Yes, rebuild index button. PC CADDIE then automatically sorts your desired list in the specified order and shows you the progress of the special sorting:


Commands for the sequence/sorting

- Alphabet (names)
mitgname
- Date, exit
DTOS(golfmitg->mitgausd)+LEFT(golfmitg->mitgname, 10)+LEFT(golfmitg->mitgvorn, 5)
- Date, entry
DTOS(golfmitg->mitgeind)+LEFT(golfmitg->mitgname, 10)+LEFT(golfmitg->mitgvorn, 5)
- Date of entry
DTOS(golfmitg->mitgeind)+LEFT(golfmitg->mitgname, 10)+LEFT(golfmitg->mitgvorn, 5)
- Date of birth
DTOS(golfmitg->mitggebd)+LEFT(golfmitg->mitgname, 10)+LEFT(golfmitg->mitgvorn, 5)
- Birthday
SUBSTR(DTOC(mitggebd), 4, 2)+LEFT(DTOC(mitggebd), 2)+<NAME>+LEFT(mitgvorn, 5)
- Handicap
str(mitgspvorg)+str(mitgstvorg)+left(mitgname, 10)+left(mitgvorn, 5)
- Home club
UPPER(mitgclubku+<NAME>+<VORNAME>)
- Membership number
mitgcode
- Postcode
<PLZ>+<NAME>+LEFT(mitgvorn, 5)
- Search code
mitgsuch
- Membership feature (MERKMAL02)
STR(mitgmerk02, 2)+MitgSort()
- Status (MERKMAL03)
STR(mitgmerk03, 2)+MitgSort()
All commands can be entered under Edit.

Combine families

Here you determine whether families should be summarised under one item. If Combine families is activated, you can select to the right whether persons with the status „write to separately“ or the status „separate invoice“ should not be included or whether they should also be printed alone.
Email addresses of the family partners
Check data protection settings beforehand!

Important: Tick the box: Family summary

Layout to copy:
<KOPFINFO:FILTER> <Z >|<NACHNAME, VORNAME >|<MAIL >|<2MAIL >| <FAMILIENWEISE_ALLE>

Note issue
If you are working with the CRM\DMS module, you can use the Note button to save information for all issued persons in the person mask.
TIP If you have invited all young people to the children's training camp, you can output a corresponding filter here and save a completed note for these people.
Find out more about the CRM\DMS .
Printing the completed list of people
Once you have entered all the information you require, you can start the printing process by clicking the Print (F8) button. PC CADDIE will now ask you whether you would like to rebuild the index. This function ensures that you do not have to output a new index each time you make corrections to the list of persons or when editing, so that you can always use the „old“ index after a completely finished output.

Please note that you would otherwise always have to run the index again as soon as you have selected a different group of people on a particular day. You could have just added a new member today.
Here is an example of a possible printout:

Example of a list of resignations
1. please create via PERSONS/LIST OF PERSONS
to create a layout as shown in the screenshot below:

2. you must then set the person filter. Make sure that you empty the „Entry/Exit“ field to match the„:

3. you will then receive a list of all withdrawals in the selected period via Print.

TIP It is also interesting to print the list with integrated pictures of people. You can find information about this here: List printing with person images
Hiding information in lists of persons
TIP Sometimes members do not want their private details such as address or telephone numbers to appear on any lists that are publicly displayed for inspection.
So that you do not always have to manually remove the address in such cases, you have the option of hiding personal details for list printouts in PC CADDIE hide or to hide them.
This is possible for the following information:
- Street
- POSTCODE
- Place of residence
- Telephone number
- Mobile number
- E-mail address
To hide one of the above details from the list printout, simply add an „*(asterisk)“ in the person mask.
In this example, we would like to hide the telephone number and the mobile number and have therefore added an „*(asterisk)“ to the telephone number and the mobile number. „*(asterisk)“ to the telephone number and the mobile number:

If lists of persons are now printed from PC CADDIE, the required details are hidden:

Create complex list of persons
Comprehensive list of members
TIP Some clubs print member directories for their own members to provide a better overview. You can also create these directly from PC CADDIE.
Below is an example of such a member directory. You can use if/then conditions to organise your list so that a line is only printed if it is also filled in the person mask. For example, if a member has not entered a fax number, this line would be omitted. In this way, only the lines containing information are printed. Unnecessary blank lines are therefore omitted.

In the field Lines field, specify how many lines per entry PC CADDIE should start from. This prevents PC CADDIE from suddenly making a page break in the middle of a multi-line entry or making a page break far too early.
The printed list of members can then look like this:

List of "round" birthdays
Why don't you simply print a birthday list of the „round“ birthdays of your members?
This will give you a template and no important day will be forgotten!
Layout - Birthdays in the current year
Open via Persons/Person list/Edit to open the editor window and copy the following command lines for the list layout and save it save it:
<VAR1=YEAR(DATE())-YEAR(golfmitg->mitggebd)>
<VAR2=STR(var1, 2)>
<VAR3="">
<WENN var2 $ "40,50,60,65,70,75,80,85,90,95">
<VAR3="Runder Geburtstag: "+var2>
<ENDE_WENN>
<WENN !EMPTY(golfmitg->mitggebd)>
<Z >•<NACHNAME, VORNAME           >•<GEBURT>•<3.>
<ENDE_WENN>
The window then looks like this:

Layout - Birthdays in the following year
For birthdays that are not due until the following year - please copy the following lines:
<VAR1=YEAR(DATE()+365)-YEAR(golfmitg->mitggebd)>
<VAR2=STR(var1, 2)>
<VAR3="">
<WENN var2 $ "40,50,60,65,70,75,80,85,90,95">
<VAR3=""+var2>
//<ENDE_WENN>
<WENN !EMPTY(golfmitg->mitggebd)>
<Z >•<NACHNAME, VORNAME           >•<GEBURT>•<3.>
<ENDE_WENN>
The finished list looks like this:

Extended list with "round" birthdays
Print a list with round birthdays and the corresponding addresses and emails.
Layout - extended list
Nr.  SUKZ  Nachname, Vorname              Geburtsdatum
<VAR1=YEAR(DATE())-YEAR(golfmitg->mitggebd)>
<VAR2=STR(var1, 2)>
<VAR3="">
<WENN var2 $ "40,50,55,60,65,70,75,80,85">
<VAR3="Runder Geburtstag: "+var2>
<ENDE_WENN>
<WENN !EMPTY(golfmitg->mitggebd)>
<Z >|<SUKZ>|<NACHNAME, VORNAME           >|<GEBURT>|<3                          >|<ADRESSE3          >|<ADRESSE4             >|<MAIL>|
<ENDE_WENN>

Layout - Anniversary list
Print a list of your members who are celebrating an anniversary this year. List of persons with this layout, sorted by: Date joined.
Layout to copy:
<KOPFINFO:FILTER>
<VAR1=YEAR(DATE())-YEAR(golfmitg->mitgeind)>
<VAR2=STR(var1, 2)>
<VAR3="">
<WENN var2 $ "05,10,15,20,25,30,35,40,45,50, 55">
<VAR3="Mitglied seit: "+var2 +"Jahren">
<WENN !EMPTY(golfmitg->mitgeind)>
  <Z >•<NACHNAME, VORNAME >•<Eintrittsdatum>•<3.>
<ENDE_WENN>
<ENDE_WENN>
Example:

Postcode - only abroad
For the group of all members who have a foreign address, please make the following setting:


Copy template:
.NOT.EMPTY(GetLand(golfmitg->mitgplz))
Normally, the country code for your own country, e.g. Germany „D“, is not entered in the postcode field. However, if you have entered this, German addresses would also be included in the list. You can avoid this by ticking the postcode field and then entering !D, for Switzerland !CH.

Postcode - Germany only
For the group of all members who have a German address, please make the following setting:


Copy template:
EMPTY(GetLand(golfmitg->mitgplz))
Number of rounds played per person
With this round statistics you can see who has played the most rounds, how many no shows they have had and when they last played.
all customers who have ever been booked with a Pro
You can do this with the following logical expression in the filter:
TibuCount(„PRO2:01.01.2000-31.12.2035“) > 0
⇒ This command therefore only includes the persons who had a booking in the PRO2 area between 01/01/2000 and 31/12/2035.
TibuCount(„PRO5;PRO3;PRO2:01.01.2000-31.12.2035“) > 0
⇒ You can also specify several ranges separated by a semicolon - this is then regarded as „or“ - i.e. if it is found in one of the specified ranges, it is taken
Erklärungen:
- the search abbreviation is meant by area, which can also be different for your areas:

Logical filter - the command specified for your purposes is entered here:
Copy template: TibuCount(„PRO2:01.01.2000-31.12.2035“) > 0

- Create a new person filter and select „Logical“
- Tick the box for the use of „Logical“
- Enter the command, confirm with OK and save the person filter with a suitable name! Also make sure that the FIELD „Entry/Exit matching“ is empty!
- Keine Schlagworte vergeben
PC CADDIE AG
Bachtelweg 3
6048 Horw/Luzern
Schweiz
Kontakt
![]() Fon +49 2642 9854110
Fon +49 2642 9854110
Fax +49 2642 9854199
![]() Fon +41 41 5110600
Fon +41 41 5110600
Fax +41 41 5110699
![]() Fon +43 13 55667788
Fon +43 13 55667788
Fax +43 13 55667799
Mail support@pccaddie.com
Web www.pccaddie.com
Support Online-Module
PC CADDIE://online
GmbH & Co. KG
Fon: +49 2642 9854120
Fax: +49 2642 9854169
Mail support@pccaddie-online.de
Web www.pccaddie-online.de
Tägliche Supportzeiten:
April-Oktober
09.00 - 20.00 Uhr
November-März
09.00 - 18.00 Uhr